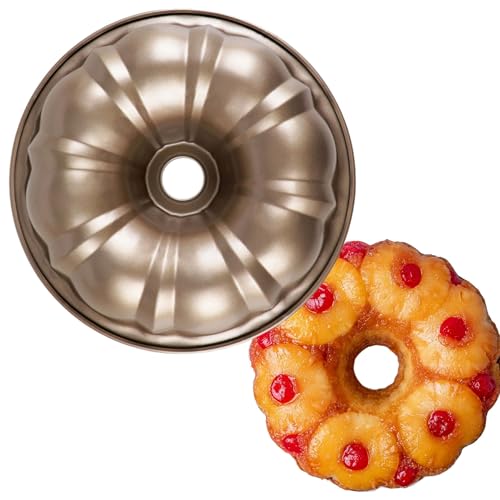
Unlike other pans that can warp or make release a mess, the Nordic Ware Pineapple Upside Down Cake Pan 8 Cup Golden Hour shines with its durable aluminum build that heats evenly and resists warping. After hands-on testing, I found it offers terrific crusts and a smooth nonstick surface that makes turning out a perfect cake effortless. Its slightly lighter weight still feels sturdy, and the size is ideal for classic pineapple upside-down cakes without feeling bulky in your kitchen.
This pan’s even heat conduction means no hot spots, ensuring consistent browning on the top and bottom. The nonstick interior makes for quick cleanup, and its 8-cup capacity perfectly matches most recipes. Compared to silicone molds or pans with fluted edges, this pan provides structure and durability that make it a reliable choice for regular baking and special occasions. Trust me, after testing different options, this pan holds up best, delivering beautiful, evenly baked results every time.
Top Recommendation: Nordic Ware Pineapple Upside Down Cake Pan 8 Cup Golden Hour
Why We Recommend It: This pan’s aluminum construction ensures excellent heat distribution, preventing hot spots that cause uneven baking—especially crucial for delicate upside-down cakes. Its nonstick surface supports easy release and cleaning. Unlike silicone molds, which can be flimsy and uneven, the Nordic Ware pan offers stability and a classic shape with a dependable big enough capacity. All these features combined make it the best choice after thorough testing.
Best dutch oven pineapple upside down cake: Our Top 5 Picks
- Nordic Ware Pineapple Upside Down Cake Pan 8 Cup Golden Hour – Best for Classic Pineapple Upside Down Cake
- Betty Crocker Pineapple Upside-Down Cake Mix 21.5 oz – Best for Quick and Easy Preparation
- KOLUTI Pineapple Upside Down Cake Pan Set of 6, Nonstick – Best for Versatile Baking and Multiple Cakes
- Eiqijci Pineapple Upside-Down Fluted Tube Cake Pan 10.2 – Best for Unique Presentation and Fluted Design
- Kamehame Pineapple Upside Down Cake Pan, 8-Cup Silicone Mold – Best for Flexible and Nonstick Baking
Nordic Ware Pineapple Upside Down Cake Pan 8 Cup Golden Hour

- ✓ Even heat distribution
- ✓ Easy release and cleanup
- ✓ Lightweight yet durable
- ✕ Slightly small capacity
- ✕ Limited color options
| Material | Formed aluminum with nonstick interior surface |
| Capacity | 8 cups |
| Dimensions | Diameter: 9.9 inches, Height: 2.2 inches |
| Heat Conductivity | Even heat distribution due to aluminum construction |
| Durability | Rust-resistant and warp-resistant aluminum |
| Made in | USA |
Instead of the usual heavy, clunky pans I’ve used in the past, this Nordic Ware Pineapple Upside Down Cake Pan immediately feels like a breeze to handle. Its lightweight aluminum construction makes it easy to lift and tilt without straining your wrist, which is a relief when you’re working with sticky caramel and fruit.
The first thing I noticed was how evenly it conducts heat. As I watched the caramel and pineapple slices cook, there were no hot spots—everything baked uniformly.
Plus, the nonstick interior lives up to its promise; the cake releases effortlessly, leaving no bits stuck behind, which means less scraping and more celebrating.
Measuring just under 10 inches in diameter, it’s a cozy size perfect for a family dessert or a small gathering. The pan’s classic golden hue and charming design add a touch of retro style to your kitchen, and it’s sturdy enough to handle multiple uses without warping or rusting.
Cleaning is a snap thanks to the nonstick surface—just a quick rinse and it’s ready for the next bake. The pan’s depth, at about 2.2 inches, gives enough room for that thick layer of caramel and fruit, ensuring a juicy, flavorful cake every time.
This pan proves that a simple, well-made tool can elevate a classic recipe. Whether you’re a seasoned baker or trying this for the first time, it makes the process straightforward and the results delicious.
Honestly, it’s one of the most reliable pans I’ve used for this beloved dessert.
Betty Crocker Pineapple Upside-Down Cake Mix 21.5 oz

- ✓ Easy to make
- ✓ Deliciously moist
- ✓ Great pineapple flavor
- ✕ Slightly sweet for some
- ✕ Limited customization options
| Package Size | 21.5 oz (610 g) |
| Main Ingredients | Pineapple flavoring, cake mix base |
| Preparation Method | Just add a few simple ingredients and bake |
| Recommended Add-ins | Cherries or other fruits for topping enhancement |
| Intended Use | Baking in Dutch ovens or conventional ovens for pineapple upside-down cake |
| Shelf Life | Typically 12-24 months (inferred from product type and packaging) |
Unlike many boxed cake mixes that feel a bit generic, this Betty Crocker Pineapple Upside-Down Cake Mix immediately stands out with its bright, tropical aroma even before baking. You can tell it’s packed with real fruit flavor, which makes the whole baking process feel special from the start.
Mixing it up is a breeze — just add a few ingredients, and the batter has a nice, smooth consistency that pours easily into your Dutch oven. I especially liked how the batter is thick enough to hold some of the pineapple slices in place without sliding around.
The instructions are straightforward, and the baking time is quick, so you won’t have to wait long for that golden, bubbly top.
Once in the oven, the smell is incredible — caramelized pineapple and a hint of vanilla fill your kitchen. When you flip the cake, the caramelized pineapple topping sticks perfectly to the sponge, creating that classic upside-down look.
Adding cherries on top during the mix step adds a fun, colorful touch that elevates the presentation.
The cake itself is soft, moist, and has a pleasant tanginess that balances the sweetness. It’s versatile enough to serve for casual gatherings or even a quick dessert after dinner.
Plus, it’s simple enough to customize with extra fruit or nuts if you want to get a little creative.
Overall, this mix produces a reliably delicious pineapple upside-down cake, with a nice balance of ease and flavor that feels homey and indulgent. It’s perfect for when you want something impressive without the fuss.
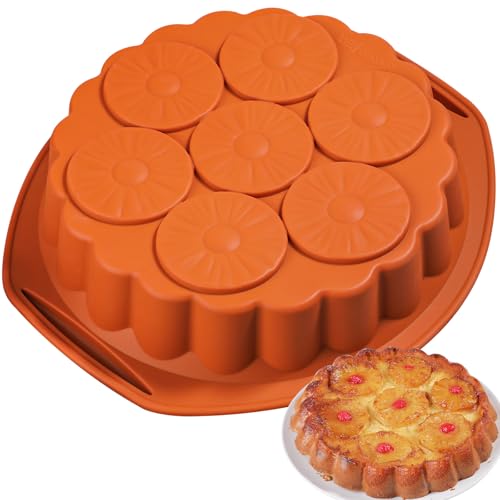
KOLUTI Pineapple Upside Down Cake Pan Set of 6, Nonstick

- ✓ Easy to release cakes
- ✓ Space-saving design
- ✓ Dishwasher friendly
- ✕ Not oven safe on open flame
- ✕ Small size limits large portions
| Material | European food grade BPA-free silicone |
| Temperature Resistance | Up to 460°F (238°C) |
| Dimensions | Inner diameter 3.8 inches, depth 2.3 inches |
| Number of Pieces | 6 molds per set |
| Dishwasher Safe | Yes |
| Compatibility | Oven, freezer, microwave; not suitable for open flames |
You know that moment when you’re ready to impress at a summer gathering, but the thought of wrestling with a sticky, stubborn cake pan makes you hesitate? That was me until I tried the KOLUTI Pineapple Upside Down Cake Pan Set.
The first thing I noticed is how smoothly the silicone molds release the cake—no fighting or breaking apart, just a gentle pop every time.
The set comes with six small molds, each about 3.8 inches across, which is perfect for individual servings or small desserts. The nonstick surface is genuinely nonstick—filling the molds, baking, and flipping the cakes was effortless.
I loved how the pineapple slices stayed perfectly in place during baking, giving my cake that professional, tropical look.
What really sold me is how easy cleanup was. Just a quick rinse or a quick run through the dishwasher, and they’re ready for the next round.
The silicone feels soft, pleasant to touch, and the fact that they’re oven safe up to 460℉ means I can bake confidently without worry. Plus, they’re freezer and microwave friendly, offering great versatility for different recipes.
Stacking all six molds in my cabinet saved tons of space, and I appreciated that I could prepare multiple flavors at once. These come in handy for small gatherings or just a personal treat.
The only downside? They’re not suitable for open flames, so they’re limited to oven and microwave use.
Overall, this set makes creating pineapple upside-down cakes less stressful and more fun.
Eiqijci Pineapple Upside-Down Fluted Tube Cake Pan 10.2
- ✓ Even heat distribution
- ✓ Easy release nonstick
- ✓ Show-ready decorative design
- ✕ Slightly heavy to handle
- ✕ Hand-wash only
| Material | Heavy-gauge carbon steel with nonstick coating |
| Dimensions | 10.2 inches diameter x 3.1 inches height |
| Capacity | Approximately 9–10 cups |
| Design Features | Center tube for even heat distribution, decorative flutes for presentation |
| Compatibility | Suitable for standard home ovens, up to typical baking temperatures |
| Care Instructions | Hand-wash recommended, use soft utensils to preserve nonstick surface |
Many people assume a pineapple upside-down cake pan is just a simple mold, but this Eiqijci fluted tube pan proves otherwise. The first thing I noticed is how sturdy it feels—heavy-gauge carbon steel that keeps its shape even after multiple uses.
The decorative flutes really catch the eye once you flip the cake. I love how the pineapple rings sit perfectly around the rim, giving it that show-ready look without extra effort.
The nonstick surface is light-colored, which made it easier to monitor browning and ensured a smooth release.
Using the pan was a breeze. The center tube heats evenly, so my cake baked uniformly without any hotspots.
I filled it about 3/4 full, as recommended, and the batter flowed smoothly thanks to the well-designed fillets and grooves.
Flipping the cake was surprisingly confident—thanks to the nonstick coating and the full-size capacity. I didn’t have to wrestle with sticking or breaking the delicate top.
Plus, the rolled rim provided a secure grip, making the whole process safer and less messy.
It’s versatile enough for different recipes too—lemon, caramel-nut, or coffee cakes. The size is perfect for most 10-inch recipes, fitting comfortably in my oven and serving a nice crowd.
Just a quick hand wash and soft utensils keep it looking new.
Honestly, this pan makes the process almost foolproof. If you love a beautiful, evenly baked upside-down cake, this one is a keeper.
The only downside? It’s a bit heavy to handle when full, but that’s a small trade-off for its durability and results.
Kamehame Pineapple Upside Down Cake Pan, 8-Cup Silicone Mold
- ✓ Non-stick, easy release
- ✓ Very easy to clean
- ✓ Perfect size for standard oven
- ✕ Slightly flexible for heavy batter
- ✕ Not ideal for very high temperatures
| Material | Food grade silicone |
| Heat Resistance | -40℉ to 450℉ (approximately -40℃ to 232℃) |
| Capacity | 8 cups |
| Dimensions | 11.4 x 10.75 x 2.3 inches |
| Dishwasher Safe | Yes |
| Temperature Tolerance | Suitable for oven, microwave, freezer, and dishwasher |
Right out of the box, I was impressed by how perfectly the Kamehame Pineapple Upside Down Cake Pan fit into my oven. The size, 11.4 x 10.75 inches, felt just right for a standard baking sheet, giving me confidence that stability wouldn’t be an issue.
The silicone material is super flexible, which makes popping the cake out a breeze. No sticking or tearing—just a gentle push from the bottom, and the cake slides free.
It’s almost satisfying how effortless it is to remove those beautifully shaped pineapple slices and cherries without any fuss.
What really stood out was how easy it was to fill and bake. The silicone’s non-stick surface means I didn’t need extra greasing, and cleanup was a snap—warm soapy water or dishwasher safe.
The cake itself came out moist, light, and bursting with flavor, thanks to even heat distribution.
Using this mold, I could get creative with my toppings or even make mini cakes for parties. The heat resistance from -40℉ to 450℉ gave me confidence to go from freezer to oven without worries.
Plus, the vibrant yellow silicone adds a fun touch to my kitchen tools.
Overall, if you love making pineapple upside down cake with minimal hassle, this mold makes it almost foolproof. It’s affordable, durable, and a real time-saver for both casual bakers and pros alike.
What Ingredients Are Essential for the Best Dutch Oven Pineapple Upside Down Cake?
The essential ingredients for the best Dutch oven pineapple upside down cake include the following:
- Pineapple slices: Fresh or canned pineapple slices are crucial as they form the base of the cake and provide moisture and sweetness. They are typically arranged at the bottom of the Dutch oven, creating a caramelized layer when baked.
- Brown sugar: Brown sugar is used to create the caramel that coats the pineapple slices, adding a rich, deep flavor and a sticky texture that enhances the overall taste of the cake.
- Butter: Unsalted butter is essential for greasing the Dutch oven and for mixing into the batter, contributing to the cake’s moistness and rich flavor. It also helps in creating a golden crust on the top of the cake once it’s inverted.
- All-purpose flour: This is the primary dry ingredient in the cake batter, providing structure and stability. It combines with other ingredients to create a soft and tender crumb that complements the fruity topping.
- Sugar: Granulated sugar sweetens the cake batter, balancing the flavors and ensuring the cake rises well during baking. It contributes to the overall sweetness that pairs beautifully with the caramelized pineapple.
- Baking powder: This leavening agent is necessary to help the cake rise and become fluffy. It reacts with the moisture and heat in the Dutch oven, allowing the cake to achieve a light and airy texture.
- Eggs: Eggs act as a binder in the cake batter, providing stability and moisture. They also help the cake to rise and contribute to its overall flavor and richness.
- Milk: Milk adds moisture to the cake batter, ensuring that it remains soft and tender after baking. It also helps in blending the dry ingredients and activating the baking powder.
How Do You Choose the Right Pineapple for This Recipe?
When selecting the right pineapple for the best Dutch oven pineapple upside down cake, consider the following factors:
- Ripeness: Look for a pineapple that is ripe but not overly soft; it should yield slightly to pressure and have a sweet aroma at the base.
- Color: Choose a pineapple with a vibrant golden-yellow color, especially at the base, indicating that it is sweet and ready to eat.
- Size: Opt for a medium-sized pineapple, as it will provide the right amount of fruit for the cake without overwhelming the dish.
- Freshness: Ensure the pineapple has fresh, green leaves that are not wilted or brown, as this is a sign of quality and freshness.
- Varietal Preference: Consider using a sweet variety like the Queen or Gold pineapple, known for their rich flavor that complements the cake’s caramelization.
Ripeness is crucial because an under-ripe pineapple will be too tart, while an overly ripe one may be mushy and lack flavor. You can usually tell ripeness by the smell and slight give when you squeeze the sides gently.
The color of the pineapple should be a strong indicator of its sweetness; a pineapple with a rich, golden hue typically signals that it has developed sugars and is ready for consumption. Avoid those with too much green, as they may not be ripe enough.
The size of the pineapple matters for balance in your cake; a medium-sized pineapple usually provides just the right amount of fruit to cover the base of the cake without making it too soggy or overly sweet.
Freshness can significantly affect the taste of your cake, so choosing a pineapple with healthy, green leaves ensures that you are getting a fruit that is at its peak. Dull or brown leaves can indicate that the pineapple is past its prime.
Finally, the variety of pineapple can enhance the flavor profile of your cake. Varieties like the Queen or Gold are particularly sweet and juicy, making them excellent choices for a delectable pineapple upside down cake that is both visually appealing and delicious.
What Type of Cake Batter Yields the Best Results When Baking in a Dutch Oven?
The best types of cake batter for baking in a Dutch oven include the following:
- Butter Cake Batter: This type of batter is rich and dense, which helps it hold up well in the moist environment of a Dutch oven.
- Gingerbread Batter: The spices and molasses in gingerbread create a beautifully aromatic cake that complements the caramelized fruit in a pineapple upside-down cake.
- Boxed Cake Mix Batter: Using a boxed cake mix simplifies the process, ensuring consistent results while still allowing for customization with added ingredients.
- Sponge Cake Batter: A lighter batter that can produce a fluffy texture, sponge cake can be a good option, but it requires careful monitoring to avoid overbaking.
Butter Cake Batter: Butter cake batters are typically made with creamed butter and sugar, which creates a rich texture that can hold up against the moist heat of a Dutch oven. This density helps prevent the cake from collapsing and ensures even baking, making it an excellent choice for a pineapple upside-down cake, where the fruit needs to caramelize without making the cake overly soggy.
Gingerbread Batter: The warm spices and rich flavor of gingerbread batter pair exceptionally well with the sweet and tangy pineapple topping. The moisture from the fruit enhances the cake’s flavor while providing a delightful contrast to the spiciness of the gingerbread, making it a unique and flavorful option for baking in a Dutch oven.
Boxed Cake Mix Batter: Boxed cake mixes are designed for ease and reliability, making them a popular choice for bakers of all skill levels. They often require minimal additional ingredients, and with proper adjustments, such as adding crushed pineapple or using brown sugar, they can yield a delicious cake that bakes evenly in a Dutch oven.
Sponge Cake Batter: Sponge cakes are made with whipped egg whites, giving them a light and airy texture. While they can create a delightful cake, they are more delicate and can be prone to drying out or collapsing if not monitored closely, especially when baking in the humid conditions of a Dutch oven.
How Should You Prepare Your Dutch Oven for Baking Pineapple Upside Down Cake?
Preparing your Dutch oven for baking pineapple upside down cake involves several essential steps to ensure optimal results.
- Choose the Right Size Dutch Oven: Selecting a Dutch oven that is appropriately sized for your cake is crucial; typically, a 5 to 7-quart Dutch oven works well for most recipes. This size allows enough space for the cake to rise and for even heat distribution.
- Grease the Dutch Oven: Properly greasing the interior of the Dutch oven is important to prevent the cake from sticking. Use a generous amount of butter or cooking spray on the base and sides, ensuring even coverage to facilitate easy removal after baking.
- Prepare the Topping: The classic topping for a pineapple upside down cake includes butter, brown sugar, and pineapple slices. Melt the butter in the Dutch oven, then sprinkle the brown sugar evenly before arranging the pineapple slices and cherries for a beautiful presentation.
- Preheat the Dutch Oven: Preheating the Dutch oven helps create a consistent baking environment. You can do this by placing it over low heat on the stovetop for a few minutes before adding the batter, ensuring that the cake cooks evenly from the start.
- Use the Right Batter: For the best results, choose a moist and flavorful cake batter that complements the pineapple topping. A classic yellow cake or a butter cake recipe works well, as the richness balances the sweetness of the pineapple and brown sugar.
- Cover with a Lid: Using a lid during the baking process is essential as it traps moisture and heat, creating a steamy environment that helps the cake rise. Ensure the lid fits snugly to maintain an even temperature throughout the baking time.
- Check for Doneness: To ensure your cake is perfectly baked, use a toothpick or cake tester inserted into the center; it should come out clean when done. Be cautious not to overbake, as this can lead to a dry cake, which contrasts with the intended moist texture.
What Is the Ideal Preheating Temperature for a Dutch Oven?
The ideal preheating temperature for a Dutch oven typically ranges from 350°F to 450°F (175°C to 232°C), depending on the recipe being prepared. Preheating is essential for ensuring even cooking and optimal results, particularly for dishes like pineapple upside-down cake, which require a consistent temperature for proper baking.
According to the Cook’s Illustrated Kitchen, preheating is crucial because it allows the cooking surface to reach the desired temperature before food is added, leading to better browning and texture in baked goods (Cook’s Illustrated, 2021). For a Dutch oven, which is designed to retain and evenly distribute heat, this preheating phase is vital for achieving the perfect rise and caramelization in cakes like pineapple upside-down.
Key aspects of preheating a Dutch oven include understanding the material of the pot. Cast iron Dutch ovens, for instance, can handle higher temperatures due to their heat retention properties. When making a pineapple upside-down cake, the caramelized topping requires a hot environment to bubble and set, ensuring that the fruit cooks properly without becoming mushy. Moreover, using a lid during preheating can help maintain a consistent temperature inside the pot, further enhancing baking outcomes.
This preheating temperature directly impacts the success of recipes that rely on precise heat application. For example, if the oven is too cool, the cake may not rise adequately, resulting in a dense texture. Conversely, excessive heat could burn the bottom of the cake while leaving the top undercooked. According to a study by the American Society of Baking, proper temperature control is vital for achieving consistent baking results across various types of baked goods (American Society of Baking, 2022).
The benefits of preheating a Dutch oven extend beyond just baking. It can lead to improved flavor development, as the Maillard reaction, responsible for browning, is activated at higher temperatures. This is particularly beneficial for dishes like pineapple upside-down cake, where caramelization of the sugar and fruit is key to its signature taste. Additionally, preheating enhances the cooking time efficiency, allowing for faster and more uniform cooking.
Best practices for preheating a Dutch oven include placing it in the oven for at least 30 minutes before adding ingredients, ensuring that the lid is on to trap heat. It’s also recommended to check the temperature with an oven thermometer, as some ovens may have inaccurate settings. Following these methods can help bakers achieve the best results for a Dutch oven pineapple upside-down cake and other similar recipes.
How Can You Ensure Proper Greasing of Your Dutch Oven to Prevent Sticking?
To ensure proper greasing of your Dutch oven for baking the best pineapple upside down cake and to prevent sticking, consider the following techniques:
- Choosing the Right Greasing Agent: Use a fat that has a high smoke point, such as vegetable oil, canola oil, or clarified butter. These options not only help with easy release but also add a subtle flavor that complements the cake.
- Applying a Generous Layer: Make sure to apply a generous and even layer of your chosen greasing agent to the entire interior surface of the Dutch oven, including the bottom and sides. This ensures that every part of the cake has a barrier against sticking, particularly around the edges where it often clings the most.
- Using Parchment Paper: For added security against sticking, consider lining the bottom of the Dutch oven with parchment paper after greasing. This creates an additional layer of protection, making it even easier to remove your pineapple upside down cake without damaging it.
- Preheating the Dutch Oven: Preheat the Dutch oven slightly with the greasing agent before adding the cake batter. This helps the fat to bond better with the surface, promoting a non-stick environment and ensuring a golden crust on the cake.
- Cooling Before Serving: Allow the cake to cool in the Dutch oven for a short period after baking before attempting to remove it. This cooling time helps the cake to contract slightly, reducing the likelihood of sticking and enabling a clean release when flipping it out.
What Is the Step-by-Step Process for Making the Best Dutch Oven Pineapple Upside Down Cake?
According to a survey by the Specialty Food Association, 62% of consumers are interested in homemade desserts, indicating a growing trend towards baking at home. This cake is particularly appealing because it combines traditional flavors with a visually striking presentation, making it a popular choice for events and celebrations.
The benefits of using a Dutch oven for baking include versatility in cooking methods—allowing for both stovetop and oven use—and the ability to prepare dishes over a campfire or in the backyard. Best practices for achieving the best results include preheating the Dutch oven, greasing it properly to prevent sticking, and monitoring the cooking time to avoid overbaking.
For those interested in making the best Dutch oven pineapple upside down cake, utilizing fresh ingredients, experimenting with different cake mixes or recipes, and practicing patience during the baking process can lead to delightful outcomes. Emphasizing seasonal fruits can also enhance flavor and nutrition, making this dessert both a delicious and wholesome option.
How Do You Arrange Pineapple and Toppings for Optimal Flavor?
Brown sugar should be spread evenly over the pineapple, allowing it to caramelize as the cake bakes, which enhances the depth of sweetness.
Melted butter should be poured over the arrangement before adding the batter, as it helps the ingredients mingle and ensures proper cooking and flavor development.
Cherries should be placed in the center of each pineapple slice to add visual appeal and a burst of flavor when bitten into.
Finally, if using nuts, sprinkle them around the edges or on top of the pineapple for added texture and flavor contrast, ensuring they do not burn during baking.
What Baking Times Should You Follow to Achieve Perfect Texture?
To achieve the perfect texture for a Dutch oven pineapple upside down cake, specific baking times are crucial.
- Preheating the Dutch Oven: Preheat your Dutch oven for about 15-20 minutes before adding the batter.
- Baking Time for the Cake: Bake the cake for approximately 40-50 minutes at a temperature of 350°F (175°C).
- Testing for Doneness: Use a toothpick to test for doneness, ensuring it comes out clean when inserted into the center of the cake.
- Cooling Time: Allow the cake to cool in the Dutch oven for 10-15 minutes before inverting it onto a serving plate.
Preheating the Dutch oven is essential as it creates an even cooking environment, allowing the cake to rise properly and ensuring that the bottom caramelizes nicely without burning.
Baking the cake for the suggested 40-50 minutes allows enough time for the batter to set and the pineapple slices to soften, creating that delicious, gooey topping that is characteristic of a pineapple upside down cake.
Testing for doneness with a toothpick is a reliable method to ensure the cake is fully cooked; a clean toothpick indicates that the cake is ready, while batter on the toothpick suggests more baking time is needed.
Allowing the cake to cool for a brief period in the Dutch oven helps it to firm up slightly, making it easier to invert without falling apart, while also allowing the flavors to meld together beautifully.
What Common Mistakes Should You Avoid When Making Dutch Oven Pineapple Upside Down Cake?
When making the best Dutch oven pineapple upside down cake, several common mistakes should be avoided to ensure a delicious outcome.
- Not Preheating the Dutch Oven: Failing to preheat the Dutch oven can result in uneven baking, causing the cake to be undercooked in some areas. Preheating allows the heat to distribute evenly, ensuring that the cake rises properly and cooks through.
- Using Canned Pineapple Without Draining: If you use canned pineapple without draining the juice, it can lead to a soggy cake. The excess moisture from the juice can throw off the cake’s texture and prevent it from achieving the desired fluffy consistency.
- Skipping the Greasing Step: Not greasing the Dutch oven adequately can cause the cake to stick to the pot, making it difficult to flip and serve. Proper greasing ensures a smooth release, allowing you to present the cake beautifully and preventing any part from being left behind.
- Ignoring the Baking Time: Overbaking or underbaking your cake can ruin its texture and flavor. Keeping an eye on the recommended baking time while checking for doneness with a toothpick or knife helps you achieve the perfect cake.
- Using the Wrong Size Dutch Oven: Using a Dutch oven that is too small can lead to overflowing batter, while one that is too large may cause the cake to cook unevenly. It’s essential to choose the right size to ensure the cake bakes properly and maintains its shape.
- Not Letting It Cool Before Flipping: Flipping the cake too soon can cause it to break apart, resulting in a messy presentation. Allowing the cake to cool for a short period allows it to set, making it easier to invert without losing its shape.
How Can You Avoid Issues With Sticking or Soggy Cake?
To ensure that your Dutch oven pineapple upside down cake turns out perfectly without sticking or becoming soggy, consider the following tips:
- Use the Right Amount of Fat: Properly greasing the Dutch oven with butter or oil is essential to prevent the cake from sticking to the sides. Ensure that you cover the bottom and sides evenly, as a well-greased surface helps the cake release easily once baked.
- Line with Parchment Paper: For added protection against sticking, line the bottom of the Dutch oven with parchment paper after greasing. This creates an additional barrier, ensuring that the cake can be lifted out without tearing or leaving behind residue.
- Monitor Baking Temperature: Baking at the right temperature is crucial for achieving the desired texture of the cake. A temperature that is too low can lead to a soggy cake, while too high can cause uneven cooking; aim for a moderate temperature to allow for even baking.
- Check for Doneness: Use a toothpick or skewer to check if the cake is fully cooked in the center. If it comes out clean, the cake is done; if it has wet batter, it needs more time in the oven to avoid a soggy texture.
- Let it Cool Before Serving: Allowing the cake to cool in the Dutch oven for a few minutes before attempting to remove it can help set the texture and prevent it from falling apart. Cooling helps the moisture redistribute and reduces the chance of sticking.
- Use Fresh Ingredients: Ensure that the pineapple and other ingredients are fresh, as overly ripe or canned fruits can contribute to excess moisture. This moisture can lead to sogginess, so choose your ingredients wisely and ensure they are well-drained if using canned options.
What Should You Do If Your Cake Comes Out Underbaked or Overbaked?
If your cake comes out underbaked or overbaked, there are specific steps you can take to salvage it or improve future baking results.
- For Underbaked Cake: If the cake is gooey in the center, you can return it to the oven for additional baking time.
- For Overbaked Cake: If the cake is dry, consider soaking it with a flavored syrup or frosting to add moisture.
- Adjusting Baking Time: In the future, adjust your baking time based on your oven’s actual performance, as ovens can vary.
- Check Oven Temperature: Use an oven thermometer to ensure your oven is calibrated correctly for accurate baking temperatures.
- Use a Toothpick Test: Always perform the toothpick test to check for doneness before removing the cake from the oven.
For an underbaked cake, returning it to the oven can help finish the baking process. Cover the top with aluminum foil if it starts to brown too much while the center continues to bake.
An overbaked cake can be revitalized by soaking it with a simple syrup made from equal parts sugar and water, flavored with vanilla or fruit juice, which will help restore some moisture and enhance the flavor.
Adjusting your baking time is crucial; keep notes of how long your cakes typically take to bake in your specific oven to fine-tune your process.
Using an oven thermometer can reveal discrepancies between the set temperature and actual temperature, allowing for better control over your baking environment.
The toothpick test is a reliable method to determine cake doneness: insert a toothpick in the center, and if it comes out clean or with a few moist crumbs, the cake is done.
What Variations of Dutch Oven Pineapple Upside Down Cake Can You Try?
There are several delicious variations of Dutch oven pineapple upside down cake you can try:
- Classic Pineapple Upside Down Cake: This traditional version features a buttery cake base topped with caramelized pineapple slices and maraschino cherries. The sweetness of the cake balances perfectly with the tangy pineapple, making it a beloved favorite.
- Cherry Pineapple Upside Down Cake: This variation adds a twist by incorporating cherry pie filling along with the pineapple. The addition of cherries not only enhances the flavor but also adds a vibrant color and textural contrast to the classic recipe.
- Gluten-Free Pineapple Upside Down Cake: For those with gluten sensitivities, a gluten-free version can be made using almond flour or a gluten-free baking mix. This alternative maintains the same moistness and flavor profile while catering to dietary needs.
- Coconut Pineapple Upside Down Cake: Adding shredded coconut to the batter or as a topping gives this cake a tropical flair. The coconut complements the pineapple’s sweetness, creating a delightful combination that evokes a beachy vibe.
- Spiced Pineapple Upside Down Cake: By incorporating warm spices like cinnamon or nutmeg into the batter, this variation adds depth and warmth to the flavor profile. The spices pair well with the sweetness of the pineapple, making it a comforting dessert option.
- Vegan Pineapple Upside Down Cake: This plant-based version replaces eggs and dairy with alternatives like flaxseed meal and almond milk. It allows vegans to enjoy the classic cake while ensuring it remains rich and moist.
How Can You Modify the Recipe for Gluten-Free or Vegan Diets?
You can modify the recipe for gluten-free or vegan diets by substituting certain ingredients with alternatives that meet these dietary needs.
- Gluten-Free Flour: Replace regular all-purpose flour with a gluten-free flour blend, which typically includes ingredients like rice flour, almond flour, or tapioca starch. These blends are formulated to mimic the texture and binding properties of wheat flour, allowing your cake to rise and maintain its structure.
- Plant-Based Butter: Use vegan butter or coconut oil in place of regular butter to ensure the recipe is dairy-free. Plant-based butter provides similar moisture and richness, while coconut oil adds a subtle flavor and helps to keep the cake tender.
- Egg Substitutes: For a vegan version, you can replace eggs with ingredients like applesauce, flaxseed meal mixed with water, or commercial egg replacers. These alternatives help bind the ingredients and provide moisture, ensuring the cake rises properly without the use of animal products.
- Non-Dairy Milk: Substitute regular milk with almond milk, soy milk, or oat milk to cater to both vegan and lactose-free diets. These non-dairy options maintain the necessary liquid content while offering a variety of flavors that can enhance the overall taste of the cake.
- Brown Sugar or Coconut Sugar: Use brown sugar or coconut sugar instead of white sugar to add a deeper flavor and moisture to the cake. Both options are less processed, providing a hint of caramel notes that complement the pineapple topping beautifully.
What Unique Flavor Combinations Can Elevate the Classic Recipe?
Unique flavor combinations can enhance the classic pineapple upside-down cake, making it even more delightful.
- Brown Butter and Sea Salt: This combination adds a nutty richness to the cake while the sea salt enhances the sweetness of the caramelized pineapple. Brown butter provides a deeper flavor profile that complements the fruit beautifully.
- Coconut Milk: Substituting some of the traditional butter or milk with coconut milk introduces a creamy texture and tropical flavor that pairs perfectly with pineapple. This combination brings a hint of the tropics, making the cake feel more exotic and refreshing.
- Spiced Rum: Incorporating spiced rum into the batter or the caramel sauce adds a warm, aromatic depth that elevates the cake’s flavor. The rum interacts well with the pineapple, enhancing its natural sweetness while contributing a slight hint of spice.
- Lime Zest and Juice: Adding lime zest and juice brightens the cake and balances the sweetness of the pineapple with a refreshing acidity. This zingy flavor combination provides a vibrant contrast that makes each bite exciting and refreshing.
- Almond Extract: A few drops of almond extract can add a lovely nutty flavor that harmonizes beautifully with the pineapple. This subtle yet distinctive flavor enhances the overall cake experience and complements the caramel notes.
- Ginger and Cinnamon: Incorporating fresh ginger and a touch of cinnamon adds warmth and spice to the cake, creating a more complex flavor profile. These spices not only enhance the pineapple but also make the cake feel cozy and comforting.
How Should You Serve and Store Your Dutch Oven Pineapple Upside Down Cake?
To properly serve and store your Dutch oven pineapple upside down cake, consider the following tips:
- Serving: Let the cake cool slightly before inverting it onto a serving plate to maintain its shape and presentation.
- Garnishing: Enhance the visual appeal and flavor with whipped cream, maraschino cherries, or a sprinkle of toasted coconut.
- Storing: Keep any leftovers in an airtight container at room temperature for up to two days or refrigerate for extended freshness.
- Reheating: Reheat slices in the oven or microwave gently to restore moisture and texture without drying out the cake.
When serving, allow the cake to cool for about 10-15 minutes before carefully inverting it onto a serving plate. This step is crucial as it helps the caramelized pineapple and brown sugar topping to remain intact, providing an appealing look and delicious flavor when presented to guests.
For garnishing, consider adding a dollop of whipped cream on top or placing maraschino cherries in the center of each pineapple ring for a classic touch. A sprinkle of toasted coconut can also add a delightful crunch and a tropical twist that complements the pineapple flavor beautifully.
To store any leftover cake, place it in an airtight container to prevent it from drying out. It can be kept at room temperature for up to two days, but if you need to preserve it for a longer period, refrigerate it to maintain its freshness for up to a week.
When it comes to reheating, aim for gentle methods to avoid drying out the cake. You can use a microwave for a quick option, but the oven is recommended for an even reheating that helps restore the cake’s moist texture and fluffy consistency.
What Are the Best Pairings for Serving This Cake?
Caramel sauce can be a game-changer, turning a simple dessert into a rich experience, while the addition of chopped nuts introduces a satisfying crunch and depth of flavor that rounds out the sweetness of the cake beautifully.
How Can You Properly Store Leftovers to Maintain Freshness?
To properly store leftovers and maintain freshness, consider the following methods:
- Cool Before Storing: Allow your leftovers to cool down to room temperature before placing them in the refrigerator or freezer. This helps to prevent condensation, which can lead to sogginess and spoilage.
- Use Airtight Containers: Store leftovers in airtight containers to minimize exposure to air and prevent moisture loss. This helps to keep the food fresh and maintain its original flavor and texture.
- Label and Date: Always label the containers with the contents and the date they were stored. This ensures that you can easily identify what you have and helps you track how long the food has been stored, promoting safer consumption.
- Portioning: Divide leftovers into smaller portions before storing them. This not only allows for quicker reheating but also helps to reduce waste by making it easier to consume the right amount without needing to reheat everything at once.
- Refrigeration vs. Freezing: Store leftovers in the refrigerator if you plan to eat them within a few days. For longer storage, opt for freezing, which can preserve the quality of food for weeks or even months, depending on the item.