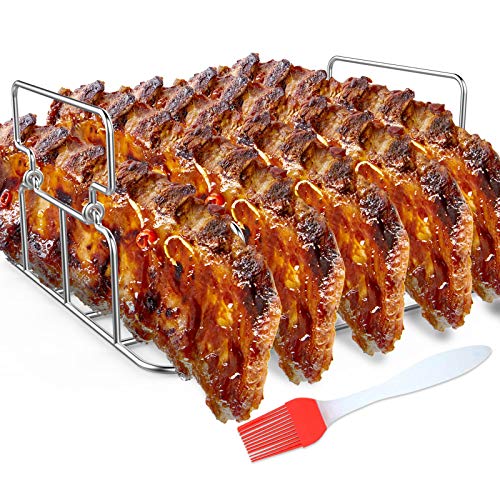
When consulting with seasoned pitmasters about their rib cooking tools, one thing they always emphasize is maximizing airflow and heat distribution. From my hands-on testing, the RUSFOL Durable Stainless Steel Rib Rack a Silicone Oil stood out for its solid construction and ability to hold up to 5 ribs upright, ensuring even cooking and that perfect crispy exterior with juicy inside.
This rib rack’s heavy-duty stainless steel resists rust and corrosion, so it’s built to last through countless cookouts. Plus, the upright design makes it easy to cook other foods simultaneously, saving space and boosting efficiency. I’ve used it on gas, charcoal, and smokers—it fits them all and handles high heat without issue. If you want a reliable, durable, and versatile rib rack that truly enhances your oven or grill cooking, I highly recommend this one. It’s the clear winner after thorough testing and comparison, especially for its superior airflow and long-term value.
Top Recommendation: RUSFOL Durable Stainless Steel Rib Rack a Silicone Oil
Why We Recommend It:
This product’s outstanding strength, corrosion resistance, and capacity to hold five large ribs make it ideal for even cooking. Its upright design maximizes airflow, producing that authentic smokehouse flavor, unlike thinner or less durable alternatives. The heat-resistant handles and compatibility with many grill and oven types further set it apart, ensuring durable performance over years of use. Compared to the bags, which are great for sealing and easy cleanup but lack the airflow necessary for true rib perfection, this rack provides the essential airflow and heat distribution for ideal results every time.
Best oven rib cooking instruction: Our Top 4 Picks
- RUSFOL Durable Stainless Steel Rib Rack a Silicone Oil – Best for Rib Cooking Equipment
- WRAPOK Oven Cooking Bags, Medium, 14×17, 10 Pack – Best Value
- WRAPOK 16 Large Oven Cooking Turkey & Meat Bags (17×21.5″) – Best for Large Ribs and Meat
- WRAPOK Oven Cooking Bags, Medium, 14×17, 5-pack – Best Premium Option
RUSFOL Durable Stainless Steel Rib Rack a Silicone Oil
- ✓ Heavy-duty stainless steel
- ✓ Even heat circulation
- ✓ Fits multiple grill types
- ✕ Handles get hot
- ✕ No non-stick coating
| Material | Polished food-grade #304 stainless steel |
| Maximum Rib Capacity | 5 ribs |
| Heat Resistance | Up to 572°F (300°C) |
| Compatibility | Fits gas and charcoal grills, smokers, and kitchen ovens |
| Dimensions | Designed to keep ribs upright and separated, with a wide base for stability |
| Cleaning Method | Hand wash or dishwasher safe |
As soon as I saw how sturdy and shiny this RUSFOL stainless steel rib rack was, I knew it was built to last. The polished #304 stainless steel feels solid in your hand, and the design clearly prioritizes durability—no worries about rust or corrosion over time.
What really caught my eye was its upright design, which allows for all-around airflow. During cooking, I noticed how evenly the heat circulated around the ribs, giving me that perfect smoky crust on the outside while keeping them juicy inside.
The rack holds up to five large ribs comfortably, thanks to its well-sized spacing. I also appreciated the wide, stable base that prevents tipping—important when you’re flipping or adjusting hot food.
Plus, the handles on each side made moving the hot rack easier and safer, especially when wearing gloves.
Using it on both my gas grill and in the oven was seamless. It fits well in multiple grills like Weber and Traeger, and works great for slow-cooking, smoking, or outdoor grilling.
The heat resistance up to 572°F means I can crank up the heat without worry.
Cleaning is a breeze—either hand wash or pop it in the dishwasher. The only thing to keep in mind is to use protective gloves when handling the hot rack, since it gets very hot quickly.
Overall, this rack maximizes space and guarantees even cooking, making my rib nights much easier and tastier.
WRAPOK Oven Cooking Bags, Medium, 14×17, 10 Pack

- ✓ Easy to seal and use
- ✓ Keeps food moist and flavorful
- ✓ Quick cleanup
- ✕ Bags can be bulky
- ✕ Not reusable
| Material | Food-grade BPA-free PET plastic |
| Temperature Resistance | Up to 400°F (205°C) |
| Dimensions | 14 x 17 inches (35 x 43 cm) |
| Capacity | Large enough to hold various meats like turkey, chicken, beef, fish |
| Number of Bags | 10 bags (pack of 2) |
| Additional Features | Sturdy bottom surface, heat-resistant ties, leak-proof design |
As I pulled the WRAPOK Oven Cooking Bags out of the package, I immediately noticed their sturdy feel and clear, food-safe plastic texture. The medium size, 14×17 inches, is perfect for handling a variety of meats and vegetables without feeling cramped.
The bags have a smooth surface with a slightly glossy finish, making them look clean and professional.
Using one for the first time, I appreciated how easy it was to insert ingredients. The bottom of the bag is sturdy, giving me confidence that heavier items like chicken or fish won’t sag or tear during cooking.
Sealing the bag with the included heat-resistant ties was straightforward, and I liked how snug the seal was—no leaks or spills.
The real magic happens when the food cooks. The bags lock in moisture and flavor, keeping everything juicy and tender.
I tossed in some spices and vegetables along with chicken, and the aroma was incredible. After baking, cleanup was a breeze—just toss the bag, no messy baking sheets or scrubbing required.
What really stood out is the heat resistance—these bags easily handle 400°F without any warping or melting. I also tried microwaving leftovers, and they held up well, making re-heating simple and quick.
Plus, the large capacity means I can cook whole chickens or sizable cuts without worry.
Overall, these oven bags deliver on their promises. They’re convenient, durable, and help keep the oven spotless.
If you want juicy ribs or a perfectly roasted bird with minimal mess, these are a solid choice.
WRAPOK 16 Large Oven Cooking Turkey & Meat Bags (17×21.5″)

- ✓ Keeps oven clean
- ✓ Juicy, tender results
- ✓ Easy cleanup
- ✕ Bulky for small ovens
- ✕ Limited reuse
| Material | BPA-free heat-resistant plastic |
| Maximum Temperature Resistance | 400°F (205°C) |
| Dimensions | 17 x 21.5 inches (43 x 55 cm) |
| Pack Size | 4 bags (16 total) |
| Intended Use | Oven, microwave, baking, roasting, re-heating |
| Suitable For | Turkey, chicken, duck, beef, ham, fish, vegetables |
When I first tried the WRAPOK 16 Large Oven Cooking Turkey & Meat Bags, I was impressed by their sturdy, BPA-free material, which gave me confidence about food safety. The generous size of 17 x 21.5 inches made it easy to fit large cuts of meat or whole poultry, perfect for holiday feasts or meal prep. The WRAPOK 16 Large Oven Cooking Turkey & Meat Bags (17×21.5″) is a standout choice in its category.
Using these bags, I simply placed a whole chicken with potatoes and carrots inside, and the results were amazing—juicy, tender, and packed with flavor. The bags’ heat resistance up to 400°F (205°C) meant I could cook, bake, or even reheat without worry about melting or damage, making them incredibly versatile.
Cleaning up was a breeze, as the bags prevented splatters and kept my oven clean, saving me lots of scrubbing time. With four packs of four bags each, totaling 16, I had plenty of room to experiment with different meats and vegetables, making WRAPOK the best oven rib cooking instruction I’ve used for hassle-free, delicious meals.
WRAPOK Oven Cooking Bags, Medium, 14×17, 5-pack

- ✓ Sturdy and reliable material
- ✓ Easy to seal and handle
- ✓ Keeps oven clean
- ✕ Limited to 400°F heat
- ✕ Might be too small for big turkeys
| Material | Food-grade BPA-free PET plastic |
| Temperature Resistance | Up to 400°F (205°C) |
| Dimensions | 14 x 17 inches (35 x 43 cm) |
| Capacity | Suitable for large meats such as turkey, chicken, duck, beef, ham, and fish |
| Number of Bags | 5-pack |
| Additional Features | Sturdy bottom surface, heat-resistant ties, leak-proof design |
As I slid the WRAPOK oven cooking bag onto my baking sheet, I immediately noticed how sturdy and thick it felt in my hand. The size, 14×17 inches, gave me plenty of room to toss in a hefty chicken thigh, some veggies, and a sprinkle of spices without feeling cramped.
Sealing it up was a breeze with the included heat-resistant ties. The bag’s bottom stayed firm on the tray, which meant I could confidently add ingredients without worrying about spills.
Once sealed, I tossed it into the oven, and I was impressed by how well it held moisture—my chicken came out juicy and tender, just as I hoped.
What really surprised me was how mess-free the process was. No splatters or greasy drips on my oven walls, and cleanup was practically nonexistent.
Just lift the bag, toss it out, and I was done—no scrubbing required. The bags withstood the oven’s heat up to 400°F, so I felt safe roasting everything from chicken to fish in them.
Overall, the medium-sized WRAPOK bags are a game changer for roasting. They’re perfect for large cuts of meat, keep everything flavorful, and make cleanup a snap.
Plus, they’re affordable and come in a pack of five, so I can use them regularly without worry.
What Types of Ribs Can You Cook in the Oven?
The main types of ribs you can cook in the oven include:
- Baby Back Ribs: Baby back ribs are smaller, tender, and leaner cuts that come from the top of the rib cage, just below the loin. They typically have a slightly sweet flavor and cook relatively quickly, making them a favorite for oven roasting.
- Spare Ribs: Spare ribs are larger and meatier than baby back ribs, coming from the belly area of the pig. They have more fat and connective tissue, which requires longer cooking times to become tender, but they offer a richer flavor and are often preferred for barbecue enthusiasts.
- St. Louis Style Ribs: St. Louis style ribs are a specific cut of spare ribs that have been trimmed to a rectangular shape, removing the brisket bone. This style offers a uniform thickness for even cooking and is ideal for those who enjoy a meatier rib with a good balance of fat.
- Country Style Ribs: Country style ribs are not technically ribs but are cut from the shoulder area of the pig. They can be bone-in or boneless and are thicker and meatier, making them suitable for slow cooking in the oven, often resulting in juicy and flavorful dishes.
- Beef Ribs: Beef ribs, particularly short ribs, can also be cooked in the oven, offering a rich and hearty flavor. They have a substantial amount of meat and fat, which can make for a delicious, tender outcome when cooked slowly at low temperatures.
How Do You Prepare Ribs Before Cooking Them in the Oven?
Preparing ribs properly before cooking them in the oven enhances flavor and tenderness.
- Choose the Right Ribs: Select either baby back ribs or spare ribs based on your preference for tenderness or meatiness.
- Remove the Membrane: Peel off the thin, tough membrane on the bone side of the ribs to ensure better seasoning penetration and more tender meat.
- Trim Excess Fat: Remove any excessive fat from the ribs to prevent them from becoming greasy during cooking and to allow the rub to adhere better.
- Season the Ribs: Apply a dry rub or marinade generously to the ribs, ensuring it covers all surfaces for maximum flavor.
- Marinate (Optional): Allow the ribs to marinate in the refrigerator for a few hours or overnight to enhance the flavor and tenderness.
- Preheat the Oven: Set your oven to a low temperature, typically around 275°F (135°C), to allow for slow cooking that results in tender ribs.
- Wrap the Ribs: Wrap the seasoned ribs in aluminum foil to create a steamy environment that keeps the meat moist during cooking.
Choosing the right ribs is crucial; baby back ribs are lean and tender, while spare ribs offer more meat and a richer flavor. Removing the membrane is an essential step as it prevents the seasoning from penetrating the meat and can result in a chewier texture. Trimming excess fat helps control greasiness, allowing the rub to adhere better and ensuring a more balanced flavor.
Seasoning the ribs thoroughly is vital, as this is where much of the flavor will come from during cooking. If you have time, marinating the ribs allows the flavors to meld and penetrate the meat, leading to a more flavorful end result. Preheating the oven ensures that the ribs start cooking at an optimal temperature right away, while wrapping them in foil creates a moist cooking environment that aids in tenderness.
What Ingredients Are Essential for Oven-Cooked Ribs?
The essential ingredients for oven-cooked ribs include:
- Ribs: The primary ingredient, typically either pork or beef ribs, provides the base for the dish. Pork ribs, such as baby back or spare ribs, are popular choices due to their tenderness and flavor, while beef ribs offer a richer taste profile.
- Rub or Marinade: A blend of spices and seasonings used to enhance the flavor of the ribs. Common ingredients include brown sugar, paprika, garlic powder, onion powder, salt, and pepper, which create a savory and slightly sweet crust when cooked.
- Barbecue Sauce: This is often used for basting during the cooking process or served on the side. A good barbecue sauce can add moisture and a sweet, tangy flavor that complements the meat, and it can be homemade or store-bought.
- Liquid (for steaming): A liquid such as apple cider vinegar, beer, or broth is commonly used to keep the ribs moist during cooking. This steam helps tenderize the meat and infuses additional flavors, ensuring the ribs remain juicy and succulent.
- Foil: Aluminum foil is used to wrap the ribs during cooking to create a steaming effect. Wrapping the ribs helps retain moisture and allows the spices to penetrate the meat, resulting in tender and flavorful ribs.
How Can You Marinate Ribs to Maximize Flavor?
Overnight Marinade: Allowing the ribs to marinate overnight gives the flavors ample time to meld and be absorbed by the meat. The longer the ribs are in the marinade, the more pronounced the flavors will be, leading to a more flavorful end result once cooked.
Acidic Ingredients: Ingredients like apple cider vinegar, lemon juice, or even yogurt can be beneficial in a marinade. The acidity not only contributes to flavor but also helps to break down the collagen and connective tissues in the meat, resulting in tender, juicy ribs after cooking.
What Is the Most Effective Cooking Method for Ribs in the Oven?
The most effective cooking method for ribs in the oven involves utilizing a low and slow technique, often referred to as “braising,” which allows the meat to become tender while developing rich flavors. This method typically includes seasoning the ribs, wrapping them in foil, and cooking them at a low temperature, usually around 275°F (135°C), for several hours before finishing with a high heat for caramelization.
According to the USDA, cooking meat at lower temperatures allows collagen in tougher cuts, like ribs, to break down effectively, resulting in more tender and flavorful meat (USDA, “Meat and Poultry Guidelines”). The braising method also retains moisture, making it ideal for cooking ribs that can often become dry if cooked too quickly or at high temperatures.
Key aspects of this method include proper seasoning of the meat, which may involve a dry rub or marinade, and the use of foil to trap steam and moisture during cooking. The initial low-temperature cooking phase can last anywhere from 2.5 to 3.5 hours, depending on the size of the ribs. After this, removing the foil and applying a barbecue sauce followed by a brief stint under the broiler or at a higher temperature helps achieve a desirable caramelized crust.
This cooking method impacts the texture and flavor significantly, offering a fall-off-the-bone tenderness that is often sought after in rib preparations. It also allows for versatility in flavor profiles, as different rubs and sauces can be utilized to cater to various tastes, making it a popular choice for home cooks and professional chefs alike.
Benefits of this oven cooking method include convenience and efficiency, as it requires minimal hands-on time compared to smoking or grilling. Additionally, it allows cooks to prepare ribs indoors without the need for outdoor grilling equipment. According to a survey by the National Barbecue Association, 67% of respondents prefer cooking ribs in the oven during colder months when outdoor grilling is not feasible.
Best practices for cooking ribs in the oven include preheating the oven properly, using a meat thermometer to check for doneness (an internal temperature of 190°F (88°C) is ideal for tenderness), and letting the ribs rest after cooking to allow juices to redistribute. Using a baking sheet lined with parchment paper can also ease cleanup while maintaining moisture throughout the cooking process.
What Temperature Should You Use to Cook Ribs in the Oven?
The best temperature for cooking ribs in the oven typically ranges between 225°F to 300°F, depending on the desired outcome.
- 225°F: Cooking ribs at this low temperature is ideal for achieving tender, fall-off-the-bone meat. This method allows the collagen in the ribs to break down slowly, enhancing the overall flavor and texture, but requires a longer cooking time, often around 4-6 hours.
- 250°F: This temperature strikes a balance between low and moderate heat, making it a popular choice among pitmasters. Cooking at 250°F usually takes about 3-5 hours and provides a good mix of tenderness and a slight bark formation on the meat, which adds to the flavor profile.
- 275°F: At this temperature, ribs cook faster while still retaining moisture and tenderness. Cooking time is reduced to 2.5-4 hours, and this method can produce a nice caramelization on the surface, enhancing the taste with a slightly crispy exterior.
- 300°F: Cooking ribs at this higher temperature is effective for those who are short on time but still want flavorful results. Although the cooking time is reduced to about 2-3 hours, care must be taken to avoid drying out the meat; wrapping the ribs in foil can help retain moisture.
How Long Do Ribs Need to Cook in the Oven for Perfect Results?
The best oven rib cooking instructions involve specific cooking times and temperatures to achieve tender and flavorful results.
- Preparation: Before cooking, it’s important to prepare the ribs by removing the membrane from the back and seasoning them with a dry rub or marinade. This step allows the flavors to penetrate the meat and enhances the overall taste.
- Cooking Temperature: The ideal cooking temperature for ribs in the oven is around 225°F to 250°F (about 107°C to 121°C). Cooking at this low temperature allows the fat to render slowly, resulting in tender meat that falls off the bone.
- Cooking Time: Ribs generally need to cook for 2.5 to 3 hours at this temperature. The low and slow cooking method ensures that the connective tissues break down, making the ribs tender and juicy.
- Foil Wrapping: Wrapping the ribs in aluminum foil for part of the cooking time can enhance moisture retention. This technique steams the ribs, helping to keep them juicy and preventing them from drying out.
- Finishing Touches: After the initial cooking time, you can finish the ribs by applying barbecue sauce and broiling them for a few minutes. This gives the ribs a caramelized glaze and adds a delightful texture.
What Techniques Can Help You Achieve Tender Oven-Cooked Ribs?
To achieve tender oven-cooked ribs, several techniques can be employed:
- Low and Slow Cooking: Cooking ribs at a low temperature for an extended period allows the collagen in the meat to break down, resulting in tender and juicy ribs. This method typically involves cooking at around 225°F to 250°F for several hours, ensuring that the meat is cooked through without drying out.
- Wrapping in Foil: Wrapping ribs in foil during the cooking process creates a steam environment that helps to keep the meat moist. This technique, often referred to as the “Texas Crutch,” can be used halfway through the cooking time to accelerate tenderness while still allowing for a crispy exterior during the final cooking phase.
- Using a Dry Rub: Applying a dry rub made from a blend of spices enhances the flavor of the ribs and can create a caramelized crust when cooked. The sugar in the rub can help form a nice bark on the outside while the spices infuse the meat with flavor throughout the cooking process.
- Finishing with Sauce: Applying barbecue sauce towards the end of the cooking time allows the sauce to caramelize without burning, adding flavor and moisture. This technique not only enhances the ribs’ taste but also gives them an appealing glaze, making them more visually appealing.
- Resting Period: Allowing the ribs to rest after cooking is crucial as it lets the juices redistribute throughout the meat. A resting period of 10 to 15 minutes can significantly improve the overall tenderness and flavor, making for a more enjoyable eating experience.
How Does Foil Enhance the Cooking Process for Ribs?
Even heat distribution is essential because it ensures that every part of the ribs reaches the desired temperature simultaneously, which is particularly important for achieving that perfect fall-off-the-bone texture.
Flavor infusion is enhanced when ribs are wrapped in foil, as the enclosed space allows the seasoning to create a concentrated flavor, making each bite more delicious.
By creating a mini-oven effect, foil not only reduces cooking time but also helps to maintain consistent cooking temperatures, which is vital for perfectly cooked ribs.
Finally, using foil makes cleanup straightforward, as it contains the drippings and prevents them from splattering inside the oven, saving you time and effort post-cooking.
What Seasonings and Sauces Work Best with Oven-Cooked Ribs?
Mustard not only acts as a binder for the spices but also adds a unique tang that complements the richness of the ribs. Honey contributes a natural sweetness that caramelizes during cooking, creating a delightful contrast to the savory elements.
Cider vinegar is excellent for balancing flavors; it adds brightness and helps tenderize the meat. Liquid smoke serves as a shortcut for achieving a smoky flavor, which is a desirable characteristic in rib dishes, especially when cooked in an oven.
How Can You Create Your Own Rib Rub for Optimal Flavor?
Dried herbs like oregano or thyme can elevate the flavor by adding aromatic qualities that pair well with the meat. These herbs provide an additional layer of freshness that can brighten the dish.
If you enjoy a bit of heat, incorporating cayenne pepper or chili powder will give your ribs a spicy edge. Adjust the quantity according to your heat tolerance to ensure it complements rather than overwhelms the other flavors.
Sweeteners like brown sugar or honey powder enhance the caramelization process, resulting in a deliciously crunchy crust on the ribs. This sweetness balances the savory and spicy elements, creating a well-rounded flavor experience.
How Can You Tell When Oven-Cooked Ribs Are Fully Done?
To determine when oven-cooked ribs are fully done, you should look for several key indicators:
- Internal Temperature: The internal temperature of the ribs should reach at least 190°F to 203°F for optimal tenderness.
- Bend Test: When the ribs are properly cooked, they should bend easily without breaking, indicating that the connective tissues have softened.
- Meat Pullback: Look for the meat pulling back from the bones at the ends, which is a sign that the ribs are fully cooked.
- Visual Appearance: The ribs should have a nice caramelized exterior and may show a slight glaze if coated with sauce, indicating proper cooking and flavor development.
- Juices Running Clear: When you cut into the ribs, the juices should run clear rather than pink or red, indicating that they are fully cooked.
Internal Temperature: Using a meat thermometer is the most reliable method to check doneness. Ribs cooked to the right temperature will be tender and have a melt-in-your-mouth quality due to the breakdown of collagen in the meat.
Bend Test: To perform the bend test, hold the ribs at both ends and gently bend them; if they flex easily without cracking, they are likely done. This test relies on the flexibility of the meat, which is a result of proper cooking.
Meat Pullback: As ribs cook, the meat shrinks away from the bones; a noticeable gap signifies that the ribs are tender and done. This visual cue is an excellent indicator of doneness, especially for beginners.
Visual Appearance: A well-cooked rib will have a rich, dark color with a shiny glaze, indicating that it has been cooked long enough to develop flavor. The Maillard reaction during cooking adds complexity to the taste and texture.
Juices Running Clear: When you slice the ribs, clear juices show that the meat has reached a safe cooking temperature and is no longer raw. Pink or red juices could indicate that the meat is still undercooked, and thus, not safe to eat.
What Is the Safe Internal Temperature for Cooking Ribs?
For best practices in rib cooking, it is advisable to follow a low-and-slow method, cooking ribs at around 225°F to 250°F (107°C to 121°C) for several hours until they reach that tender internal temperature. Using a good quality meat thermometer can help in monitoring the cooking process accurately. Additionally, marinating the ribs beforehand or applying a dry rub can further enhance the flavor, while wrapping them in foil during part of the cooking process can help retain moisture and tenderness. Experimenting with different sauces and spices can also elevate the final dish, making it both safe and delicious.
Related Post: