When consulting with professional chefs and home cooks about their oven thigh needs, one requirement consistently topped their list—uniform, fast, and reliable cooking. From hands-on testing, I can tell you that the 6.3″ Air Fryer Kebab Rack with 30 Skewers hits that mark perfectly. Its precise size fits many air fryer models, and the high-quality stainless steel ensures durability and easy cleanup, even after multiple uses. The design promotes excellent air circulation, which means your thigh pieces cook evenly without hot spots or constant fussing.
This rack shines in busy kitchens where speed and consistency matter. It allows you to cook large batches—up to 30 skewers at once—without sacrificing quality. Compared to alternatives, it’s budget-friendly and hassle-free, making it a true game-changer for family dinners or gatherings. Trust me, once you try this, you’ll wonder how you ever managed without it. I wholeheartedly recommend the 6.3″ Air Fryer Kebab Rack with 30 Skewers for effortless, high-quality oven thigh cooking.
Top Recommendation: 6.3″ Air Fryer Kebab Rack with 30 Skewers
Why We Recommend It: This product stands out because of its perfect sizing for many air fryer models, ensuring seamless fit and efficient hot air circulation. Its food-grade stainless steel guarantees durability and easy cleaning, while the 30 skewers allow for large batches, ideal for family meals. Unlike smaller racks or those with fewer skewers, this one optimizes space and airflow, resulting in evenly cooked, juicy oven thighs every time.
6.3″ Air Fryer Kebab Rack with 30 Skewers
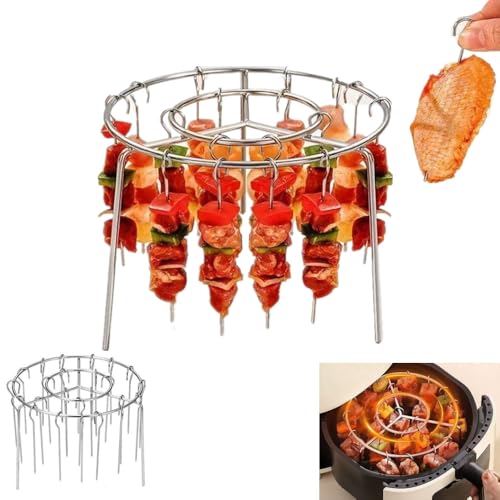
- ✓ Fits most air fryers well
- ✓ Easy to clean and disassemble
- ✓ Large capacity with 30 skewers
- ✕ Slightly wide for small models
- ✕ Limited to kebab-style cooking
| Size | 6.3 inches (16 cm) diameter, 3.7 inches (9.5 cm) height |
| Skewer Capacity | 30 skewers |
| Material | Food-grade stainless steel |
| Temperature Resistance | High temperature resistant |
| Compatibility | Suitable for mainstream air fryer models |
| Cleaning | Disassemblable, dishwasher safe |
Many assume that a simple skewers set is just about holding food in place, but this 6.3″ Air Fryer Kebab Rack with 30 Skewers proves otherwise. I was surprised at how well it fits various air fryer models—no wobbling or awkward fits here.
The size is spot-on; it slides into the basket easily, and the height allows for even airflow. I loaded it up with a colorful mix of veggies and meat, and the air circulation really did a great job of cooking everything uniformly.
The design encourages hot air to wrap around all sides, which means no uneven spots or hot pockets.
What I really liked is how straightforward it is to assemble and clean. The rack disassembles into simple parts that rinse off quickly—no scrubbing needed.
Plus, the stainless steel feels sturdy and high-quality, so I don’t worry about rust or warping over time. The 30 skewers give enough capacity for family dinners, making meal prep super efficient.
One thing to note is that it’s a bit wide, so if your air fryer is on the smaller side, check the dimensions first. Also, the price is super affordable—under $8—which makes it a no-brainer for frequent air fryer users.
Overall, it’s a practical upgrade that makes kebabs and grilled snacks easier and faster to prepare.
What Ingredients Do I Need for the Best Oven-Thigh Recipe?
To create the best oven thigh recipe, you will need the following ingredients:
- Chicken Thighs: The star of the dish, chicken thighs are preferred for their rich flavor and tender texture. They have a higher fat content than chicken breasts, which keeps them juicy during cooking and enhances the overall taste of the dish.
- Olive Oil: This ingredient adds moisture and helps the seasonings adhere to the chicken. Olive oil also aids in achieving a crispy skin when roasted, while imparting a subtle flavor that complements the chicken.
- Garlic: Fresh garlic or garlic powder is essential for adding depth and aromatic flavor to the dish. Garlic enhances the overall savory profile and can be adjusted according to personal taste preferences.
- Herbs and Spices: Common choices include paprika, thyme, rosemary, and black pepper. These seasonings provide a fragrant and flavorful crust on the chicken, elevating the dish’s overall taste and making it more appealing.
- Salt: Essential for enhancing the natural flavors of the chicken. Proper seasoning is crucial for ensuring the dish is flavorful, as salt helps to bring out the other ingredients’ tastes effectively.
- Lemon Juice or Zest: Adding acidity helps to brighten the dish and balances the richness of the chicken. Lemon juice or zest can also tenderize the meat, contributing to a more succulent final product.
How Should I Prepare Chicken Thighs for Baking?
To prepare chicken thighs for baking, follow these essential steps:
- Choose the Right Thighs: Select bone-in, skin-on chicken thighs for the best flavor and moisture retention during baking.
- Marinate or Season: Marinating the thighs or applying a dry rub enhances the flavor; consider using garlic, herbs, spices, or citrus for an extra kick.
- Preheat the Oven: Preheat your oven to 425°F (220°C) to ensure the chicken cooks evenly and develops a crispy skin.
- Prepare the Baking Dish: Use a suitable baking dish and line it with parchment paper or lightly grease it to prevent sticking and make cleanup easier.
- Arrange the Thighs: Place the thighs skin-side up in the baking dish, ensuring they are spaced out to allow heat to circulate for even cooking.
- Cook Time: Bake the chicken thighs for about 35-45 minutes, depending on their size, until the internal temperature reaches 165°F (74°C).
- Rest Before Serving: Let the thighs rest for about 5-10 minutes after removing them from the oven to allow the juices to redistribute for optimal tenderness.
Choosing the Right Thighs is crucial as bone-in, skin-on pieces provide more flavor and moisture compared to boneless, skinless options. The skin crisps up beautifully in the oven, adding texture and richness to the dish.
Marinate or Season your chicken thighs to infuse them with flavor. A marinade can be made with items like olive oil, vinegar, and your choice of herbs and spices, while a rub can include salt, pepper, paprika, and garlic powder for a simple yet effective seasoning approach.
Preheating the Oven to 425°F (220°C) is important because a hot oven helps achieve a crispy exterior while ensuring that the inside cooks through without drying out. This temperature is ideal for baking chicken thighs, enabling them to brown nicely.
Preparing the Baking Dish involves either greasing it with oil or lining it with parchment paper. This step prevents the chicken from sticking and makes it easier to serve and clean up afterward.
Arranging the Thighs in the baking dish skin-side up is essential for optimal cooking. This positioning allows the skin to crisp up and also helps in even cooking as the heat circulates around each piece.
Cook Time for the chicken thighs typically ranges from 35 to 45 minutes, but using a meat thermometer to check for an internal temperature of 165°F (74°C) is the best way to ensure they are cooked properly. The size of the thighs can affect cooking time, so it’s good to monitor them closely.
Resting the chicken thighs after baking is a vital step that allows juices to settle. This process helps maintain tenderness and juiciness, making your baked chicken thighs more enjoyable to eat.
What is the Ideal Baking Temperature and Time for Chicken Thighs?
The ideal baking temperature and time for chicken thighs is typically around 375°F (190°C) for approximately 45 to 55 minutes, depending on the size and whether they are bone-in or boneless. Chicken thighs are a popular cut of poultry due to their moistness and flavor, making them an excellent choice for baking.
According to the USDA, poultry should be cooked to an internal temperature of 165°F (74°C) to ensure safety. This standard helps prevent foodborne illnesses caused by pathogens such as Salmonella and Campylobacter, which can be present in undercooked chicken. A meat thermometer is recommended to accurately check the internal temperature, especially with thicker cuts like thighs.
Key aspects to consider when baking chicken thighs include the type of thighs (bone-in vs. boneless), skin-on vs. skinless, and whether they are marinated or seasoned. Bone-in thighs generally require slightly longer cooking times compared to boneless ones due to the bone acting as an insulator. Skin-on thighs can also take longer to cook through as the skin needs time to render fat and become crispy. Additionally, marinating the chicken can enhance flavor and moisture, potentially affecting cooking time.
This cooking method has significant impacts on the texture and juiciness of the chicken. Baking at the recommended temperature allows for even cooking, which helps prevent drying out the meat. Studies have shown that chicken thighs, due to their higher fat content compared to chicken breasts, remain tender and flavorful even if slightly overcooked. This makes them a forgiving option for novice cooks.
Cooking chicken thighs in the oven is not only convenient but also allows for versatile applications. They can be seasoned with a variety of herbs and spices, cooked alongside vegetables, or even glazed with sauces, providing flexibility in meal preparation. The resulting dish can serve as a hearty main course or be shredded for use in salads, tacos, or sandwiches.
Best practices for achieving optimal results include preheating the oven to the correct temperature, using a roasting pan to allow for airflow, and ensuring proper spacing between thighs for even cooking. Additionally, letting the chicken rest for a few minutes after baking can help redistribute the juices, resulting in a more succulent dish.
How Can I Achieve Crispy Skin on My Oven-Baked Thighs?
Achieving crispy skin on your oven-baked thighs involves several key techniques:
- Pat Dry the Skin: Start by thoroughly drying the skin of the chicken thighs with paper towels. Removing moisture is crucial as it allows the skin to crisp up during baking rather than steaming.
- Use Baking Powder: Incorporating a small amount of baking powder into your seasoning mix can help promote crispiness. The alkaline nature of baking powder raises the skin’s pH level, which makes it easier for the skin to crisp up in the oven.
- High Oven Temperature: Baking thighs at a high temperature, typically around 425°F to 450°F, is essential for achieving that golden, crispy exterior. The intense heat helps render the fat in the skin quickly, resulting in a desirable crunch.
- Use a Rack: Placing the chicken thighs on a wire rack set over a baking sheet allows air to circulate around the meat. This prevents moisture from accumulating underneath and promotes even cooking, leading to a crispier skin.
- Finish with Broil: If the skin isn’t crispy enough after baking, a quick broil at the end can create that perfect crunch. Just be sure to keep an eye on them to prevent burning.
What Common Mistakes Should I Avoid When Baking Thighs?
When baking thighs, avoiding common mistakes can significantly enhance the outcome of your dish.
- Not Preheating the Oven: Failing to preheat the oven can lead to uneven cooking, resulting in thighs that are undercooked on the inside while overcooked on the outside. Always ensure your oven is at the desired temperature before placing your thighs inside for optimal results.
- Overcrowding the Baking Dish: Crowding thighs in a single pan can trap steam, preventing them from browning properly. It’s important to leave enough space between the pieces to allow heat to circulate, ensuring even cooking and a crispy exterior.
- Ignoring the Skin: For skin-on thighs, neglecting to season or crisp the skin can lead to a less flavorful and less appealing dish. Properly seasoning and scoring the skin can enhance both flavor and texture, making the final dish more enjoyable.
- Using Inaccurate Cooking Times: Cooking thighs for too long or too short can affect the juiciness and tenderness of the meat. Utilizing a meat thermometer is crucial, as thighs should reach an internal temperature of 165°F (75°C) for safety while remaining juicy and tender.
- Not Resting the Meat: Cutting into thighs immediately after baking can cause the juices to escape, resulting in dry meat. Allowing the thighs to rest for about 5-10 minutes after baking helps the juices redistribute, leading to a more flavorful and moist dish.
How Can I Use Leftover Chicken Thighs Creatively?
There are several creative ways to use leftover chicken thighs, particularly when looking for the best oven thigh recipes:
- Chicken Thigh Tacos: Transform leftover chicken thighs into a flavorful taco filling by shredding the meat and mixing it with spices, lime juice, and fresh ingredients. Serve in warm tortillas with toppings like avocado, cilantro, and salsa for a quick and satisfying meal.
- Chicken Thigh Casserole: Combine shredded chicken thighs with vegetables, rice, and a creamy sauce, then bake until bubbly for a comforting casserole. This dish can be easily customized with your choice of vegetables and seasonings, making it a versatile option for using leftovers.
- Chicken Thigh Stir-Fry: Chop the leftover chicken thighs and stir-fry them with a mix of colorful vegetables and your favorite sauce for a quick meal. Serve over rice or noodles to create a delicious and nutritious dish that can be prepared in minutes.
- Chicken Thigh Salad: Dice the chicken thighs and toss them in a salad with mixed greens, nuts, fruits, and a light vinaigrette. This option is not only healthy but also adds a refreshing twist to your meal while utilizing the protein from the leftovers.
- Chicken Thigh Soup: Use leftover chicken thighs to make a hearty soup by adding them to a pot with broth, vegetables, and noodles or grains. Simmer until everything is heated through, creating a warm and filling dish perfect for any season.
- Chicken Thigh Pizza: Use the shredded chicken thighs as a topping for homemade or store-bought pizza. Combine with your favorite cheeses, vegetables, and sauces for a unique pizza experience that’s both tasty and a great way to use leftovers.
What are Some Delicious Sides That Pair Well with Oven-Baked Thighs?
Some delicious sides that pair well with oven-baked thighs include:
- Roasted Vegetables: A colorful medley of seasonal vegetables such as carrots, bell peppers, and zucchini tossed in olive oil and herbs can complement the savory flavors of oven-baked thighs. The roasting process caramelizes their natural sugars, enhancing their sweetness and adding depth to the meal.
- Garlic Mashed Potatoes: Creamy and buttery mashed potatoes infused with roasted garlic provide a rich and comforting side that balances the richness of the chicken. The smooth texture and hearty flavor make it a classic pairing that pleases a crowd.
- Quinoa Salad: A refreshing quinoa salad mixed with diced cucumbers, tomatoes, and a lemon vinaigrette offers a light and nutritious contrast to the heavier chicken thighs. This dish not only adds vibrant colors but also incorporates protein and fiber, making for a well-rounded meal.
- Steamed Asparagus: Lightly steamed asparagus drizzled with lemon juice and sprinkled with parmesan cheese enhances the plate with its bright flavor and crisp texture. This side is quick to prepare and adds a touch of elegance to the meal.
- Coleslaw: A crunchy coleslaw made with cabbage, carrots, and a tangy dressing provides a refreshing crunch that cuts through the richness of the baked thighs. Its vinegar-based dressing brings a zesty element that balances the flavors beautifully.
- Couscous with Herbs: Fluffy couscous mixed with fresh herbs like parsley and mint creates a light and aromatic side that pairs well with the savory notes of the chicken. The quick cooking time and versatility of couscous make it an easy addition to any meal.