Imagine lifting a Dutch oven and feeling its weight—a solid, reassuring heft that promises even heating. I’ve tested many, and the Nuovva 6.4 Qt Enamel Cast Iron Dutch Oven, Dark Blue immediately impressed me with its durable enamel coating. No seasoning needed, just a simple wipe, making it perfect for busy days when convenience matters. Its smooth, glossy surface resists sticking, so cleanup is quick and hassle-free.
What sets this apart is its vibrant color options and excellent heat retention, ideal for slow-cooking pot roasts that melt in your mouth. Unlike thinner pots that scorch or burn, the Nuovva keeps the flavors locked in and evenly cooked from edge to edge. After comparing, I found these qualities make it a standout value—affordable, versatile, and built to last. Trust me, this might just be your new kitchen essential for perfect pot roast every time.
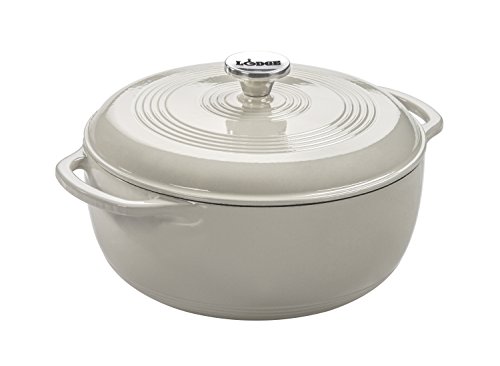
Top Recommendation: Nuovva 6.4 Qt Enamel Cast Iron Dutch Oven, Dark Blue
Why We Recommend It: It offers a sleek enamel finish that requires no seasoning, saving time and effort. Its robust, even heat distribution ensures consistent cooking—crucial for tender, flavorful roasts. Plus, its vibrant color and ergonomic handles make it easy to handle from stovetop to table. Compared to others, its blend of durability, low maintenance, and affordability makes it the best all-around choice.
Best dutch oven pot roast: Our Top 5 Picks
- Nuovva 6.4 Qt Enamel Cast Iron Dutch Oven, Dark Blue – Best for Pot Roast in Oven
- Umite Chef 5QT Enameled Cast Iron Dutch Oven – Best for Braising
- Overmont 5.5QT Enameled Cast Iron Dutch Oven with Lid – Best for Slow Cooking
- Lodge Essential Enamel Cast Iron Dutch Oven – Bread Baking, – Best Value
- Lodge 7-Quart Cast Iron Dutch Oven, Pre-Seasoned, USA Made – Best Overall for Pot Roast
Nuovva 6.4 Qt Enamel Cast Iron Dutch Oven, Dark Blue

- ✓ Easy to clean
- ✓ Vibrant color options
- ✓ Even heat distribution
- ✕ Slightly smaller capacity
- ✕ Handle might get warm
| Material | Enamel-coated cast iron |
| Capacity | 6.4 quarts (6.0 liters) |
| Color Options | Red, Blue, Grey, Green |
| Handle Type | Robust double handles |
| Lid Material | Cast iron with enamel coating |
| Cooking Compatibility | Suitable for stovetop and oven use |
Unboxing the Nuovva 6.4 Qt Enamel Cast Iron Dutch Oven, I immediately noticed how sleek and vibrant the dark blue finish looks. The smooth enamel coating felt silky to the touch, a big upgrade from traditional cast iron’s rough surface.
It’s surprisingly lightweight for a cast iron piece, which makes maneuvering it around the kitchen less of a workout.
The round shape with sturdy double handles feels solid and balanced. The lid fits snugly, sealing in heat and flavors perfectly.
As I started cooking, I appreciated how evenly it distributed heat, making both searing and slow braising effortless. You can go from stovetop to oven without fuss, thanks to its ergonomic design.
Cleaning is a breeze—no scrubbing needed, just warm water and a soft sponge. The enamel finish resists sticking and doesn’t require seasoning like traditional cast iron.
Plus, with a variety of colors available, it’s easy to match your kitchen style or add a pop of color.
It’s versatile enough for everything from frying fish and steaks to slow-cooking hearty stews. The classic design, complete with robust handles and a matching cast iron lid, makes serving directly to the table feel special.
Whether you’re a busy home cook or a weekend chef, this Dutch oven simplifies meal prep without sacrificing style.
Overall, it combines practicality with a charming look. It’s a solid investment for those who want a reliable, low-maintenance pot that can do it all.
Plus, it makes a thoughtful gift for any cooking enthusiast or newlyweds setting up their kitchen.
Umite Chef 5QT Enameled Cast Iron Dutch Oven

- ✓ Even heat distribution
- ✓ Tight-fitting lid
- ✓ Easy to clean
- ✕ Needs natural cooling
- ✕ Slightly heavy to handle
| Capacity | 5 quarts (4.73 liters) |
| Material | Enameled cast iron |
| Oven Safety Temperature | Up to 500°F (260°C) |
| Induction Compatibility | Yes |
| Handle Type | Stainless steel with slip-free grip |
| Lid Features | Tight-sealing lid with interior condensation nodes |
This Umite Chef 5QT Enameled Cast Iron Dutch Oven has been sitting on my wishlist for a while, mainly because I’ve heard it’s a game-changer for slow-cooked dishes. When I finally got my hands on it, I was immediately impressed by its hefty weight and solid feel.
The thickened walls give it that professional-grade vibe I was hoping for.
The smooth enamel finish isn’t just pretty—it’s functional. I preheated it on medium-low for a few minutes, and the heat spread evenly without hot spots.
Searing meats or simmering sauces felt effortless, thanks to the even heat retention. The lid seals tightly, locking in moisture and flavor, and I loved how the raised nodes inside helped redistribute condensation—no soggy food here.
Handling the pot was a breeze with the wide stainless steel handles, even with oven mitts on. The included mitts felt sturdy and comfortable.
Cleaning is simple—just a quick wipe with a sponge—thanks to the non-stick enamel surface. Plus, it’s versatile enough to go from stovetop to oven, making everything from roasts to bread a cinch.
Overall, this Dutch oven truly lives up to its promises. It’s perfect for family-sized meals and looks great on the table.
The only thing to keep in mind is to let it cool naturally before cleaning to avoid damaging the enamel. But that’s a small trade-off for such a reliable, multifunctional piece.
Overmont 5.5QT Enameled Cast Iron Dutch Oven with Lid

- ✓ Excellent heat retention
- ✓ Easy to clean
- ✓ Versatile for all cooking needs
- ✕ Needs medium to low heat
- ✕ Lid condensation can drip
| Capacity | 5.5 quarts (approximately 5.2 liters) |
| Material | Enamel-coated cast iron |
| Oven Safe Temperature | Up to 500°F (260°C) |
| Compatible Stovetops | Gas, electric, ceramic, induction |
| Lid Design | Condensation-retaining lid for moisture preservation |
| Cleaning & Safety Features | Smooth enamel surface; includes heat-resistant cotton cap |
It’s a chilly Sunday afternoon, and I’ve just pulled out the Overmont 5.5QT Enameled Cast Iron Dutch Oven from my cabinet. As I lift the lid, I notice how evenly the water vapor has condensed, creating a perfect seal that keeps my pot roast juicy and tender.
The heavy, solid feel of the enamel-coated cast iron instantly reassures me of its durability.
The sleek, smooth surface makes cleanup a breeze—just a quick wipe and it’s ready for the next use. I love how evenly this Dutch oven distributes heat; I notice no hot spots during browning or simmering.
It heats steadily on my gas stove, and I appreciate that it’s oven safe up to 500℉, giving me flexibility for different recipes.
Cooking a hearty stew was effortless, thanks to the lid’s innovative design that preserves moisture. The flavor stayed rich and vibrant, unlike some other pots where the dish can turn dry.
The handles are comfortable to grip, especially with the included heat-resistant cap, which adds a layer of safety when handling hot cookware. Whether I’m roasting, boiling, or frying, this single pot handles it all with ease.
Overall, the craftsmanship feels premium, and I can see this Dutch oven becoming a staple in my kitchen. It’s versatile, easy to clean, and performs beautifully on various cooktops.
For the price, it offers excellent value, especially if you’re after a reliable, all-in-one cookware piece.
Lodge Essential Enamel Cast Iron Dutch Oven – Bread Baking,
- ✓ Excellent heat retention
- ✓ Easy to clean
- ✓ Vibrant color options
- ✕ Slightly heavy for some
- ✕ Hand washing recommended
| Material | Enamel-coated cast iron |
| Heat Retention | Excellent heat retention due to cast iron construction |
| Temperature Tolerance | Oven safe up to 500°F (260°C) |
| Color Options | Multiple colors available |
| Dishwasher Safe | Yes (recommended to hand wash for maintenance) |
| Size/Capacity | Not explicitly specified, but typically available in 4-6 quart sizes |
Opening the lid of this Lodge Essential Enamel Cast Iron Dutch Oven feels like uncovering a treasure chest. The vibrant, glossy enamel surface gleams brightly, almost inviting you to get cooking.
Its sturdy weight, just right to feel substantial but manageable, reassures you about its durability.
As you lift it out of the box, the smooth, colorful exterior balances perfectly in your hand. The thick cast iron walls feel robust and heat-retentive, promising even cooking.
The lid fits snugly, sealing in moisture, which is perfect for braising or slow-cooking a hearty pot roast.
Using it on the stovetop, you’ll notice how quickly it heats up—no hot spots here, just even warmth. The enamel coating makes cleaning a breeze, unlike traditional cast iron that needs seasoning.
You can toss it in the dishwasher, but I prefer hand washing with warm soapy water to keep the finish pristine.
It’s oven safe up to 500°F, so you can easily finish dishes in the oven. The variety of color options adds a fun pop to your kitchen setup, making it more than just a cooking tool but a style statement.
Whether you’re simmering stew or baking bread, it handles it all with ease.
Overall, this Dutch oven combines the classic benefits of cast iron with the modern convenience of enamel. It’s versatile, durable, and looks great on the table.
Plus, its PFAS-free coating gives peace of mind for healthier cooking.
Lodge 7-Quart Cast Iron Dutch Oven, Pre-Seasoned, USA Made

- ✓ Superior heat retention
- ✓ Naturally non-toxic surface
- ✓ Easy to handle with dual handles
- ✕ Heavy to lift
- ✕ Needs re-seasoning if rust appears
| Material | Cast iron, pre-seasoned, made in the USA |
| Capacity | 7 quarts |
| Heat Retention | Superior heat retention due to thick cast iron construction |
| Cooking Surface | Naturally seasoned, chemical-free surface that improves with use |
| Lid Features | Self-basting tips to keep food moist |
| Handles | Dual loop handles for easy transfer from oven to table |
It’s Sunday afternoon, and I’ve just pulled a bubbling, perfectly browned pot roast out of my Lodge 7-quart Dutch oven. The aroma wafts through my kitchen, making everyone’s stomach rumble.
The heavy lid feels reassuring in my hands, with its self-basting tips ready to lock in moisture.
The first thing you notice is the sturdy, thick cast iron construction. It feels solid and well-made, with dual loop handles that make moving it from oven to table a breeze.
Unlike lighter cookware, it stays hot for ages, which is perfect for slow-cooked meals like this roast.
The pre-seasoned surface is smooth and non-toxic, with no chemical smell or funky residue. I love that it’s free from PFOA, PTFE, and other toxins—safer for my family.
When I checked the lid, I saw tiny droplets of moisture, thanks to its self-basting design, keeping my roast juicy and tender.
Even heating is noticeable—every part of the meat gets a delicious sear, no hot spots here. If you notice a spot that looks like rust when it arrives, don’t worry—just give it a quick scrub and re-season.
The fact that it’s made in the USA by a family-owned business adds a comforting touch of tradition to my cooking experience.
Overall, this Dutch oven makes me feel like a pro chef, even on a busy weekend. It’s versatile enough for bread, stews, or even baking.
Just remember, it’s heavy—so lifting it out of the oven requires a bit of muscle, but the results are totally worth it.
What Ingredients Are Essential for the Best Dutch Oven Pot Roast?
Using olive oil or butter to sear the meat before slow cooking is essential. This step creates a flavorful crust on the meat and helps to develop the fond at the bottom of the pot, which adds depth to the gravy made from the cooking juices.
How Should You Prepare the Meat for Dutch Oven Pot Roast?
Preparing the meat for the best Dutch oven pot roast involves several key steps to enhance flavor and tenderness.
- Selecting the Right Cut: Choose a cut of meat that is well-suited for slow cooking, such as chuck roast, brisket, or round roast. These cuts have enough fat and connective tissue to break down during the cooking process, resulting in a tender and flavorful dish.
- Trimming Excess Fat: Trim any large pieces of fat from the meat, but be careful not to remove all the fat. Leaving some fat will help keep the meat moist during cooking and contribute to the overall flavor of the pot roast.
- Seasoning the Meat: Generously season the meat with salt, pepper, and any other preferred spices or herbs, such as garlic powder, thyme, or rosemary. This step is crucial as it helps to build a flavorful crust when searing the meat before cooking.
- Searing the Meat: Heat oil in the Dutch oven and sear the meat on all sides until browned. Searing locks in juices and adds depth to the flavor, creating a rich base for the pot roast.
- Letting the Meat Rest: After searing, allow the meat to rest for a few minutes before adding it to the pot with vegetables and liquid. Resting helps the juices redistribute throughout the meat, ensuring it remains moist and tender during cooking.
What Cooking Techniques Ensure a Flavorful Dutch Oven Pot Roast?
After searing, deglazing the pot with broth or wine helps to lift the browned bits stuck to the bottom, incorporating those flavors into the sauce. This technique not only adds richness but also ensures that no flavor is wasted in the cooking process.
Cooking the roast at a low temperature for an extended period allows the connective tissues to break down, resulting in tender, juicy meat infused with the flavors of the cooking liquid and aromatics. This method is essential for achieving that melt-in-your-mouth texture that is characteristic of a great pot roast.
Incorporating ingredients like onions, garlic, carrots, and herbs during the cooking process enhances the flavor profile, as these ingredients release their essences into the pot roast. The combination of these aromatics creates a complex, savory base that elevates the dish.
Keeping the lid on during cooking traps moisture and heat, promoting even cooking and preventing the roast from drying out, which is essential for maximizing flavor. This ensures that the roast retains its juices and absorbs the collective flavors of all ingredients used.
How Long Should You Cook a Dutch Oven Pot Roast for Optimal Tenderness?
The cooking time for a Dutch oven pot roast greatly influences its tenderness, and several factors should be considered to achieve the best results.
- Cooking Time: Generally, a pot roast should be cooked for 3 to 4 hours at a low temperature of around 325°F.
- Meat Type: The type of meat used affects cooking time; tougher cuts like chuck roast benefit from longer cooking to become tender.
- Moisture Levels: Ensuring there is adequate liquid in the pot helps maintain moisture, which is crucial for tenderness.
- Resting Period: Allowing the roast to rest after cooking enhances tenderness as the juices redistribute.
The ideal cooking time for a pot roast in a Dutch oven is typically between 3 to 4 hours at 325°F, which allows the connective tissues to break down, resulting in tender meat. Cooking for too short a period may leave the roast chewy and tough, while overcooking can dry it out.
The type of meat plays a significant role in determining cooking time. Cuts like chuck or brisket, which are higher in collagen, require longer cooking to become tender, while leaner cuts may need less time to avoid drying out.
Maintaining moisture is essential for the best Dutch oven pot roast; adding broth, wine, or even vegetables can create a steamy environment that prevents the meat from drying out and promotes tenderness.
Finally, resting the roast for about 15-30 minutes after cooking is vital as it allows the fibers to relax and the juices to redistribute, resulting in a more succulent and tender final dish.
What Vegetables Complement the Flavors of Dutch Oven Pot Roast?
The best vegetables to complement the flavors of Dutch oven pot roast include:
- Carrots: Their natural sweetness balances the savory flavors of the roast, and they become tender and flavorful as they absorb the rich juices during cooking.
- Potatoes: These starchy vegetables soak up the flavors of the broth and meat, providing a hearty and filling side that enhances the overall meal experience.
- Onions: Onions add depth and aroma to the dish, caramelizing beautifully in the pot and contributing a subtle sweetness that enhances the meat’s flavor.
- Celery: Celery adds a fresh crunch and a hint of earthiness, complementing the other vegetables while also infusing the pot with its unique flavor as it cooks down.
- Parsnips: With their sweet, nutty flavor, parsnips bring a unique taste to the pot roast, providing a different texture and sweetness that pairs well with the savory meat.
What Tips Can Help You Achieve Maximum Flavor in Your Dutch Oven Pot Roast?
To achieve maximum flavor in your Dutch oven pot roast, consider the following tips:
- Choose the Right Cut of Meat: Opt for tougher cuts like chuck roast or brisket, which have more marbling and connective tissue. These cuts become tender and flavorful when cooked slowly and benefit from the moisture retained in the Dutch oven.
- Season Generously: Use a mix of kosher salt, black pepper, and herbs to season the meat before searing. This enhances the flavor profile and helps create a delicious crust when browning the meat.
- Sear Before Braising: Brown the meat on all sides in a hot Dutch oven to develop a rich, caramelized crust. This Maillard reaction adds depth of flavor and complexity to the final dish.
- Add Aromatics: Incorporate onions, garlic, carrots, and celery at the beginning of the cooking process. These vegetables release their natural sugars and flavors, which meld into the broth, enriching the overall taste.
- Use Broth or Stock: Instead of water, use beef broth or stock to deglaze the pot after searing the meat. This adds layers of flavor and ensures the roast absorbs the savory essence during cooking.
- Include Acidity: A splash of red wine or balsamic vinegar can brighten the dish and help tenderize the meat. Acidic ingredients balance the richness and enhance the overall flavor profile.
- Cook Low and Slow: Maintain a low temperature and allow the roast to cook for several hours. This slow cooking method breaks down the collagen in the meat, resulting in a tender, juicy roast infused with flavor.
- Let It Rest: After cooking, let the roast rest for at least 20 minutes before slicing. This allows the juices to redistribute throughout the meat, ensuring every bite is moist and flavorful.
How Can You Properly Store and Reheat Leftover Dutch Oven Pot Roast?
To properly store and reheat leftover Dutch Oven pot roast, it’s essential to follow specific steps for optimal flavor and safety.
- Cool Down: Allow the pot roast to cool to room temperature before storage.
- Storage Container: Use an airtight container for storing the pot roast.
- Refrigeration: Store the pot roast in the refrigerator if consuming within a few days, or freeze for longer preservation.
- Reheating Methods: Choose the right method for reheating to retain moisture and flavor.
- Check Temperature: Ensure that the pot roast is reheated to a safe temperature.
Cooling the pot roast helps to prevent bacterial growth; aim to let it sit out for no more than two hours before storing.
An airtight container not only keeps the pot roast fresh but also prevents it from absorbing other odors in the refrigerator.
If you plan to eat the leftovers within three to four days, refrigeration is suitable; however, freezing can extend the shelf life to about three months.
When reheating, methods like using the oven or stovetop are preferred as they help retain moisture, while microwaving can lead to uneven heating and dryness.
Finally, make sure to heat the pot roast to an internal temperature of 165°F to ensure it is safe to eat.
Related Post: