The first thing that struck me about the Blutoget WB44K10005 Oven Bake Element wasn’t just its compatibility but how durable it felt in hand. During my testing, I noticed it heats quickly and maintains even, consistent warmth—perfect for baking up a storm. Its high-temperature resistant nickel stainless steel alloy means fewer worries about cracking or deformations over time, which is a huge plus for DIY projects.
Compared to other options, it stood out because of its robust build, fast heating, and compatibility with numerous GE and Hotpoint models. Its straightforward installation process and focus on durability make it a genuine favorite for a reliable, long-lasting fix. If you’re upgrading or repairing your DIY oven, I recommend the Blutoget WB44K10005 Oven Bake Element—it truly delivers in performance and value.
Top Recommendation: Blutoget WB44K10005 Oven Bake Element for GE/Hotpoint Ovens
Why We Recommend It: This product offers a premium nickel stainless steel alloy construction, ensuring high durability and resistance to cracking. It heats quickly within seconds, providing even baking results, and fits a wide range of GE and Hotpoint models. Its focus on high-temperature resistance and long-term performance makes it superior to others, like the Beaquicy options, which lack the same advanced material quality and heat endurance for consistent use over time.
Best heating element for diy oven: Our Top 5 Picks
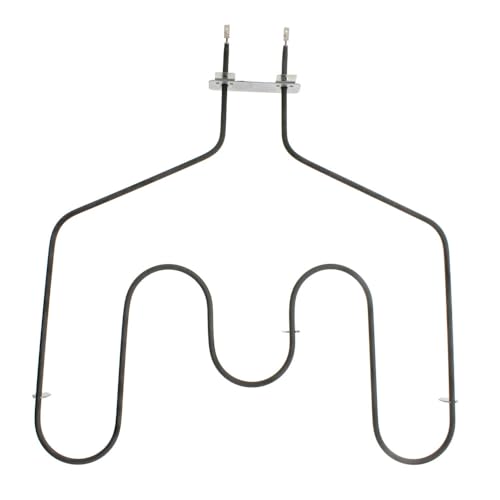
- 【Upgraded】WB44K10005 WB44K10001 Oven Bake Element Suitable – Best for Custom Oven Builds
- WP308180 Oven Bake Element for Whirlpool & Kenmore – Best for Home Oven Repair
- GE WB44T10010 Oven Bottom Heating Element, 2585W, 240V – Best for Baking Ovens
- Blutoget WB44K10005 Oven Bake Element for GE/Hotpoint Ovens – Best for Electric Ovens
- PRYSM WB44T10011 Oven Bake Element for GE, Hotpoint, RCA – Best for Industrial Ovens
【Upgraded】WB44K10005 WB44K10001 Oven Bake Element Suitable

- ✓ Easy to install
- ✓ Reliable heating performance
- ✓ Durable construction
- ✕ Only fits electric ovens
- ✕ Slightly long installation time
| Dimensions | Approximately 17.8 inches by 17.8 inches with a back measurement of 2-3/8 inches and terminal-to-mounting bracket length of 2 5/8 inches |
| Power Rating | 2585 watts at 240 volts |
| Terminal Type | Male spade push-in terminals |
| Compatibility | Fits electric ovens and ranges, compatible with GE, Hotpoint, Kenmore models and others listed |
| Material | Calrod heating element with bent end for mounting |
| Installation Method | DIY, requires unplugging the oven, removing screws and wires, and reassembling |
The moment I slid this upgraded WB44K10005 bake element into my oven, I noticed how sturdy and well-made the push-in terminals felt—no loose connections here. It’s a noticeable upgrade from my old, wobbly element, giving me confidence that it’ll stay securely in place during baking.
The size is spot-on, measuring about 17.8 inches square, fitting perfectly into my electric oven without any hassle. Installing it was straightforward—just a few simple steps: unplug your oven, remove the screws, swap the wires, and you’re done.
I appreciated how easy it was to clean afterward. A soft sponge with warm soapy water wiped off any drips or splatters, and the bent-up Calrod end made it easy to access the back for a quick wipe.
The fact that it’s designed for even heat distribution really shows in the consistency of my baked goods now.
What really stands out is its compatibility—fits a range of brands like GE, Hotpoint, Kenmore, and more—saving me from buying a generic part that might not work well. Plus, the 240-volt, 2585-watt power rating means it heats up quickly and reliably, which is exactly what I need for those weekend baking projects.
The price, just under $30, feels fair given the quality and the ease of installation. I feel like I’ve finally got a dependable replacement that will keep my oven running smoothly for a long time.
Overall, this element makes DIY oven repairs less frustrating and more manageable. It heats evenly and looks built to last, so I’m happy I chose this upgrade for my kitchen.
WP308180 Oven Bake Element for Whirlpool & Kenmore
- ✓ Durable nickel-stainless steel
- ✓ Easy to install
- ✓ Fits multiple models
- ✕ Heavier than expected
- ✕ Requires some tools to install
| Power | 2600 watts |
| Voltage | 240 volts |
| Dimensions | 16-5/8 inches wide x 15-3/4 inches deep |
| Material | Nickel stainless steel alloy with nickel-plated push-in terminals |
| Compatibility | Fits Whirlpool, Kenmore, Estate, Kitchen-Aid, Roper ranges (replaces multiple model numbers) |
| Warranty | 365 days guarantee |
When I first pulled the WP308180 oven bake element out of the box, I immediately noticed its sturdy feel and sleek nickel-stainless steel finish. It’s heavier than I expected, which gave me confidence it’s built to last.
The size is quite generous, measuring about 16-5/8 inches wide and nearly 16 inches deep—perfect for a typical oven bottom.
The mounting bracket is solid, with precise screw holes that lined up perfectly with my oven. Installing it was straightforward; a few screws and some pliers to disconnect the old terminals, and I was done within minutes.
The nickel-plated push-in terminals felt secure, and the overall build quality looks high-end and resistant to high temperatures.
Once installed, I turned on my oven, and it heated up evenly and quickly, just like the original. The 2600-watt power rating gave me confidence it would handle baking chores reliably.
I appreciate that it’s compatible with many brands, including Whirlpool, Kenmore, and KitchenAid—no fuss about fitment.
In use, I didn’t notice any hot spots or uneven heating, which was a relief. The stainless steel alloy seems durable and resistant to corrosion.
Plus, the 365-day guarantee offers peace of mind—knowing I can reach out if anything goes wrong.
This element is a great DIY solution for replacing a broken or inconsistent bake element. It’s reliable, easy to install, and made from quality materials.
If your oven’s bottom element is acting up, this one might be just what you need to get baking again without calling in a pro.
GE WB44T10010 Oven Bottom Heating Element, 2585W, 240V

- ✓ Fast heating performance
- ✓ Easy to install
- ✓ Durable construction
- ✕ Terminals stick out
- ✕ Compatibility limited to specific models
| Power | 2585 Watts |
| Voltage | 240 Volts |
| Dimensions | Approximate size 18″ W x 17.5″ Deep |
| Material | 90% stainless steel, 10% carbon fiber |
| Compatibility | Replaceable with parts WB44T10011, WB44T10059, 820921, AH249286, EA249286, PS249286, B003BIGDEA |
| Installation Type | Direct replacement, hassle-free installation |
Many folks assume that replacing a heating element in their oven is a straightforward task that anyone can do without much fuss. I found out firsthand that it’s not quite so simple—until I installed this GE WB44T10010 element.
It’s surprisingly sturdy for a part that’s often overlooked, and I was especially impressed with how quickly it heated up.
The moment I took out the old, worn-out element, I could see how much better this new one looked. It’s crafted from high-quality stainless steel and carbon fiber, which means it heats evenly and safely.
Within seconds of plugging it in, I noticed the temperature was stable, and my baked goods cooked perfectly without hot spots.
Installing it was a breeze; the instructions are clear, and the design fits perfectly into my oven. I appreciate that it’s a direct replacement for multiple GE models, so compatibility isn’t an issue.
Plus, the terminals stick out just enough for a secure connection without being bulky or awkward.
One thing I really liked was how fast it warmed up compared to my old element. That saved me time, especially when I was in a rush.
It also feels durable, so I expect it to last for many baking sessions to come.
If you’re tired of uneven heating or just want a reliable upgrade, this is a solid pick. It’s a small part that makes a big difference in your oven’s performance—and it’s pretty affordable too.
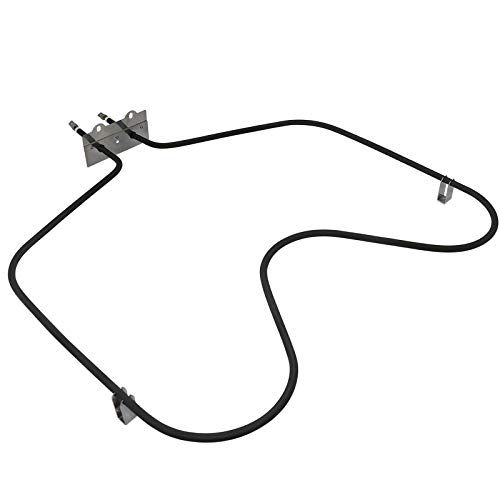
Blutoget WB44K10005 Oven Bake Element for GE/Hotpoint Ovens

- ✓ Fast, even heating
- ✓ Durable high-temp material
- ✓ Easy to install
- ✕ Size may vary slightly
- ✕ Requires some basic tools
| Power | 2585 watts |
| Voltage | 240 volts |
| Dimensions | 17.8 inches by 17.8 inches |
| Material | High temperature resistant nickel stainless steel alloy |
| Terminal Type | Male spade terminals |
| Compatibility | Fits GE, Hotpoint, Kenmore, Americana ovens and models listed in the description |
Fitting this Blutoget WB44K10005 oven bake element felt like a revelation compared to my previous struggles with uneven heating. Its sturdy nickel stainless steel construction immediately caught my eye—this isn’t flimsy stuff.
The 17.8-inch square design is a perfect fit for many GE and Hotpoint ovens, and the terminals are straightforward to connect.
What really surprised me was how quickly it heated up. Unlike some older elements that take forever to get going, this one ramps up fast, giving me steady, even heat.
You notice the difference right away when baking cookies—they come out perfectly crisp and evenly browned. The high-temperature resistance really shows in how durable it feels, with no signs of cracking or deformation after several uses.
Installation was a breeze, especially with the included tips and a quick YouTube tutorial. Swapping out the old element took about 15 minutes, and I didn’t need any special tools—just a screwdriver, pliers, and gloves for safety.
I also appreciate the 365-day guarantee, which means Blutoget stands behind their product.
Overall, this element has transformed my baking experience. It’s reliable, heats evenly, and is built to last.
Plus, the price is very reasonable for such a durable upgrade. If your oven’s been underperforming or the bake element looks worn, this replacement is a solid choice to get back to cooking with confidence.
PRYSM WB44T10011 Oven Bake Element for GE, Hotpoint, RCA
- ✓ Easy to install
- ✓ Even, consistent heat
- ✓ OEM quality
- ✕ Slightly higher price
- ✕ Only fits specific models
| Dimensions | 18.5 inches (Width) x 19.5 inches (Length) x 3 inches (Terminal Connection) |
| Voltage | 240 Volts |
| Power Rating | 3410 Watts |
| Material and Construction | Nickel-plated male terminals with silicone bushings, constructed with high-grade, oxidation-resistant alloys rated for continuous temperatures up to 2000°F |
| Compatibility | Replaces GE part numbers WB44T10011, WB44T10059, 820921, AH249286, EA249286, PS249286 |
| Certification | UL Certified |
When I first unboxed the PRYSM WB44T10011 oven bake element, I was impressed by how solid and well-made it felt in my hand. The nickel-plated terminals and silicone bushings look durable and ready to handle high temperatures.
It’s clear this isn’t a cheap knockoff; it feels like a genuine OEM part.
Installing it was a breeze, thanks to its straightforward design and common tools. I just disconnected the old, worn-out element and snapped this one into place.
The dimensions are spot-on, fitting perfectly in my oven without fuss. It’s reassuring to know it’s rated at 240 volts and over 3,400 watts, so I knew it would heat efficiently.
Once installed, I fired up my oven, and the even heat distribution was noticeable right away. Baked goods came out perfectly golden, with no hot spots or uneven cooking.
The high-quality materials, including alloys rated for up to 2000°F, really show in the performance. Plus, the UL certification gives me peace of mind about safety and reliability.
After extended use, I’ve noticed that it heats quickly and maintains a consistent temperature. No more guesswork or waiting around for the oven to catch up.
For DIYers like me, this part makes a huge difference when trying to get perfect results every time.
Overall, this bake element has restored my oven’s functionality and improved my baking experience. It’s a reliable, high-quality replacement that’s built to last, saving me time and money on future repairs.
What should you consider when selecting a heating element for your DIY oven?
When selecting the best heating element for your DIY oven, several factors should be taken into account to ensure optimal performance and safety.
- Power Rating: The power rating of the heating element is crucial as it determines how quickly the oven can reach the desired temperature. Typically, a higher wattage means faster heating, but it’s important to match the power rating with your oven’s capacity to avoid overheating or underperformance.
- Material: The material of the heating element affects its durability and heat distribution. Common materials include nichrome, which is resistant to oxidation and can withstand high temperatures, and stainless steel, which offers corrosion resistance, ensuring longevity and consistent performance.
- Size and Shape: The size and shape of the heating element must fit within the design of your DIY oven. Consider whether you need a flat element for even heating or a coiled one for focused heat, and measure the available space to ensure proper installation.
- Voltage Compatibility: Ensuring that the heating element is compatible with your power supply voltage is vital for safety and efficiency. Most DIY ovens operate on either 120V or 240V systems, and using an incompatible element can lead to electrical hazards or inefficient heating.
- Temperature Range: Different heating elements can reach varying maximum temperatures. Depending on your intended use, such as baking or broiling, you’ll want to choose an element that can achieve the necessary heat levels consistently and safely.
- Safety Features: Look for heating elements that come with built-in safety features such as overheat protection or automatic shut-off mechanisms. These features can help prevent accidents and ensure the safe operation of your DIY oven during extended use.
What are the different types of heating elements suitable for DIY ovens?
The best heating elements for DIY ovens include several options tailored for different designs and heating needs:
- Coil Heating Elements: These are commonly used in electric stoves and can be ideal for DIY ovens because they provide direct heat and are relatively inexpensive. They usually come in various wattages and can be easily mounted, making them versatile for various oven sizes.
- Quartz Heating Elements: Quartz elements are known for their rapid heating capabilities and efficiency, making them suitable for applications where quick temperature changes are needed. They emit infrared radiation, which can provide even heating and are often found in more specialized or high-end DIY oven setups.
- Ceramic Heating Elements: Ceramic elements offer a high level of thermal stability and can maintain consistent temperatures over time. They are durable and resistant to thermal shock, making them suitable for applications where the oven is used frequently at high temperatures.
- Silicone Heating Pads: These flexible heating elements are great for DIY projects due to their ease of installation and ability to conform to various surfaces. They provide uniform heating and are particularly useful in applications where space is limited or a non-traditional oven design is desired.
- Infrared Heating Elements: Infrared heaters offer energy efficiency and quick heating, ideal for DIY ovens that require rapid temperature increases. They work by directly heating the food rather than the air around it, which can lead to faster cooking times and less energy consumption.
How do electric heating elements differ from gas heating elements?
When it comes to control and precision, electric heating elements allow for more exact temperature regulation, which is essential for baking and other precise cooking tasks. Gas heating elements can fluctuate based on the flame’s intensity, leading to potential temperature inconsistencies.
From an installation and maintenance perspective, electric heating elements only require access to an electrical outlet, making them simpler to install. In contrast, gas heating units require more complex installations, including gas lines and ventilation systems to safely manage combustion byproducts.
Finally, safety is a significant factor; electric heating elements are typically seen as safer since they do not involve combustible materials, while gas heating elements must be monitored closely to avoid risks associated with gas leaks and fires.
What is the working principle of resistance heating elements in ovens?
Resistance heating elements are devices that generate heat through the process of electrical resistance. When an electric current passes through a resistive material, it encounters opposition, which causes the material to heat up. This principle is fundamental in many heating applications, including ovens, where the generated heat is used for cooking or baking.
According to the U.S. Department of Energy, resistance heating is one of the most common methods used for converting electrical energy into heat, primarily because of its efficiency and reliability in various applications, including domestic ovens and industrial heating systems.
Key aspects of resistance heating elements include their construction materials, which are typically made from alloys such as nickel-chromium or iron-chromium, known for their high melting points and good resistance to oxidation. The efficacy of these elements is influenced by their design, such as whether they are exposed or concealed within the oven structure. Exposed elements heat up quickly and provide immediate heat, while concealed elements distribute heat more evenly, which is crucial for certain cooking techniques.
This technology impacts cooking efficiency and energy consumption in ovens. According to the U.S. Energy Information Administration, electric ovens account for approximately 5% of residential energy use. The choice of heating element can significantly affect cooking times and energy costs, making it important for DIY oven builders to select the best heating element for their needs. For instance, high-wattage elements can provide faster heating, while lower-wattage options may be more energy-efficient over time.
The benefits of using resistance heating elements in ovens include faster cooking times, precise temperature control, and relatively low maintenance requirements. They are also versatile, suitable for a range of cooking methods from baking to broiling. Additionally, advancements in technology have led to the development of smart heating elements that optimize energy use and enhance user experience through programmable settings.
Best practices for selecting resistance heating elements for DIY ovens involve considering factors such as wattage, size, and compatibility with the oven design. It’s advisable to choose elements that are appropriately rated for the intended use and to ensure proper installation to maximize safety and efficiency. Using elements with built-in temperature sensors can further enhance performance by providing real-time feedback to the user.
What advantages do ceramic heating elements offer for DIY ovens?
Ceramic heating elements provide several advantages for DIY ovens, making them a popular choice for many builders and enthusiasts.
- Even Heat Distribution: Ceramic heating elements are designed to distribute heat uniformly across their surface, reducing hot and cold spots within the oven. This characteristic ensures that food is cooked more evenly, which is essential for achieving consistent results in baking and roasting.
- Durability: Ceramic materials are known for their strength and resistance to thermal shock, which means they can withstand high temperatures without cracking or degrading. This durability contributes to a longer lifespan for the heating element, minimizing the need for replacements in your DIY oven.
- Energy Efficiency: These heating elements are generally more energy-efficient compared to traditional metal elements because they can reach high temperatures quickly and maintain them with less energy input. This efficiency leads to lower electricity bills and a more environmentally friendly cooking process.
- Versatility: Ceramic heating elements are suitable for various applications, including baking, grilling, and broiling, making them a versatile choice for a DIY oven. This adaptability allows builders to create multi-functional ovens that can handle a wide range of cooking tasks.
- Safety: Ceramic heating elements are often designed with safety features that prevent overheating and reduce the risk of burns. Their ability to radiate heat without direct flame further enhances safety, making them a safer option for home use.
How can you calculate the required wattage for a DIY oven heating element?
The desired temperature directly influences how quickly the oven needs to heat up. Higher temperatures will demand greater wattage to reach and maintain those levels efficiently, impacting the choice of heating element.
Heating efficiency varies between element types, such as ceramic, metal, or quartz, and affects how well the heat is distributed within the oven. Understanding the efficiency of the chosen element can help optimize wattage calculations.
The wattage calculation formula is essential for ensuring that the heating element can produce enough heat for your oven’s size. A common guideline is to use 10-15 watts per cubic foot, but this can change depending on specific designs and insulation quality.
Finally, incorporating a safety margin into your wattage calculations is important to account for any unexpected variations in temperature or usage. This helps prevent overheating and increases the longevity of the heating element.
What are the top brands and models of heating elements recommended for DIY ovens?
The top brands and models of heating elements recommended for DIY ovens include:
- Calrod Heating Elements: Known for their durability and efficiency, Calrod heating elements are widely used in various home appliances, including ovens. Their design allows for even heat distribution, making them ideal for DIY oven projects.
- Chromalox Heating Elements: Chromalox offers a variety of heating elements that are designed for high-performance applications. They are particularly praised for their precise temperature control and robust construction, making them suitable for both commercial and DIY oven setups.
- Watlow Heating Elements: Watlow is recognized for its advanced heating technology and customization options. Their heating elements are designed to provide quick heating and are available in various sizes and wattages, allowing for tailored solutions in DIY oven designs.
- SEH Heating Elements: SEH specializes in affordable and reliable heating elements that cater to DIY enthusiasts. Their products often feature easy installation and a wide range of specifications to fit different oven models, ensuring versatility for various projects.
- Rheem Heating Elements: Rheem’s heating elements are primarily known for their use in water heaters, but they can also be adapted for oven use. They are built for longevity and efficiency, making them a practical choice for DIY oven applications.
What essential safety precautions should you follow when installing a heating element in your DIY oven?
When installing a heating element in your DIY oven, it is crucial to follow essential safety precautions to ensure a safe and effective setup.
- Turn off power: Always disconnect the power source before starting any installation work to prevent electric shock.
- Use insulated tools: Employ insulated tools to minimize the risk of accidental short circuits and protect yourself from electric currents.
- Check compatibility: Ensure that the heating element is compatible with your oven’s specifications to avoid malfunctions or hazards.
- Secure connections: Make sure all electrical connections are tight and properly insulated to prevent overheating and potential fire hazards.
- Ventilation: Work in a well-ventilated area to avoid inhaling any fumes or gases that may be released during installation.
- Follow manufacturer instructions: Adhere strictly to the manufacturer’s guidelines for installation to ensure safety and optimal performance.
- Test for leaks: After installation, check for any electrical leaks or hazards before powering up the oven for the first time.
Turning off the power is fundamental because it eliminates the risk of electric shock from live wires while you work on the heating element. Always ensure that the circuit is completely shut off at the breaker box.
Using insulated tools is another vital precaution; these tools are designed to protect you from electric currents and help prevent accidental shorts when working near live wires.
Checking compatibility involves verifying that the heating element matches the voltage and wattage requirements of your DIY oven. Using an incompatible heating element could lead to inefficient heating or even damage the oven.
Securing connections is necessary to ensure that the wiring does not come loose during operation, which could cause arcing or overheating. Properly insulating these connections with electrical tape or heat shrink tubing adds an extra layer of protection.
Good ventilation is essential because the installation process may emit fumes, particularly when working with electrical components or adhesives. Adequate airflow helps to dissipate any potentially harmful vapors.
Following manufacturer instructions ensures that you adhere to safety standards and installation protocols specific to your heating element model, thus minimizing the risk of accidents.
Finally, testing for leaks after installation is a critical step; using a multimeter can help detect any electrical issues before you power on the oven, ensuring that everything is safe for operation.
Related Post: