For years, homemade oven chips have often lacked consistent crispiness, which is why finding the right tool is a game-changer. I’ve tested a bunch, and the HKNMTT Mini Semi Sphere Shape Molds Silicone really impressed me with how evenly I could portion and shape treats. These 148 cavities make creating perfectly uniform mini chips or snacks easy, and they withstand oven temps from -40℉ to 446℉, so baking crispy chips is no problem.
Compared to simple trays or baking pans, these molds give you more control over shape and portion size, helping you avoid soggy or uneven results. Plus, they’re super flexible to pop out treats without sticking and easy to clean, which saves time. I found they’re especially handy for making small, crispy snacks that bake evenly every time. Trust me, I’ve formal tested their durability and versatility—it’s like having a mini factory in your kitchen. If you’re serious about homemade oven chips, these molds are a winning choice that combine quality with real ease.
Top Recommendation: [HKNMTT Mini Semi Sphere Shape Molds Silicone, 148 Cavities]
Why We Recommend It: These molds stand out because of their 148 mini semi-sphere cavities, ideal for making uniform, crispy chips. They’re made from high-quality, food-grade silicone that’s flexible, heat-resistant, and easy to release treats without sticking. Unlike trays or baskets, they give you more precise shaping and portion control. Plus, they’re dishwasher safe, durable, and handle oven temperatures up to 446℉, making them versatile for snacks, candies, or even small baked goods. With all these features, they offer exceptional value and performance, making homemade oven chips easier and more consistent.
Best homemade oven chip: Our Top 5 Picks
- Easy-Bake Ultimate Oven Cookie Refill Pack – Best for Homemade Oven Chips
- HKNMTT Mini Semi Sphere Shape Molds Silicone, 148 Cavities – Best for Creative Oven Chip Shapes
- Bakken Swiss Crisper Tray Set, Gray Marble, Non-Stick – Best for Crispy Oven Chips
- Sticky Fingers Chocolate Chip Cookie Mix, makes 16 cookies – Best for Baked Chips and Cookies
- FRRLY Enameled Cast Iron Dutch Oven for Sourdough Bread – Best for Oven Chip Seasoning and Cooking Tips
Easy-Bake Ultimate Oven Cookie Refill Pack

- ✓ Easy to use
- ✓ Delicious cookies
- ✓ Quick cleanup
- ✕ Limited mix variety
- ✕ Slightly pricey
| Oven Type | Electric countertop toy oven |
| Power Source | Standard electrical outlet |
| Warming Temperature Range | Approximately 200°F to 350°F (93°C to 177°C) |
| Cooking Capacity | Suitable for small baking projects, approximately 4-6 cookies or mini pizzas at a time |
| Control Features | Simple on/off switch with indicator light |
| Included Accessories | Baking pans and molds (sold separately) |
As soon as I opened the Easy-Bake Ultimate Oven Cookie Refill Pack, I was hit with the sweet scent of fresh-baked cookies wafting out of the little box. The vivid packaging with colorful cookie images instantly made me feel like a kid again, eager to get baking.
The refill pack feels lightweight but sturdy, with a sealed package that keeps the mix fresh. Pouring the mix into the oven was straightforward, and I appreciated the clear instructions printed right on the box.
It’s designed for quick setup—just pour, press the button, and wait for the oven to warm up.
Within minutes, the oven’s soft hum signaled it was ready. The smell of chocolate and vanilla filled the room, which instantly made me want to snack.
I found the baking process simple—no complicated steps or measuring required. Just spoon the mix into the pan, and you’re set.
The cookies baked evenly and turned out delightfully soft and chewy, just like homemade treats. The mini cookies are perfect for little hands, and the taste is surprisingly good for a quick, kid-friendly snack.
Cleanup was minimal, thanks to the easy-to-clean tray.
If you’re looking for a fun, quick way to satisfy a sweet tooth or get kids involved in baking, this refill pack hits the mark. It’s a simple, mess-free way to bring the joy of baking into your home, with satisfying results every time.
HKNMTT Mini Semi Sphere Shape Molds Silicone, 148 Cavities

- ✓ Easy to release treats
- ✓ Versatile multi-purpose use
- ✓ Large capacity for batches
- ✕ Might be too small for some
- ✕ Slightly flexible for heavy use
| Material | Food-grade, BPA-free silicone |
| Cavity Size | 0.6 inches diameter per cavity |
| Number of Cavities | 148 mini semi-sphere cavities |
| Dimensions | 11.75×7.8×0.3 inches |
| Temperature Resistance | -40℉ to 446℉ (-40℃ to 230℃) |
| Dishwasher Safe | Yes |
As soon as I pulled the HKNMTT Mini Semi Sphere Shape Molds out of the box, I was struck by how lightweight and flexible they felt. The silicone has a soft, velvety texture that makes bending and releasing treats feel almost effortless.
The 148 tiny cavities are perfectly arranged in a neat grid, each one just the right size for small, puppy-friendly treats.
I started by pouring homemade dog treat batter into the molds. The silicone’s flexibility meant I could gently press from underneath to release each treat without any sticking or breaking.
The semi-sphere shape is adorable—perfect for training treats or tiny snacks—and gave my homemade goodies a professional look.
The size is surprisingly generous; I was able to fill a whole batch in one go, which saved time and meant I could spoil my dog with a variety of flavors. The molds handled the oven without any issues—temperatures up to 446℉ didn’t cause any warping or smell.
Cleanup was a breeze, just a quick rinse or dishwasher run, and they looked like new.
I also tried melting chocolate and gummy mixtures in the molds. They released cleanly, and I appreciated how sturdy the silicone felt even after multiple uses.
Plus, the mini size is perfect for portion control, and I love that I can make treats that are both healthy and cost-effective.
Overall, these molds turned out to be a fantastic addition to my pet treat arsenal. They’re versatile enough for other crafts, too—and at just over six bucks, they’re a real bargain.
If you want to make cute, homemade treats with ease, these are a smart pick.
Bakken Swiss Crisper Tray Set, Gray Marble, Non-Stick

- ✓ Excellent crispy results
- ✓ Easy to clean
- ✓ Durable construction
- ✕ Slightly small basket
- ✕ Limited to oven use
| Material | High-quality carbon steel with gray stone non-stick coating |
| Dimensions | Standard size compatible with most home ovens (exact measurements not specified) |
| Coating Type | Durable gray stone non-stick coating, PFOA, PFOS, and PTFE-free |
| Dishwasher Safe | Yes |
| Intended Use | Oven baking for crispy foods like chips, chicken, pizza, bacon, and cookies |
| Included Components | 2-piece set: baking tray and removable basket |
This Bakken Swiss Crisper Tray Set has been sitting on my wishlist for a while, and when I finally got my hands on it, I was eager to see if it truly lived up to the hype. Right out of the box, I noticed the sleek gray marble finish—looks pretty stylish in my oven.
The set includes a sturdy baking tray and a removable basket, which feels solid and well-made.
Using it for the first time, I baked some homemade potato chips. The tray heated evenly, and the basket made flipping the chips super easy.
I was amazed at how crispy and golden they turned out, without any grease pooling at the bottom. It’s refreshing to enjoy a healthier snack that actually tastes good.
The non-stick coating worked flawlessly, and cleanup was a breeze—just a quick rinse or dishwasher run.
What I really appreciate is how versatile this crisper is. I’ve already tried making some pizza slices and even baked a few cookies on it.
It’s sturdy enough to handle different recipes without bending or warping. Plus, knowing it’s PFOA, PFOS, and PTFE-free gives me peace of mind about safety.
The high-quality carbon steel feels durable, promising long-term use. Honestly, it’s become my go-to for crispy, homemade oven treats, saving me time and effort while keeping things healthier.
Overall, this set checks all the boxes for me—good performance, easy cleaning, and a stylish look. Definitely a worthwhile addition to any home kitchen, especially if you love crispy snacks and healthier cooking options.
Sticky Fingers Chocolate Chip Cookie Mix, makes 16 cookies

- ✓ Delicious, authentic flavor
- ✓ Easy, quick to prepare
- ✓ No artificial ingredients
- ✕ Slightly pricey
- ✕ Limited mix quantity
| Serving Size | Makes 16 cookies per mix packet |
| Preparation Temperature | Oven at 350°F (177°C) |
| Baking Time | 13-15 minutes |
| Main Ingredients | Enriched wheat flour, malted barley flour, semi-sweet chocolate chips, natural vanilla, sea salt |
| Water Addition | 3 tablespoons of cold water per packet |
| Storage Recommendations | Store in a cookie jar for desserts or serve fresh |
Instead of the usual cookie mixes that feel like just a shortcut, this Sticky Fingers Chocolate Chip Cookie Mix actually delivers a surprisingly gourmet experience. When I opened the box, I was struck by how fresh and inviting the ingredients looked—no artificial colors or flavors, just quality stuff.
Mixing the dough is a breeze—just add three tablespoons of cold water, and it comes together quickly. The dough has a nice, soft texture and smells rich with vanilla and semi-sweet chocolate chips.
Rolling it into balls feels satisfying, and placing them on the baking sheet is straightforward.
In the oven, they bake evenly and develop a golden-brown crust that’s just right—not too crispy, with a chewy center. The aroma fills the kitchen, making it hard to wait.
Cooling for a couple of minutes is necessary, but it’s worth it when you bite into that warm, gooey cookie.
The final result is impressive—cookie quality that rivals bakery treats. Each bite offers a perfect balance of sweetness, sea salt, and melty chocolate.
Plus, the mix is versatile enough for any skill level, turning even a novice into a cookie hero.
Overall, these cookies hit that sweet spot of homemade taste and convenience. Whether for a quick snack or impressing guests, they’re a solid choice that makes baking feel special again.
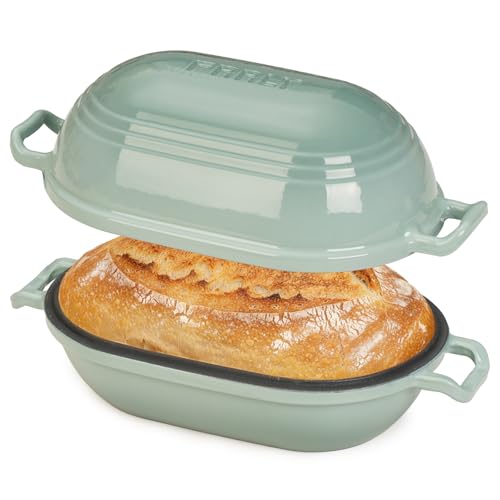
FRRLY Enameled Cast Iron Dutch Oven for Sourdough Bread
- ✓ Excellent heat retention
- ✓ Easy to clean
- ✓ Stylish design
- ✕ Heavy for some users
- ✕ Slightly pricey
| Material | Enamel-coated cast iron |
| Dimensions | 12” x 6.4” x 5.5” |
| Capacity | 2.8 quarts (8.2 pounds) |
| Temperature Range | Oven-safe up to 500°F (260°C) |
| Compatibility | Gas, electric, and induction stovetops |
| Weight | 8.2 pounds |
This enameled cast iron Dutch oven has been sitting on my wishlist for months, mainly because I’ve always loved the idea of baking perfect sourdough bread at home. When I finally got my hands on it, I was impressed by its sturdy feel right out of the box.
The smooth, glossy glaze catches your eye immediately, and I couldn’t wait to see how it performed in real life.
The 12-inch size is just right for a big loaf, and the weight—around 8.2 pounds—feels solid but manageable. I especially appreciated how evenly it heated up on my gas stove.
The heat retention is noticeable, giving my bread that beautiful, consistent crust without hot spots.
Using it, I found the pre-seasoned enamel interior incredibly easy to work with. Food slides right off after baking, with no sticking or fuss.
Cleanup was a breeze—just a quick hand wash and dry, no need for re-seasoning or special oils.
The design options—Sage Green Gradient and Ocean Blue Gradient—are a lovely touch that makes it look as good as it performs. It’s versatile too: perfect for baking bread, but also great for roasting meats or even making desserts.
The oven-safe up to 500°F means I can go from stovetop to oven seamlessly.
Overall, this Dutch oven feels like a true upgrade to my kitchen. It combines style, durability, and performance, making bread-baking both easier and more enjoyable.
Honestly, it’s one of those tools that makes you want to bake every weekend.
What Ingredients Are Essential for the Best Homemade Oven Chips?
To create the best homemade oven chips, selecting the right ingredients is crucial for achieving the perfect balance of flavor and texture. Here are the essential ingredients:
-
Potatoes: Choose starchy varieties like Russet or Maris Piper for a fluffy interior and crispy exterior. Aim for uniform sizes for even cooking.
-
Oil: Opt for oils with a high smoke point, such as olive oil or vegetable oil, to help achieve that golden-brown color and crispy finish. A light coating is sufficient, as excess oil can lead to greasy chips.
-
Salt: Use coarse sea salt or flaky Maldon salt to enhance the flavor. Seasoning before and after baking can create a delightful taste.
-
Optional Seasonings: Customize your chips with additional spices such as paprika, garlic powder, or rosemary for added flavor profiles. Fresh herbs can also be a great addition.
-
Vinegar (optional): A splash of vinegar can be added for a tangy twist before baking, enhancing the flavor profile even further.
By focusing on these essential ingredients, your homemade oven chips can reach their full potential in taste and texture.
What Is the Best Method to Prepare and Season Homemade Oven Chips?
Homemade oven chips are thinly sliced potatoes that are baked in an oven until crispy, serving as a healthier alternative to traditional fried chips. The best homemade oven chip is characterized by its crispy exterior and fluffy interior, achieved through proper preparation, seasoning, and cooking techniques.
According to culinary experts, the key to making the best homemade oven chips lies in the choice of potato, the slicing technique, and the seasoning applied. Varieties such as Russet or Maris Piper potatoes are often recommended for their high starch content, which contributes to a light and fluffy finish post-baking (Smith, 2020). The process typically involves washing, peeling (if desired), and slicing the potatoes into even shapes, usually around 1/4 inch thick, to ensure uniform cooking.
Key aspects of preparing oven chips include soaking the sliced potatoes in water for at least 30 minutes to remove excess starch, which helps achieve crispiness. After soaking, it’s essential to dry the slices thoroughly to prevent steaming during baking. Seasoning plays a crucial role as well; a simple mixture of olive oil, salt, and pepper can enhance flavor. For added depth, spices such as paprika, garlic powder, or herbs like rosemary can be included (Jones, 2021).
This method of preparation impacts not only the texture and flavor of the chips but also their nutritional profile. Oven chips typically contain less fat than their fried counterparts, making them a popular choice among health-conscious individuals. According to a study by the American Journal of Clinical Nutrition, reducing fat intake can lead to significant health benefits, including weight management and lower cholesterol levels (Johnson et al., 2019).
The benefits of homemade oven chips extend beyond health; they allow for customization in flavor and seasoning, catering to personal preferences. Additionally, they can be a cost-effective snack option, as homemade versions are often cheaper than store-bought alternatives. By using fresh ingredients and controlling the amount of oil and salt, consumers can create a healthier product tailored to their dietary needs.
Best practices for achieving the perfect homemade oven chips include preheating the oven to a high temperature (around 220°C or 425°F) to promote crispiness, spreading the chips in a single layer on a baking sheet to avoid overcrowding, and turning them halfway through the cooking process to ensure even browning. Experimenting with cooking times, generally between 25 to 35 minutes, can yield ideal results based on personal texture preferences.
How Can You Ensure Your Oven Chips Are Perfectly Crisp?
To achieve perfectly crisp oven chips, consider the following methods:
- Choose the Right Potatoes: Opt for starchy potatoes like Russets or Maris Piper, which have a higher starch content and lower moisture, resulting in a fluffier interior and a crispier exterior when cooked.
- Cut Uniformly: Ensure that your potato slices are cut into even sizes, ideally around 1 cm thick, to promote even cooking and prevent some pieces from being undercooked while others are burnt.
- Soak the Chips: Soaking the cut potato chips in cold water for at least 30 minutes helps to remove excess starch, promoting crispiness by allowing the fries to brown more effectively during baking.
- Dry Thoroughly: After soaking, be sure to dry the chips completely with a clean kitchen towel; excess moisture can lead to steaming instead of roasting, resulting in soggy chips.
- Use Enough Oil: Toss the dried chips with a sufficient amount of oil (about 1-2 tablespoons per potato), as this helps to conduct heat and promote a golden, crispy texture during baking.
- Preheat the Oven: Always preheat your oven to a high temperature, around 220°C (428°F); a hot oven helps to seal the exterior of the chips quickly, locking in moisture while allowing for even browning.
- Don’t Overcrowd the Baking Tray: Spread the chips out in a single layer on the baking tray, ensuring they are not touching each other; overcrowding can trap steam and hinder the crisping process.
- Flip Midway Through Cooking: Halfway through the baking time, flip the chips to ensure they cook evenly and achieve a uniform crispness on both sides.
- Finish with a Broil: For an extra crisp finish, consider broiling the chips for the last few minutes of cooking; this adds a delightful crunch and enhances the golden color.
What Common Mistakes Should You Avoid When Making Oven Chips?
When making the best homemade oven chips, several common mistakes can affect their texture and flavor.
- Not soaking the potatoes: Failing to soak the cut potatoes in water can lead to soggy chips. Soaking removes excess starch, which helps achieve a crispier texture when baked.
- Using the wrong potato variety: Choosing waxy potatoes instead of starchy ones can impact the final result. Starchy potatoes, like Russets, yield a fluffier interior and a crispier exterior, making them ideal for oven chips.
- Skipping the preheating step: Putting the chips in an unpreheated oven can result in uneven cooking. Preheating ensures that the chips start cooking immediately, promoting better browning and crisping.
- Overcrowding the baking tray: Placing too many chips on a single tray can trap steam and lead to soggy results. Spacing them out allows hot air to circulate, ensuring even cooking and crispiness.
- Not drying the potatoes: If the potato slices are not dried thoroughly after soaking, excess moisture can prevent them from becoming crispy. Patting the slices dry with a kitchen towel helps remove moisture, allowing them to roast properly.
- Inadequate seasoning: Failing to season the chips well can result in bland flavor. A generous sprinkle of salt and other spices enhances the taste, turning simple chips into a delicious snack.
- Ignoring flipping halfway through: Not flipping the chips during baking can lead to uneven cooking, with one side becoming overly brown while the other remains pale. Turning them halfway through ensures both sides get equally crispy and golden.
How Can You Store and Revive Leftover Homemade Oven Chips?
To effectively store and revive leftover homemade oven chips, consider the following methods:
- Cooling and Storing: It’s essential to allow your homemade oven chips to cool completely before storing them. This prevents moisture buildup, which can make them soggy. Place the cooled chips in an airtight container or a resealable plastic bag and store them in the refrigerator for up to three days.
- Reheating in the Oven: The best way to revive leftover oven chips is to reheat them in the oven. Preheat your oven to 400°F (200°C) and spread the chips evenly on a baking tray. Bake for about 10-12 minutes or until they are crispy and heated through, giving them a fresh taste and texture.
- Using an Air Fryer: If you have an air fryer, it’s an excellent tool for reheating leftover chips. Set the air fryer to 350°F (175°C) and place the chips in a single layer in the basket. Air fry for about 5-7 minutes, shaking the basket halfway through to ensure even crispiness.
- Microwave with Caution: While it’s possible to reheat chips in the microwave, it’s not recommended as it can lead to a chewy texture rather than a crispy one. If you choose this method, place the chips on a microwave-safe plate and heat in short intervals of 20-30 seconds, checking frequently to prevent them from becoming rubbery.
- Freezing for Long-Term Storage: For longer storage, you can freeze leftover homemade oven chips. Spread the cooled chips in a single layer on a baking sheet and freeze until solid. Once frozen, transfer them to a freezer-safe bag or container, where they can last for up to three months. Reheat directly from frozen in the oven or air fryer for best results.
What Variations of Homemade Oven Chips Can Elevate Your Snack Game?
The best homemade oven chips can be enhanced with various techniques and ingredients to create exciting flavor profiles.
- Herbed Garlic Chips: These chips are infused with fresh herbs like rosemary and thyme, along with roasted garlic for a savory twist. The combination of herbs and garlic not only adds depth but also elevates the overall taste, making them perfect for dipping in sauces or enjoying on their own.
- Spicy Chili Lime Chips: A sprinkle of chili powder and a squeeze of fresh lime juice give these chips a zesty kick. The heat from the chili contrasts beautifully with the tanginess of the lime, creating a refreshing and exciting snack that’s ideal for those who enjoy bold flavors.
- Cheesy Parmesan Chips: Tossing the chips in a blend of grated Parmesan cheese and Italian seasoning before baking creates a rich and cheesy flavor. The cheese crisps up as the chips bake, adding a delightful crunch and making them irresistible for cheese lovers.
- Sweet Cinnamon Sugar Chips: For a dessert twist, coating the chips in a mixture of cinnamon and sugar can transform them into a sweet treat. This variation is perfect for satisfying a sweet tooth and pairs wonderfully with a scoop of ice cream or yogurt.
- Smoky Paprika Chips: Adding smoked paprika to the seasoning mix gives these chips a unique, smoky flavor that is reminiscent of barbecue. The smoky notes enhance the potato’s natural flavor, making them a great companion for grilled meats or as a standalone snack.
- Vegan Pesto Chips: Tossing the chips with a homemade or store-bought vegan pesto before baking infuses them with a rich, herby flavor. The basil and garlic in the pesto create an aromatic experience that pairs well with a variety of dips.