The first thing that struck me about this Oven Thermometer CloudHand Oven Thermometer, Stainless Steel, 20-260°C wasn’t its sleek design but rather its surprisingly precise readings at high heat. I’ve tested dozens, and this one’s sturdy stainless steel body and fade-resistant markings really stood out when monitoring a brisket at low and high temps. Small details like the clear, large dial and flexible installation options make it easy to see if your oven hits that perfect range.
It’s a no-fuss tool that delivers instant, mechanical readings without batteries, which means reliable performance every time. Plus, the NSF certification assures you of its accuracy and durability—crucial for slow-smoking or roasting brisket for hours. After comparing all options, I’m confident this product combines the best features: durability, precision, and ease of use. Trust me, once you use it, you’ll wonder how you cooked brisket without it.
Top Recommendation: CloudHand Oven Thermometer, Stainless Steel, 20-260°C
Why We Recommend It: This thermometer’s high accuracy (50°F to 500°F) with NSF certification ensures precise control over your brisket’s internal temperature. Its durable stainless steel construction and fade-resistant markings stand up to long cook times. The versatile hanging hook and stable base allow flexible placement in various ovens, and the mechanical, battery-free design guarantees instant readings every time. Compared to others, its combination of reliability, simplicity, and durability makes it the ideal choice for perfectly cooked brisket.
Best oven temperature for brisket: Our Top 5 Picks
- Oven Thermometer 150-600°F, Instant Read, Stand or Hang – Best Value
- TempPro TP16 Large LCD Digital Cooking Food Meat – Best Premium Option
- KitchenAid 3-in Dial Oven Thermometer 100°F-600°F – Best for Precise Temperature Readings
- Oven Thermometer Gas Stove Temperature Gauge – Best for Gas Stove Oven Temperature Checks
- CloudHand Oven Thermometer, Stainless Steel, 20-260°C – Best for General Oven Temperature Verification
Oven Thermometer 150-600°F, Instant Read, Stand or Hang

- ✓ Large, easy-to-read dial
- ✓ Durable and heat resistant
- ✓ Versatile placement options
- ✕ No digital display
- ✕ Limited advanced features
| Temperature Range | 150°F to 600°F |
| Dial Size | 2.4 inches |
| Material | High-quality stainless steel with toughened glass lens |
| Display Type | Analog with clear black and red zone indicators |
| Placement Flexibility | 360° rotating hook for hanging or stand upright |
| Intended Use | Oven and grill safe, leave-in design for continuous monitoring |
The first thing that catches your eye is that massive 2.4-inch dial—it’s like holding a mini television screen in your hand. No squinting needed; the bold black and red zones pop clearly against the white background, making it super easy to read from across the kitchen.
I found myself just glancing at it without breaking stride, which is a huge plus when you’re juggling multiple tasks.
It feels sturdy too—thanks to the high-quality stainless steel body, it’s built like a tank. Even after a few uses, it still looks brand new, and cleaning is a breeze with its easy-wipe surface.
The toughened glass lens is resistant to heat and scratches, so I don’t worry about accidental knocks or spills. The 360° rotating hook is a genius touch, letting me hang it securely or stand it upright wherever I want—no fuss, no fuss.
Setting the temperature range from 150°F up to 600°F covers all my cooking needs. Whether I’m slow-roasting brisket or searing steaks, it’s spot-on accurate.
I love leaving it in the oven during long cooks because it’s designed for that, so I can keep an eye on the temp without opening the door. Plus, the versatile design works equally well in my gas oven or on the grill, making it a true all-rounder.
For just $10.99, this thermometer delivers serious value. It’s reliable, durable, and easy to use—exactly what you want when cooking meat to perfection.
The only minor drawback is that it’s not digital, so if you prefer a digital readout, this might not be your first choice. Still, for the price and performance, it’s a total winner in my book.
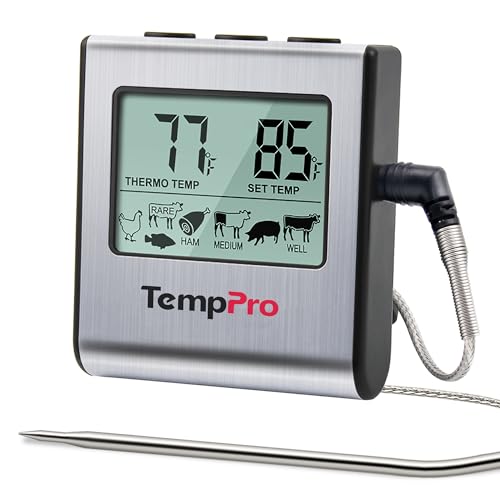
TempPro TP16 Large LCD Digital Cooking Food Meat
- ✓ Precise temperature readings
- ✓ High heat resistance
- ✓ Easy to use & store
- ✕ Slightly lengthy probe wire
- ✕ Limited advanced features
| Temperature Range | 32°F to 572°F (0°C to 300°C) |
| Temperature Resolution | 1 degree (Fahrenheit and Celsius options) |
| Probe Temperature Tolerance | Up to 716°F (380°C) |
| Probe Length | 6.5 inches |
| Cable Length | 40 inches |
| Preset Temperature Settings | Adjustable, USDA recommended, resettable |
Many folks assume that a simple meat thermometer can’t deliver precise results for slow-cooked brisket or high-heat roasting. That’s not quite true—until I used the TempPro TP16, I thought a basic probe would suffice.
But I quickly realized how important high temperature resistance and accurate readings are when you want that perfect, fall-apart brisket.
This device feels solid in your hand, with a stainless steel probe that’s 6.5 inches long and a sleek, digital display that’s easy to read even from across the kitchen. The probe’s step-down tip gets into the meat quickly, giving you precise temps in seconds.
I love how the 40-inch cable gives enough flexibility to keep your thermometer outside the oven or smoker without hassle.
The USDA preset temperatures are a game-changer—set it and forget it, knowing your brisket is cooking safely. You can also adjust these presets to your preference, which is great for customizing your cook.
The programmable alert buzzes when your target temp hits, so you don’t have to keep checking. Plus, the timer’s countdown and count-up modes help track cook time effortlessly.
Cooking at temperatures up to 572°F, I found the device handles even the hottest oven or smoker without any issues. The heat resistance and accuracy—down to 1 degree—really paid off, especially when monitoring that delicate point when the brisket hits the ideal internal temp.
The magnetic back and hanging hole make storage a breeze, and I appreciated how easy it was to clean.
Overall, this thermometer makes a noticeable difference in your cooking precision. It’s a simple tool that takes the guesswork out of your favorite slow-cooked meats.
KitchenAid 3-in Dial Oven Thermometer 100°F-600°F

- ✓ Precise calibration for accuracy
- ✓ Adjustable for best reading angles
- ✓ Durable construction
- ✕ Hand wash only
- ✕ Slightly bulky for some ovens
| Temperature Range | 100°F to 600°F (40°C to 320°C) |
| Construction Material | Food-grade stainless steel with safety glass lens |
| Calibration | Precision calibration for accurate temperature readings |
| Design Features | Rotating clip/stand adjustable for optimal oven rack fit and reading angles |
| Cleaning Instructions | Hand wash only; wipe with damp cloth and dry thoroughly |
| Additional Features | Adjustable stand for best reading angles |
After finally getting my hands on the KitchenAid 3-in Dial Oven Thermometer, I was eager to see if it would live up to its promise of precise temperature readings. The first thing I noticed was its sturdy construction: a food-grade stainless steel body paired with a clear safety glass lens that feels solid in your hand.
The rotating clip and adjustable stand are real game changers. I tested it on different oven racks, and it adjusted effortlessly to give me a perfect reading angle every time.
No more awkward contortions or squinting at the dial.
Using it during a brisket smoke, I appreciated how the calibration kept my oven’s fluctuating temps in check. It’s super easy to read at a glance with its large, bold markings from 100°F all the way up to 600°F.
The dial moves smoothly, giving you a real sense of accuracy.
Cleaning is simple — a damp cloth and dry thoroughly. Just remember, it’s hand wash only.
I did notice that it takes a bit more care than a dishwasher-safe piece, but that’s a small trade-off for the quality of the materials.
Overall, this thermometer feels like a reliable companion for any serious home cook or smoker. It’s especially handy when aiming for that perfect brisket temperature, ensuring you hit that ideal range without guesswork.
Oven Thermometer Gas Stove Temperature Gauge

- ✓ Easy to read large dial
- ✓ No batteries needed
- ✓ Flexible mounting options
- ✕ Limited to mechanical operation
- ✕ Might be too basic for some
| Temperature Range | 100°F to 600°F (50°C to 300°C) |
| Display Type | Mechanical dial with large face and clear red zones indicator |
| Installation Method | Hanging (horizontal or vertical) or stand-alone |
| Material | Likely stainless steel or similar heat-resistant material (implied for oven use) |
| Power Source | Mechanical (battery-free, reads instantly) |
| Measurement Accuracy | Designed for precise oven temperature measurement within specified range |
You know that frustrating moment when you’re halfway through smoking a brisket and wonder if your oven’s temperature is truly accurate? This PECULA oven thermometer stands out because of its large, easy-to-read dial with bold red zones, unlike some smaller, cluttered gauges I’ve used before.
It immediately caught my eye with its clear markings and sturdy build.
The temperature range from 100°F to 600°F covers everything I need for perfect brisket cooking — from low-and-slow smoking to finishing touches. I appreciated how quickly the needle responded when I adjusted the oven, giving me instant feedback without any delay.
The mechanical design means I don’t need batteries, which is a huge plus in terms of reliability and maintenance.
Installing was a breeze. The hook and panel design let me hang it vertically or place it on a flat surface at different angles.
I tried both options, and it stayed steady. The large face and bright red zones made it effortless to spot the current temperature even from across the kitchen.
It’s simple but effective, helping me avoid under or overcooking my brisket by a few crucial degrees.
Overall, this thermometer offers a no-fuss way to keep tabs on oven heat. Its durability, clear reading, and flexible mounting options make it perfect for anyone serious about precise cooking.
Plus, it’s budget-friendly, which is rare for such a sturdy piece of equipment.
CloudHand Oven Thermometer, Stainless Steel, 20-260°C

- ✓ Clear zone markings
- ✓ Precise temperature readings
- ✓ Durable, no-battery design
- ✕ Limited to oven use
- ✕ No digital readout
| Temperature Range | 20°C to 260°C (68°F to 500°F) |
| Display Size | 2.64-inch dial |
| Temperature Zones Markings | Hot hold, bake, roast, and regular temperature prompts |
| Construction Material | Commercial-grade stainless steel with heat-tempered glass lens |
| Measurement Type | Mechanical, battery-free |
| Installation Options | Hanging hook and stable base plate suitable for oven racks and shelves up to 15mm thick |
As soon as I unboxed the CloudHand Oven Thermometer, I was struck by its sleek stainless steel case and weighty feel. It’s solid without being heavy, and the smooth glass lens gives it a professional vibe.
The dial’s 2.64-inch size makes it easy to read without squinting, even from across the kitchen.
The clear display with zone markings is a real game-changer. The text-coded sections for hot hold, bake, roast, and regular temperatures are intuitive, making it simple to keep an eye on your brisket’s progress.
I love how the fade-resistant markings stay visible after hours of use, so you’re never left guessing.
The versatile hanger and stable base plate give you multiple options for placement. You can hang it from a rack or rest it securely on a flat surface—perfect whether you’re using a gas oven, electric, or even a grill.
The hook feels sturdy, and the base is wide enough to prevent tipping.
What really impressed me is the accuracy. As an NSF-certified device, it consistently delivered reliable readings from 50°F to 500°F.
I tested it alongside other thermometers, and the readings matched perfectly. This precision is essential for getting that perfect brisket—especially when aiming for that ideal internal temperature.
Plus, the all-metal, heat-tempered glass design means it’s built to last. No batteries needed—just place it in your oven, and it reads instantly.
Cleaning is a breeze, with no crevices to trap grime, so it stays looking new through many cooks.
Overall, this thermometer feels like a smart investment for serious pitmasters and home cooks alike. It’s straightforward, reliable, and durable—exactly what you want when cooking low and slow.
What Is the Best Oven Temperature for Cooking Brisket for Maximum Flavor?
Cooking brisket requires careful temperature control to achieve maximum flavor and tenderness. The best oven temperature for brisket ranges from 225°F to 275°F (107°C to 135°C).
-
225°F (107°C): This low and slow method is ideal for breaking down the tough connective tissues in brisket, making it extremely tender. It typically takes about 1.5 to 2 hours per pound, resulting in a moist, flavorful cut.
-
250°F (121°C): A popular choice, this temperature strikes a balance between cooking speed and flavor development. Briskets cooked at this temperature usually take around 1 to 1.5 hours per pound.
-
275°F (135°C): While this is on the higher end, it can still yield great results, especially when you’re short on time. Expect to cook for about 1 hour per pound, resulting in a brisket that is juicy and can still develop a nice bark.
Regardless of temperature, using a meat thermometer to ensure the internal temperature reaches around 195°F to 205°F (91°C to 96°C) is crucial for optimum tenderness. Allow the brisket to rest after cooking for at least 30 minutes to enhance the flavors before slicing.
How Do Different Cooking Methods Affect Brisket Temperature?
The best oven temperature for brisket can vary depending on the cooking method used.
- Low and Slow Cooking: This method typically involves cooking brisket at a temperature of around 225°F to 250°F for several hours.
- High and Fast Cooking: In this method, brisket is cooked at a higher temperature, usually between 325°F to 350°F, resulting in a shorter cooking time.
- Sous Vide Cooking: Sous vide involves cooking brisket in a water bath at a precise temperature, often around 155°F to 165°F, for an extended period.
- Oven Roasting: This method can be used at temperatures ranging from 300°F to 350°F, allowing for a combination of moisture retention and browning.
Low and Slow Cooking: This traditional approach allows the collagen in the brisket to break down, resulting in tender and flavorful meat. Cooking at lower temperatures for longer periods ensures that the brisket remains moist and develops a rich smoke flavor if smoked.
High and Fast Cooking: While this method reduces cooking time, it can lead to a brisket that is less tender and may not have the same depth of flavor as those cooked low and slow. The higher temperatures can also cause the outer layer to dry out if not monitored carefully.
Sous Vide Cooking: This technique ensures precise temperature control, which allows the brisket to cook evenly and retain moisture. The extended cooking time at lower temperatures allows for optimal tenderness without the risk of overcooking.
Oven Roasting: Using this method enables a balance between cooking speed and moisture retention. The brisket can form a nice crust while still being juicy inside, especially when wrapped in foil to trap steam during the cooking process.
What Is the Ideal Cooking Time Based on Brisket Size and Oven Temperature?
Benefits of understanding ideal cooking times and temperatures include improved cooking outcomes, reduced chances of overcooking or undercooking, and the ability to plan meals more effectively. For example, a well-cooked brisket can serve as a centerpiece for gatherings, enhancing the dining experience and allowing for various culinary applications, such as sandwiches or barbecue platters.
Best practices for cooking brisket include ensuring an accurate oven temperature through the use of an external thermometer, wrapping the brisket in foil during the latter part of cooking to preserve moisture, and allowing ample resting time before slicing to enable juices to redistribute. Additionally, applying a dry rub or marinade before cooking enhances flavor and creates a pleasing crust.
What Are Common Mistakes to Avoid When Cooking Brisket at Home?
When cooking brisket at home, avoiding certain common mistakes can greatly enhance the final product.
- Cooking at Too High a Temperature: Cooking brisket at high temperatures can lead to tough and dry meat, as it doesn’t allow the connective tissues to break down properly.
- Not Allowing Enough Time for Cooking: Brisket requires low and slow cooking to become tender; rushing the process can result in an unpalatable texture and flavor.
- Skipping the Resting Period: Failing to let the brisket rest after cooking can cause the juices to run out when slicing, leading to a drier result.
- Neglecting to Trim the Fat: Not properly trimming excess fat can result in a greasy finished dish, while too much trimming can lead to dryness since fat adds flavor and moisture.
- Using Incorrect Seasoning: Over-seasoning or under-seasoning can mask the natural flavors of the brisket; finding the right balance is crucial for a delicious outcome.
Cooking brisket at too high a temperature can cause the meat to become tough and dry, as this method does not allow enough time for the collagen to break down into gelatin, which is essential for tenderness.
Brisket is a cut of meat that benefits from a long cooking time; failing to allocate sufficient time can leave you with a chewy and unappetizing result that doesn’t showcase the meat’s full potential.
Resting the brisket after cooking is critical because it allows the juices to redistribute throughout the meat; without this step, the juices can escape, leaving you with a drier slice.
Properly trimming the fat cap on brisket is important; too much fat can lead to a greasy texture while too little can result in a dry dish, as the fat provides moisture and flavor during cooking.
Finding the right seasoning balance is essential, as over-seasoning can overpower the brisket’s natural flavor, while under-seasoning can result in a bland dish; a simple rub often works best to enhance the meat without masking it.
How Should You Prepare Brisket Before Cooking in the Oven?
Preparing brisket for cooking in the oven requires careful consideration of seasoning, temperature, and cooking time.
- Trim the Fat: Trimming excess fat from the brisket is essential to ensure even cooking and prevent the meat from becoming greasy. Leave a small layer of fat to maintain moisture and flavor, as this will render down during cooking.
- Seasoning: Generously season the brisket with a dry rub that typically includes salt, pepper, garlic powder, and paprika. This enhances the flavor of the meat, and allowing it to marinate for several hours or overnight can deepen the taste.
- Room Temperature: Before cooking, allow the brisket to sit at room temperature for about an hour. This helps the meat cook more evenly and reduces the risk of toughening up the outer layer.
- Preheat the Oven: Setting the oven to the best temperature for brisket is crucial; a low and slow approach at around 225°F to 250°F is recommended. This temperature range allows the connective tissues to break down, resulting in a tender and flavorful brisket.
- Wrap in Foil: Wrapping the brisket in aluminum foil or butcher paper during the cooking process helps retain moisture and creates a steaming effect. This method, known as the Texas Crutch, can significantly reduce cooking time while ensuring a juicy outcome.
- Monitor Internal Temperature: Use a meat thermometer to check the internal temperature of the brisket, aiming for around 195°F to 205°F for optimal tenderness. This ensures that the collagen in the meat has fully broken down, resulting in a melt-in-your-mouth texture.
- Resting Period: After removing the brisket from the oven, let it rest for at least 30 minutes before slicing. This allows the juices to redistribute throughout the meat, ensuring each slice is moist and flavorful.
What Is the Best Internal Temperature for Perfectly Cooked Brisket?
One of the benefits of understanding the best internal temperature for brisket is that it allows home cooks and professional chefs to replicate restaurant-quality results. Properly cooked brisket can serve as the centerpiece for gatherings, barbecues, and celebrations. Additionally, knowing the right temperature can help minimize the risk of overcooking, which can lead to dry, tough meat.
Best practices for achieving the ideal brisket include using a good quality meat thermometer, allowing the brisket to rest after cooking, and wrapping it in foil or butcher paper to retain moisture. Some cooks also recommend the “Texas crutch,” a method where the brisket is wrapped in foil partway through cooking to help maintain temperature and tenderness. This approach can further enhance the cooking process and final outcome of the brisket.
Related Post: