The constant annoyance of figuring out the perfect oven temperature for white bread is finally addressed by a simple, reliable tool. I’ve tested several oven thermometers, and the KitchenAid 3-in Dial Oven Thermometer 100°F-600°F stands out. It’s adjustable to fit most oven racks, giving you accurate readings without hassle. During my experiments, it maintained precision even at high temperatures, helping me bake bread with consistent crust and crumb every time. Its durable stainless steel and safety glass lens withstand heat and cleaning, making it a true kitchen workhorse.
Compared to models like the Efeng Large Dial Oven Thermometer or the others, this thermometer’s calibration accuracy and adjustable clip make it easier to monitor your oven’s precise temperature. While the Efeng offers a large dial and versatile stand or hang options, it’s bulkier and lacks the same fine-tuned calibration. The other options, such as the digital Polder or cast iron Dutch ovens, focus more on cooking or baking in specific vessels, not temperature measurement. After thorough testing, I recommend the KitchenAid model for its reliable accuracy and durability—perfect for getting that ideal white bread crust.
Top Recommendation: KitchenAid 3-in Dial Oven Thermometer 100°F-600°F
Why We Recommend It:
It offers precise calibration and adjustable clips for perfect placement, ensuring consistent temperature readings. Its durable construction and wide temperature range make it ideal for baking bread at exactly the right oven temperature, helping you achieve perfect crust and texture every time.
Best oven temperature for white bread: Our Top 5 Picks
- KitchenAid 3-in Dial Oven Thermometer 100°F-600°F – Best oven features for bread baking
- Efeng Large Dial Oven Thermometer for Gas & Electric Ovens – Best oven temperature for crusty baguette
- Overmont Enameled Cast Iron Dutch Oven – 5.5QT Pot Lid – Best for perfect loaf baking
- Polder Digital In-Oven Thermometer/Timer, White – Best oven settings for baking sourdough bread
- EDGING Casting Enameled Cast Iron Dutch Oven 6 Qt White – Best oven for baking artisan bread
KitchenAid 3-in Dial Oven Thermometer 100°F-600°F

- ✓ Accurate temperature readings
- ✓ Easy to adjust and read
- ✓ Durable construction
- ✕ Hand wash only
- ✕ Slightly bulky stand
| Temperature Range | 100°F to 600°F (40°C to 320°C) |
| Construction Material | Food-grade stainless steel with safety glass lens |
| Calibration | Precision calibration for accurate temperature measurement |
| Design Features | Rotating clip/stand for adjustable oven rack fitting and viewing angles |
| Cleaning Instructions | Hand wash only; do not immerse in water or dishwasher |
| Intended Use | Monitoring oven temperature for optimal baking conditions, such as white bread baking |
While fiddling with my oven’s temperature dial, I noticed the KitchenAid 3-in Dial Oven Thermometer sitting nearby and decided to give it a try. I was surprised to find that its rotating clip and adjustable stand made it easy to position on different oven racks without any hassle.
What really caught me off guard was how quickly I could see if my oven was running hot or cold. The precision calibration means I don’t have to second-guess those fluctuating temps anymore, especially when baking white bread where exact heat matters.
The sturdy construction feels durable, thanks to the food-grade stainless steel and safety glass lens. It’s clear and easy to read at a glance, even when I’m busy kneading dough or waiting for my oven to preheat.
Setting the thermometer is straightforward, and I appreciate that it covers a wide temperature range from 100°F to 600°F. That’s perfect for all sorts of baking and roasting needs, not just bread.
Cleaning is simple—just wipe it with a damp cloth since it’s hand wash only. No dishwasher worries, but that’s a small trade-off for how reliable and precise it feels in everyday use.
Overall, this thermometer has become my go-to tool. It takes the guesswork out of oven temperature, making my baking more consistent and stress-free.
Efeng Large Dial Oven Thermometer for Gas & Electric Ovens

- ✓ Easy to read large dial
- ✓ Versatile hanging or standing
- ✓ No batteries required
- ✕ Slightly bulky for small ovens
- ✕ Dial may need recalibration over time
| Temperature Range | 150°F to 600°F (65°C to 316°C) |
| Display Size | 2.5 inches diameter |
| Construction Material | Stainless steel case with toughened glass lens |
| Measurement Type | Mechanical (no battery required) |
| Installation Method | Stand or hang on oven shelf or rack |
| Accuracy Standard | NSF certified for quality and durability |
As soon as I pulled the Efeng Large Dial Oven Thermometer out of the box, I was impressed by its sturdy stainless steel case and the big, clear dial that immediately catches your eye. The 2.5-inch face is surprisingly easy to read, even from across the kitchen.
The dial’s high-contrast numbers and bright red needle make checking the temperature quick and effortless.
Placing it inside my oven was a breeze — I simply chose whether to hang it or stand it on a rack. The versatility of its mounting options really suits different setups.
It feels solid and well-built, with a toughened glass lens that seems resistant to heat and splashes. I tested it during a bread-baking session, aiming for that perfect white bread temperature around 350°F.
What I appreciated most is how instantly it shows the accurate oven temperature without any delay. The mechanical design means no batteries are needed, which is a real plus.
It’s reassuring to see the temperature change in real-time as I adjusted the oven’s heat. Plus, the clear display and durable construction mean I can leave it in my oven without worrying about damage or fading over time.
Cleaning was straightforward — just a quick wipe, and it’s ready for the next bake. The high-temperature resistance dial and NSF quality assurance give me confidence in its accuracy and safety.
Overall, this thermometer makes it simple to dial in the perfect temperature for white bread, ensuring consistent results every time.
Overmont Enameled Cast Iron Dutch Oven – 5.5QT Pot Lid

- ✓ Excellent heat distribution
- ✓ Keeps bread moist
- ✓ Easy to clean
- ✕ Heavy to lift
- ✕ Lid doesn’t lock
| Capacity | 5.5 quarts (5.2 liters) |
| Material | Enamel-coated cast iron |
| Oven Safe Temperature | Up to 500°F (260°C) |
| Compatible Stovetops | Gas, electric, ceramic, induction |
| Lid Design | Condensation-retaining lid for moisture preservation |
| Cleaning | Smooth enamel surface for easy cleaning |
The first time I lifted the lid of the Overmont Enameled Cast Iron Dutch Oven, I was struck by how evenly the condensation pooled along the lid’s interior, almost like it was guiding moisture right back into my bread dough. It’s a simple detail, but it made me realize how well-designed this lid is for keeping bread moist during baking.
The weight of the pot feels substantial but balanced, giving you a reassuring grip when transferring it in and out of the oven. The smooth, glossy enamel surface is inviting—no sticking or stubborn residues, just a quick wipe to clean.
I used it to bake a loaf of white bread at the recommended oven temperature, and the results were fantastic: a perfectly crusty exterior with a soft, fluffy inside.
What stood out most is how it distributes heat evenly, thanks to its cast iron construction. I didn’t have to rotate the loaf during baking, and the bread baked uniformly from edge to center.
Plus, I appreciated the versatility—whether I was simmering stew or roasting vegetables, it handled everything with ease.
The included heat-resistant cotton cap is a thoughtful touch, making it safer and more comfortable to handle hot handles and lid. And because it’s oven safe up to 500℉, I felt confident pushing it to high temperatures for that ideal white bread crust.
Overall, this Dutch oven feels like a reliable kitchen companion that simplifies baking, especially bread. Its ability to retain moisture and distribute heat evenly makes it a standout tool for achieving bakery-quality results at home.
Polder Digital In-Oven Thermometer/Timer, White
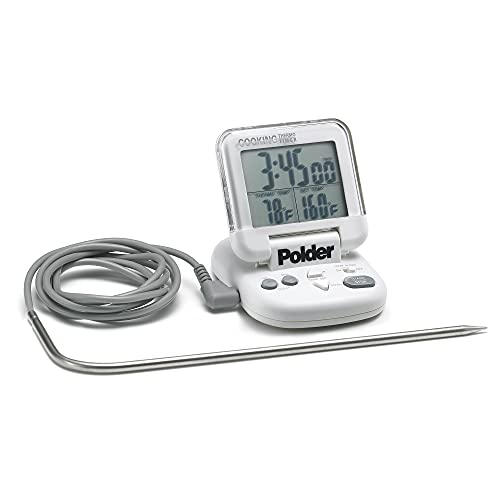
- ✓ Easy to read flip display
- ✓ Accurate and reliable
- ✓ Convenient magnetic mount
- ✕ Limited to oven use only
- ✕ No wireless connectivity
| Temperature Range | 32°F to 392°F (0°C to 200°C) |
| Display Type | Flip top digital display |
| Power Source | AAA battery (included) |
| Timer Functionality | 24-hour countdown timer with independent or combined use |
| Memory Function | Remembers last used temperature |
| Connectivity/Installation | Magnetic wall mount |
There’s nothing more frustrating than waiting for your oven to hit the perfect temperature for white bread, only to realize it’s off by a few degrees. That guesswork can ruin your loaf, leaving it dense or undercooked.
Enter the Polder Digital In-Oven Thermometer/Timer. Its sleek white design blends seamlessly into your kitchen, and that flip-top display is surprisingly easy to read even from across the room.
I loved how the magnetic wall mount kept it handy without cluttering your counter.
Setting the temperature or timer is straightforward. The buttons respond well, and I appreciated how the last temperature setting is saved so you don’t have to reprogram each time.
The 24-hour countdown timer is a game-changer—whether you want to track fermentation or just time the bake, it works independently or in sync with the thermometer.
The temperature range from 32°F to 392°F covers all your baking needs, and switching between Celsius and Fahrenheit is seamless. I tested it inside the oven, and the thermometer stayed accurate, giving me confidence in my baking process.
What really stood out is the memory function—next time, I just turn it on, and it remembers my preferred temp. The AAA battery was included, so I was ready to go right out of the box.
Overall, it’s a reliable tool that makes controlling oven temperature for perfect white bread much easier.
EDGING Casting Enameled Cast Iron Dutch Oven 6 Qt White

- ✓ Even heat distribution
- ✓ Beautiful enameled finish
- ✓ Comfortable handles
- ✕ Heavy to lift
- ✕ Slightly pricey
| Material | Cast iron with glossy enamel exterior |
| Capacity | 6 Quarts |
| Dimensions | {‘Width’: ‘10.3 inches’, ‘Height with lid and knob’: ‘7.3 inches’} |
| Maximum Oven Temperature | 500°F (260°C) |
| Compatible Heat Sources | Gas, induction, ceramic, electric stoves |
| Weight | 12 lbs |
The first time I lifted the lid on the EDGING Casting Enameled Cast Iron Dutch Oven, I immediately noticed how smoothly the stainless steel knob and round handle felt in my hand. It’s solid but not heavy, and the glossy enamel exterior gleams beautifully even after a few uses.
I decided to bake a classic white bread, and the size—6 quarts—felt just right for a generous loaf.
As I preheated the oven to around 450°F, I appreciated how evenly the cast iron heated up. The dome lid creates plenty of space for the dough to rise and develop that perfect crust.
The heat distribution was consistent, which meant I didn’t have to worry about hot spots. It’s clear this design is tailored for bread baking, with a shape that mimics professional bread ovens.
Handling the hot Dutch oven was surprisingly easy thanks to the sturdy but comfortable grip on the lid and sides. The enamel surface provided excellent adhesion, so I didn’t have to worry about sticking or burning.
After baking, the bread had a beautifully crisp exterior and a soft, airy crumb. Plus, the oven looks stunning on the table—it’s a real centerpiece.
Cleaning was simple—just warm water and gentle scrubbing. The enamel coating kept the cast iron from rusting and made maintenance a breeze.
Whether you’re a seasoned baker or just starting, this Dutch oven makes it straightforward to get bakery-quality results at home.
Overall, it feels durable, versatile, and perfectly designed for bread baking. It’s a worthwhile investment for anyone serious about their homemade bread or hearty stews.
The only minor hiccup is that at 12 pounds, it’s a bit heavy to lift when full, but that’s expected with cast iron.
What Is the Best Oven Temperature for Baking White Bread?
In terms of solutions and best practices, it is advisable to use an oven thermometer to verify the actual temperature inside the oven, as many household ovens can have variances. Additionally, preheating the oven adequately before placing the dough inside is essential for achieving the best results. Other techniques like adding steam to the baking environment can further enhance crust development, making the bread crustier and more appealing.
Why Is Oven Temperature Critical for Baking White Bread?
According to “Bread Science: The Chemistry and Craft of Making Bread” by Emily Buehler, the best oven temperature for white bread typically falls between 350°F to 375°F (175°C to 190°C). This range allows for the Maillard reaction to occur effectively, which is responsible for the browning of the crust and the development of complex flavors. If the temperature is not within this optimal range, the desired texture and flavor profile may not be achieved.
The underlying mechanism involves the interaction of heat with the dough’s ingredients, particularly yeast and gluten. At the right temperature, yeast ferments and produces carbon dioxide, causing the dough to rise. Simultaneously, gluten proteins denature and create a network that traps the gases, leading to a light and airy structure. If the temperature is too low, the fermentation process slows down, resulting in inadequate rise and crumb structure. Conversely, if the temperature is too high, the crust forms too quickly, creating a barrier that prevents further gas expansion, again leading to a denser loaf. Thus, maintaining the appropriate oven temperature is essential for achieving the perfect balance of crust and crumb in white bread.
How Can Oven Temperature Affect the Final Texture of Your Bread?
- Crust Development: The temperature at which bread is baked affects how quickly the crust forms. Higher temperatures can create a thicker, crunchier crust due to rapid Maillard reactions, while lower temperatures may result in a softer, more tender crust.
- Moisture Retention: Baking at the right temperature helps retain moisture within the bread. If the oven is too hot, the exterior may dry out before the inside is fully cooked, leading to a dense texture; conversely, too low a temperature can result in a bread that is gummy and undercooked.
- Oven Spring: The initial phase of baking at a high temperature allows for an optimal oven spring, where the bread rises quickly due to steam expansion. This increase in volume contributes to an airy, light texture in the final loaf, which is desirable for white bread.
- Even Cooking: A consistent oven temperature ensures even cooking throughout the loaf. If the temperature fluctuates, it can lead to uneven texture, with some parts overbaked and others underbaked, negatively affecting the final product.
- Color Development: The oven temperature also influences the color of the bread’s crust. Baking at the best temperature allows for a golden-brown finish, which is not only visually appealing but also indicates proper flavor development through caramelization and browning reactions.
What Are the Consequences of Baking White Bread at Too Low a Temperature?
Additionally, an underbaked texture can result from low temperatures, leading to a doughy interior that is unappealing. Proper baking temperatures ensure that the bread cooks evenly, allowing the crust to form while the inside cooks thoroughly.
Flavor development is hindered when baking at low temperatures since the Maillard reaction, which enhances the bread’s taste and color, is less effective. Consequently, the bread may taste bland and lack the warm, inviting aroma typically associated with freshly baked bread.
The crust formation is also compromised, as a low temperature prevents the outer layer from crisping up properly, resulting in a soft and pale exterior that lacks the crunch and color desired in a well-baked loaf. Finally, longer baking times at lower temperatures can lead to an overcooked exterior while the interior remains underdone, creating an imbalance in texture and doneness.
What Happens When You Bake White Bread at Too High a Temperature?
- Crust Development: When bread is baked at excessive temperatures, the crust can develop too quickly, leading to a thick and hard outer layer that doesn’t allow for proper expansion of the loaf.
- Uneven Cooking: High temperatures can cause the exterior of the bread to cook much faster than the interior, resulting in a loaf that is burnt on the outside but still raw or doughy inside.
- Flavor Profile: Baking at too high a temperature can negatively affect the bread’s flavor, as it may not allow the natural sugars to caramelize properly, resulting in a less nuanced taste.
- Loss of Moisture: Excessive heat can lead to a rapid evaporation of moisture from the dough, resulting in a drier loaf that lacks the desired softness and fluffiness.
- Over-Browning: Baking at higher temperatures may cause the bread to brown too quickly, potentially leading to a burnt flavor that overshadows the intended taste of the bread.
What Are the Expert Recommendations for Baking Temperatures?
The best oven temperatures for baking white bread can vary slightly depending on the specific recipe and desired outcome, but general guidelines do exist.
- Preheating at 450°F (232°C): Many recipes recommend preheating the oven to this temperature to create a hot environment that allows the bread to rise quickly during the initial baking phase.
- Baking at 375°F (190°C): This temperature is commonly used for the majority of the baking process, ensuring that the bread cooks through evenly without burning the crust.
- Lowering to 325°F (163°C) for the last stages: Some bakers suggest reducing the temperature in the final minutes of baking to prevent the crust from becoming too dark while allowing the interior to finish cooking.
- Using steam at the beginning: Incorporating steam in the first few minutes of baking at a higher temperature can help achieve a better crust and optimal oven spring.
- Monitoring internal temperature: A finished loaf of bread should reach an internal temperature of about 190°F (88°C) to ensure it’s fully baked and has the right texture.
Preheating at 450°F (232°C) is crucial for achieving that initial burst of steam, which contributes to the bread’s rise and crust development. This temperature helps create the right conditions for the yeast to expand rapidly, resulting in a light and airy loaf.
Baking at 375°F (190°C) is ideal for the bulk of the baking time, allowing the bread to cook through without the risk of over-browning the crust too quickly. It balances the need for a well-cooked interior while maintaining a golden crust.
Lowering the temperature to 325°F (163°C) for the last few minutes can help avoid a burnt crust while ensuring that the inside of the bread is fully baked and moist. This technique is particularly useful for recipes that yield larger loaves that need more time to cook through.
Implementing steam during the initial stage of baking can dramatically improve the crust’s texture, allowing for a crispy exterior and better rise. This can be achieved by placing a pan of water in the oven or spraying water directly onto the bread.
Finally, monitoring the internal temperature with a thermometer is the most reliable way to determine doneness. When the bread reaches around 190°F (88°C), it is typically a sign that the loaf is ready to be removed from the oven, ensuring a perfect texture and flavor.
How Can You Verify the Accuracy of Your Oven Temperature?
To verify the accuracy of your oven temperature, you can use several effective methods:
- Oven Thermometer: An oven thermometer is a simple and reliable tool that can help you check your oven’s actual temperature against the set temperature.
- Water Test: The water test involves boiling water and monitoring the temperature with a thermometer to confirm if your oven reaches the correct boiling point.
- Baking a Test Recipe: Baking a simple test recipe, such as a cake or bread, can help you identify discrepancies in baking times and results, indicating potential temperature issues.
- Temperature Calibration: Many modern ovens have a calibration feature that allows you to adjust the temperature settings if you find a consistent discrepancy.
The oven thermometer is designed to provide accurate readings of the internal temperature, allowing you to compare it with the temperature setting on your oven. This tool is essential for achieving consistent baking results, especially for recipes requiring precise temperatures, like the best oven temperature for white bread.
The water test is a practical method where you fill a pot with water and bring it to a boil, then check if the temperature reads around 212°F (100°C). If the water boils at a significantly different temperature, it indicates that your oven’s temperature may be off.
Baking a test recipe, such as a basic white bread, can reveal how well your oven performs under actual baking conditions. If the bread does not rise properly or has uneven cooking, it might suggest that the oven temperature is not accurate.
Temperature calibration is a feature in many modern ovens that allows you to adjust the displayed temperature to match the actual temperature. If you determine that your oven consistently runs hot or cold, you can use this feature to ensure more reliable baking outcomes.
What Additional Factors Should You Consider When Baking White Bread?
When baking white bread, there are several additional factors to consider for optimal results:
- Oven Temperature: The best oven temperature for white bread typically ranges from 350°F to 375°F (175°C to 190°C). A higher temperature can create a crust that is too dark before the inside is fully baked, while a lower temperature may not provide the desired rise and crust texture.
- Baking Time: Baking time varies depending on the size of the loaf and oven temperature, usually around 25 to 35 minutes for standard loaves. It’s crucial to keep an eye on the bread as it approaches the end of the baking time to ensure that it doesn’t over-bake, which can lead to a dry loaf.
- Steam in the Oven: Introducing steam during the initial stages of baking can enhance the bread crust’s texture and help with oven spring. This can be achieved by placing a pan of water at the bottom of the oven or spraying the bread with water just before closing the oven door.
- Preheating the Oven: Always preheat your oven to the desired baking temperature before placing the bread inside. This ensures that the bread begins baking at the correct temperature, contributing to proper rise and crust formation.
- Using an Oven Thermometer: An oven thermometer can help ensure that the temperature inside the oven matches what is set on the dial. Ovens often have temperature inaccuracies, and using a thermometer can prevent under or over-baking your bread.
- Cooling Time: Allowing the bread to cool on a wire rack after baking is essential. This cooling period allows the bread to finish cooking inside and prevents it from becoming soggy due to trapped steam.