Before testing the Elite Gourmet ETO236 Personal Compact 2 Slice Countertop oven, I never realized how crucial precise temperature control was for perfect toast. I’d often end up with uneven browning or burnt edges, wasting time and bread. This compact oven with adjustable controls between 200°F and 450°F made a real difference—toast comes out evenly golden every time, and it heats quickly with 650 watts of power.
What really impressed me is its versatility. The removable wire rack and non-stick pan let me toast, warm, or bake with ease—no fuss, no mess. Plus, the adjustable timer makes it simple to get perfect results for snacks or breakfast without overdoing it. It’s a straightforward, reliable choice that handles all my toast and light baking needs effortlessly—trust me, it’s a game-changer for small spaces and everyday use.
Top Recommendation: Elite Gourmet ETO236 Personal Compact 2 Slice Countertop
Why We Recommend It: This model stands out due to its adjustable temperature range (200°F-450°F), allowing fine control for ideal toasting. Unlike larger, more complex appliances, its compact size fits small kitchens without sacrificing performance. The inclusion of a removable wire rack and non-stick pan facilitates versatile use, and the 650-watt thermostat ensures even heat distribution. Overall, it offers the best combination of precise temp control, ease of use, and space efficiency—perfect for consistently excellent toast.
Best oven temperature to toast bread: Our Top 5 Picks
- Elite Gourmet ETO236 Personal Compact 2 Slice Countertop – Best for Compact Spaces
- Cuisinart Custom Classic Toaster Oven Broiler TOB-40N – Best for Broiling Steak
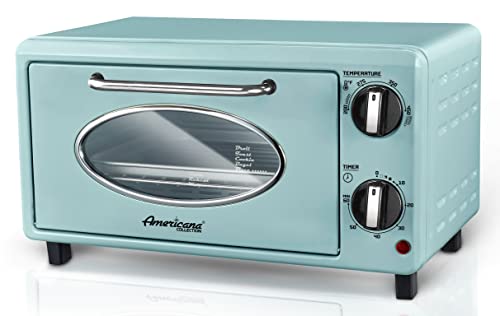
- Elite Gourmet Americana 50’s Retro Toaster Oven 2-Slice Mint – Best for Retro Style
- Elite Gourmet ETO2530M 25L Double French Door Toaster Oven – Best for Baking Cookies
- Proctor Silex 4-Slice Countertop Toaster Oven 1100W – Best Value
Elite Gourmet ETO236 Personal Compact 2 Slice Countertop

- ✓ Compact and space-saving
- ✓ Precise temperature control
- ✓ Even cooking performance
- ✕ Limited capacity
- ✕ No digital display
| Power | 650 Watts |
| Temperature Range | 200°F to 450°F |
| Timer | 15 minutes adjustable |
| Capacity | 2 slices of bread |
| Dimensions | Compact size suitable for small countertops |
| Included Accessories | Non-stick baking pan and wire rack |
As I slid the Elite Gourmet ETO236 onto my counter, I immediately appreciated how compact and sleek it looked. It’s surprisingly lightweight for its size, yet feels sturdy enough to handle daily use.
I grabbed a slice of bread, popped it in, and set the timer—instantly noticing how smooth and easy the dial turned to my preferred setting.
The adjustable temperature controls are a real highlight. I turned it up to 450°F for a crispy toast, and the even heat meant no burnt edges or underdone spots.
The 15-minute timer is just right for quick snacks, and I love how the oven maintains a consistent temperature thanks to the built-in thermostat.
Using the included accessories—like the non-stick pan and wire rack—was a breeze. I tried warming up leftovers and baking small snacks, and everything cooked evenly without fuss.
The compact design makes it perfect for my small kitchen, and I barely noticed it taking up space on the counter.
What stood out most is how versatile it is—from toasting bread to warming pastries or even small baking projects. The controls are straightforward, and the power is sufficient to handle multiple tasks quickly.
It’s a simple, no-fuss appliance that really delivers on its promise of quick, even cooking in a tiny footprint.
Overall, this tiny oven makes my mornings easier and more efficient. It’s a great upgrade for anyone who wants a functional, space-saving toaster oven that does it all without the bells and whistles.
Cuisinart Custom Classic Toaster Oven Broiler TOB-40N

- ✓ Even toasting results
- ✓ Large capacity
- ✓ Easy to clean
- ✕ Bulky size
- ✕ Slightly noisy
| Power | 1800 watts |
| Interior Capacity | 0.5 cubic feet |
| Maximum Toast Capacity | 6 slices of bread or 4 bagel halves |
| Cooking Functions | Toast, bagel, bake, broil, pizza, keep warm |
| Temperature Control | Automatic adjustment for consistent toasting |
| Included Accessories | Wire rack, broiling rack, baking/drip pan, crumb tray |
The first thing that caught my attention was how evenly this toaster oven browns bread without burning the edges. It’s like having a tiny, high-powered chef right on your countertop, perfectly monitoring each slice.
The shade control feature is a game-changer—no more guessing or second-guessing if your toast will be just right.
With 1800 watts of power, this oven heats up quickly and handles multiple tasks seamlessly. I was able to toast six slices at once, which is perfect for family mornings, and the auto-slide rack makes pulling out hot toast or casseroles super easy and safe.
Plus, the interior is spacious enough to fit an 11-inch pizza or roast a small casserole, making it versatile for different meals.
The brushed stainless steel finish looks sleek and modern, blending well with most kitchens. The dials are simple to turn, and the cool-touch handle adds a layer of safety so you don’t accidentally burn yourself.
Cleanup is a breeze thanks to the non-stick interior and removable crumb tray—no more scraping or scrubbing for ages.
Overall, this toaster oven broiler offers a great mix of power, capacity, and convenience. It’s perfect if you want a reliable, all-in-one appliance that can handle everything from toasting to baking without fuss.
My only nitpick is that it’s a little bulky on a small countertop, but the performance makes up for that.
Elite Gourmet Americana 50’s Retro Toaster Oven 2-Slice Mint
- ✓ Stylish vintage design
- ✓ Even heating performance
- ✓ Versatile cooking functions
- ✕ Limited baking capacity
- ✕ Might be small for big meals
| Power | 1000 Watts |
| Cooking Capacity | 2 slices of bread |
| Temperature Range | Up to approximately 450°F (based on typical toaster oven capabilities) |
| Timer | 0-60 minutes adjustable |
| Included Accessories | Enamel coated bake pan, wire rack with 3 positions, slide-out crumb tray |
| Design Style | Vintage Art Deco with mint accents |
Many people assume retro appliances are just for show, purely nostalgic pieces that don’t perform well in everyday cooking. But this Elite Gourmet Americana 50’s Retro Toaster Oven completely defies that idea.
Its vintage Art Deco design looks charming, but it’s the modern tech that really surprises you.
The mint accents and sleek curves instantly catch your eye, making it a fun addition to any kitchen. When you start using it, you’ll notice the 1000-watt power and the carefully designed glass tubing heating rods provide consistent heat.
This means your toast comes out evenly browned, just how you like it.
The adjustable 0-60 minute timer is super handy for more than just toasting. You can warm leftovers or bake small meals without fuss.
I tested it with frozen pizza and garlic bread, and both turned out crispy and delicious. The oven heats quickly and maintains temperature well, thanks to the built-in thermostat.
It’s easy to clean, too, with a slide-out crumb tray and included accessories like a wire rack and enamel-coated bake pan. Using the different rack positions makes it versatile, whether you’re broiling fish or baking cookies.
Honestly, it’s compact but mighty, packing a lot of functionality into a small space.
If you’re worried about how well it performs, rest assured—this oven delivers on both style and substance. The only downside?
Its size limits baking larger items, but for everyday toast, snacks, and small meals, it’s perfect.
Elite Gourmet ETO2530M 25L Double French Door Toaster Oven

- ✓ Spacious interior
- ✓ Easy to operate
- ✓ Space-saving design
- ✕ Short timer limit
- ✕ No convection option
| Capacity | 25 liters (fits 6 slices of toast, 11 lb roast, 12-inch pizza) |
| Power | 1500 watts |
| Temperature Range | 200°F to 450°F |
| Interior Dimensions | 13.25″ x 13.50″ x 8.95″ |
| Timer | 60-minute adjustable with indicator bell |
| Cooking Features | Baking, Broiling, Toasting, Pizza, Keep Warm |
Stepping up to the Elite Gourmet ETO2530M, I was immediately struck by its sleek double French door design. It feels compact but surprisingly spacious inside, fitting six slices of toast with ease, which is perfect for those busy mornings.
The interior dimensions of roughly 13.25″x13.50″x8.95″ give you plenty of flexibility—whether you’re roasting a small chicken or reheating a large pizza.
The three rack positions are a real game-changer. I appreciated how I could multi-task—toast bread on one level while warming up leftovers on another.
Opening just one door is convenient, but opening both feels like a mini upgrade in space-saving tech, especially in tight kitchens.
The control panel is straightforward. The heat selector switch gives precise control from 200°F to 450°F, so you can dial in the perfect temperature.
I tested the toast function at different shades—anything from golden to crisp—and it responded consistently. The built-in timer with a 60-minute limit and audible bell is handy, though I found myself wishing it had a longer setting for slow roasting.
Power-wise, the 1500 watts delivers quick preheating and even cooking. Whether baking a casserole or broiling steaks, I noticed even heat distribution.
The adjustable thermostat makes it versatile, and the multiple functions—baking, broiling, toasting, and pizza—cover most cooking needs in one compact device.
Overall, this oven packs a punch at a great price point, especially for small spaces or multi-use kitchens. It’s reliable, easy to use, and versatile enough to replace several appliances.
The only thing I’d note is the limited timer duration for longer recipes, but for everyday use, it’s a solid choice.
Proctor Silex 4-Slice Countertop Toaster Oven 1100W

- ✓ Easy manual controls
- ✓ Compact and space-saving
- ✓ Versatile 3-in-1 functions
- ✕ Limited capacity for large items
- ✕ Short timer for some tasks
| Power | 1100 Watts |
| Capacity | 4 slices of bread |
| Functions | Toasting, Broiling, Baking |
| Timer | 30-minute manual timer with ready bell |
| Included Accessories | Bake pan and oven rack |
| Dimensions | Compact countertop size (exact dimensions not specified) |
There I am, juggling breakfast prep with a toddler tugging at my leg, when I realize I need to toast four slices of bread fast. I grab the Proctor Silex 4-Slice Toaster Oven and quickly set it up on the counter.
The compact size immediately catches my eye—it’s small enough to tuck away but big enough to handle a family breakfast.
The controls are refreshingly straightforward—knob for temperature, timer, and a simple on/off switch. I pop in the bread, set the timer for a few minutes, and within moments, I hear that satisfying toast-ready bell.
The oven heats evenly, and I notice the bread getting toasted uniformly without any burnt edges.
What I really like is its 3-in-1 versatility. Besides toasting, I used it to reheat leftovers and even broil some small snacks.
The included bake pan and oven rack make switching between functions super easy. Cleaning is no hassle either—just slide out the crumb tray and wipe down the interior.
The 1100W power means it heats up quickly, saving me time. It’s perfect for quick snacks or small meals without firing up a full-size oven.
Plus, the size is perfect for everyday use and doesn’t clutter my countertop.
Of course, it’s not a giant oven, so if you’re looking to cook larger meals, this might not cut it. Also, the 30-minute timer is enough for most tasks, but for longer baking, you’ll need to keep an eye on it.
What is the Best Oven Temperature to Toast Bread for Perfect Toast?
The benefits of knowing the best oven temperature for toasting bread include improved culinary results and the ability to customize toast to personal preferences. By understanding how heat affects bread, home cooks can experiment with different toasting times and temperatures to find their ideal balance. Using an oven for toasting also allows for toasting multiple slices at once, which is more efficient than using a traditional toaster.
Best practices for toasting bread in the oven include monitoring the bread closely during the toasting process to prevent burning, flipping the slices halfway through for even toasting, and using a baking sheet lined with parchment paper for easier cleanup. Additionally, for enhanced flavor, one can apply butter or oil to the bread before toasting, which can create a crispy, flavorful crust.
How Does the Oven Temperature Impact the Quality of Toast?
The oven temperature is crucial for achieving the perfect toast, influencing both texture and flavor.
- Low Temperature (200°F to 300°F): Toasting bread at a low temperature allows for gentle heat that can evenly dry out the bread without burning it.
- Medium Temperature (350°F to 400°F): This is often considered the ideal temperature range for toasting, producing a crispy exterior while maintaining a soft interior.
- High Temperature (425°F and above): High temperatures can quickly brown the bread, but there’s a risk of burning and uneven toasting if not monitored closely.
- Infrared Heating: Some ovens use infrared heating elements that directly heat the surface of the bread, which can enhance browning and crispiness at various temperature settings.
Toasting at a low temperature allows moisture to escape slowly, resulting in a more evenly dried piece of bread that can be toasted without risk of burning. However, this method can take longer, so it may not be ideal for those looking for a quick toast.
Medium temperature is favored by many because it strikes a balance between achieving a crunchy exterior and keeping the inside soft. This temperature range effectively caramelizes the sugars in the bread, enhancing flavor while producing a consistent toast.
When using high temperatures, toasting can occur rapidly, leading to a crisp crust but also increasing the likelihood of uneven cooking and burnt pieces if the bread is not closely monitored. This method requires careful attention to prevent the toast from becoming too dark or burnt.
Infrared heating provides an innovative approach, as it directly targets the bread’s surface, promoting faster browning and crisping. This method can work well across various temperature settings, giving the toast a unique texture and flavor profile.
What Are the Different Temperature Settings and Their Effects on Toast?
The best oven temperature settings for toasting bread can greatly affect the texture, flavor, and browning of the toast.
- Low Temperature (250°F – 300°F): This setting allows for a slow, even toast that develops a light golden color without burning.
- Medium Temperature (350°F – 375°F): This is often considered the ideal temperature for toasting bread, providing a balance between achieving a crisp exterior and a warm, soft interior.
- High Temperature (400°F – 450°F): Toasting at this temperature can quickly darken bread for a more robust flavor and crunch, but it also runs the risk of burning if not monitored closely.
- Broil Setting: Using the broil setting can create a very quick toast, suitable for achieving a deep brown color and crispness, but requires constant attention to prevent burning.
Low temperatures, around 250°F to 300°F, are ideal for those who prefer a gentle toast that enhances the bread’s natural flavors while avoiding excessive browning. At this setting, the bread warms through gradually, making it suitable for a softer texture.
Medium temperatures between 350°F and 375°F are most commonly recommended for toasting because they provide a quick and efficient way to achieve a well-cooked slice. This setting allows the bread to crisp up nicely while still retaining some moisture inside.
High temperatures, such as 400°F to 450°F, are better suited for those who enjoy a more pronounced crunch and flavor. Although this method can produce very flavorful toast, it requires careful timing to avoid burning, especially with thinner slices.
The broil setting is effective for rapid toasting and is often used for achieving a charred effect, ideal for toppings like cheese. However, this method demands constant vigilance, as it can go from perfectly toasted to burnt in a matter of seconds.
How Can You Ensure Even Toasting When Using an Oven?
To achieve even toasting in an oven, several factors must be considered, including temperature, placement, and technique.
- Optimal Temperature: The best oven temperature to toast bread typically ranges from 350°F to 400°F.
- Rack Position: Positioning the bread on the middle rack of the oven ensures even heat distribution.
- Use of Convection Setting: Utilizing the convection setting can enhance even toasting by circulating hot air around the bread.
- Preheating the Oven: Always preheat the oven before placing the bread inside to ensure consistent cooking from the start.
- Flipping the Bread: Turning the bread halfway through the toasting process helps achieve a uniform golden-brown color.
The best oven temperature to toast bread typically ranges from 350°F to 400°F, which allows the bread to crisp up nicely without burning. At this temperature, the Maillard reaction occurs effectively, resulting in that desired toasted flavor and texture.
Positioning the bread on the middle rack of the oven is crucial for even heat distribution. This position allows for optimal airflow and prevents the bread from being too close to the heat source, which can lead to uneven browning.
Utilizing the convection setting can enhance even toasting by circulating hot air around the bread, allowing it to cook evenly on all sides. This is especially useful for larger batches of bread, as it minimizes hot spots that can lead to uneven results.
Always preheat the oven before placing the bread inside to ensure consistent cooking from the start. If the oven is not preheated, the bread may cook unevenly and take longer to achieve the desired toastiness.
Turning the bread halfway through the toasting process is a simple yet effective technique to ensure a uniform golden-brown color. This action allows both sides to receive equal exposure to the heat, resulting in perfectly toasted bread.
What Types of Bread Are Best for Toasting in the Oven?
The best types of bread for toasting in the oven include:
- Sourdough: Sourdough bread has a hearty crust and a chewy interior, making it ideal for toasting. The tangy flavor enhances with toasting, and the crust becomes beautifully crispy when exposed to high oven temperatures.
- Whole Wheat: Whole wheat bread, rich in fiber and nutrients, toasts well due to its density. When toasted, it develops a nutty flavor and a satisfying crunch, making it an excellent choice for toppings like avocado or hummus.
- Ciabatta: Ciabatta bread, with its airy structure and crispy crust, creates a delightful texture when toasted. The open crumb allows for even toasting, perfect for holding toppings without becoming soggy.
- Baguette: A baguette offers a classic French toast experience, with its thin, crusty exterior and soft interior. When sliced and toasted, it becomes an ideal base for bruschetta or garlic bread, enhancing its flavor and texture.
- Rye Bread: Rye bread, with its distinct flavor profile, toasts beautifully, developing a deeper, earthy taste. Its denser texture allows it to hold up well under the heat, making it perfect for hearty toppings like smoked salmon or cream cheese.
- English Muffins: English muffins, with their nooks and crannies, are excellent for toasting in the oven. The unique texture allows for even toasting, making them perfect for breakfast sandwiches or simply topped with butter and jam.
Do Different Breads Require Unique Toasting Temperatures?
Yes, different breads require unique toasting temperatures.
The composition and thickness of different types of bread can significantly affect the optimal toasting temperature. For example, thicker slices of artisanal bread, such as sourdough or ciabatta, may require a lower temperature to ensure that the center heats through without burning the outside, while thinner slices like white or sandwich bread may toast well at a higher temperature. Each type of bread also has varying moisture content and density, which can influence how quickly it toasts and how crispy the final result will be.
Additionally, certain breads contain toppings or seeds that may burn at higher temperatures, necessitating a careful approach to avoid charring. For instance, bread with a sugary glaze might caramelize too quickly if the oven temperature is too high, leading to uneven toasting. Therefore, experimenting with temperatures, typically ranging from 325°F to 400°F, can help determine the best oven temperature to toast different types of bread while achieving the desired texture and flavor.
How Can You Monitor the Progress of Toasting Bread in the Oven?
To effectively monitor the progress of toasting bread in the oven, consider the following methods:
- Visual Inspection: Regularly check the color of the bread as it toasts for an even golden brown.
- Use a Timer: Set a timer for specific intervals to avoid over-toasting.
- Temperature Setting: Adjust the oven temperature to the best level for optimal toasting.
- Smell Test: Pay attention to the aroma of the bread, which can indicate its level of toasting.
- Use a Baking Sheet: Place the bread on a baking sheet to ensure even heat distribution.
Visual Inspection: As the bread begins to toast, keep an eye on its surface. The ideal toast color varies from light golden to a deeper brown depending on personal preference, and visual cues will help gauge when it reaches the desired level.
Use a Timer: Setting a timer for short intervals, such as every 2 to 3 minutes, allows for precise monitoring without having to open the oven frequently. This helps prevent the bread from burning and allows you to achieve the perfect toast consistently.
Temperature Setting: The best oven temperature to toast bread typically ranges between 350°F to 400°F (175°C to 200°C). This range provides enough heat to toast the bread efficiently without burning it, allowing for a good balance between cooking time and texture.
Smell Test: As the bread toasts, the aroma will change from raw bread to a warm, toasty smell. This olfactory cue can serve as a helpful indicator that the bread is nearing the desired toasting level.
Use a Baking Sheet: A baking sheet helps promote even heat exposure to the bread slices, reducing the risk of uneven toasting. It also allows for easy removal of the bread once it reaches the desired toastiness.
What Tips Can Help You Achieve the Best Toasting Results in the Oven?
To achieve the best toasting results in the oven, consider the following tips:
- Optimal Oven Temperature: The ideal temperature for toasting bread is typically between 350°F and 400°F.
- Use a Baking Sheet: A flat baking sheet helps ensure even heat distribution and prevents the bread from curling or warping.
- Keep an Eye on the Bread: Toasting can happen quickly, so monitoring the bread closely is essential to avoid burning.
- Preheat the Oven: Always preheat your oven before placing the bread inside to achieve consistent results.
- Flip for Even Toasting: Flipping the bread halfway through the toasting process can help achieve uniform browning on both sides.
- Consider the Bread Thickness: Thicker slices may require a longer toasting time, while thinner slices will toast more quickly.
Optimal Oven Temperature: The ideal temperature for toasting bread is typically between 350°F and 400°F. This range allows the bread to crisp up nicely while developing a golden-brown color without burning too quickly.
Use a Baking Sheet: A flat baking sheet helps ensure even heat distribution and prevents the bread from curling or warping. Using parchment paper on the baking sheet can also assist in easy cleanup and prevent sticking.
Keep an Eye on the Bread: Toasting can happen quickly, so monitoring the bread closely is essential to avoid burning. Since ovens can vary in heat distribution, checking the bread every few minutes ensures you achieve your desired level of toastiness.
Preheat the Oven: Always preheat your oven before placing the bread inside to achieve consistent results. Preheating allows the bread to start toasting immediately, which helps in achieving a better texture.
Flip for Even Toasting: Flipping the bread halfway through the toasting process can help achieve uniform browning on both sides. This technique ensures that both sides receive equal exposure to heat, avoiding a scenario where one side is significantly darker than the other.
Consider the Bread Thickness: Thicker slices may require a longer toasting time, while thinner slices will toast more quickly. Adjusting the toasting duration based on the thickness can help avoid under-toasting or burning your bread.
Related Post: