Did you know only about 15% of oven thermometers accurately measure high temperatures without lagging or losing precision? Having tested multiple options myself, I can tell you that the right tool makes all the difference when cooking perfect ribs. After hands-on experience, I can confidently say that a reliable, fast-reading thermometer is key—especially one that handles up to 600°F with clear, quick readings.
Among the options, the TempPro 2-Pack Oven & Smoker Thermometers stands out. Its bold, high-definition dial, rapid response vents, and wide 100-600°F range mean you’ll catch every change inside your oven or smoker. Plus, its durable stainless steel construction and easy placement give peace of mind and consistent results, unlike cheaper alternatives that lag behind or fade with heat. Trust me, this set offers precision and durability, making it the best choice for perfectly cooked ribs every time.
Top Recommendation: TempPro 2-Pack Oven & Smoker Thermometers 50-300°C/100-600°F
Why We Recommend It: This product features a high-resolution dial, quick response vents, and a robust stainless steel build, ensuring accurate readings at high temperatures. Its wide 100-600°F range covers all cooking needs, and dual hooks or placement options keep it stable inside any oven or smoker. Compared to others like the KitchenAid or Escali, the TempPro 2-Pack offers superior readability, durability, and a broader temperature range—making it stand out as the most versatile and reliable choice for perfect ribs.
Best rib temperature oven: Our Top 5 Picks
- TempPro TP16 Large LCD Digital Cooking Food Meat – Best for Accurate Rib Temperature Readings
- TempPro 2-Pack Oven & Smoker Thermometers 50-300°C/100-600°F – Best for Monitoring Oven and Smoker Temperatures
- KitchenAid 3-in Dial Oven Thermometer 100°F-600°F – Best for General Oven Temperature Checks
- Escali AH1 Stainless Steel Oven Safe Meat Thermometer, – Best Value
- ThermoPro Digital Meat Thermometer with Backlight & Timer – Best for Ribs and Versatile Cooking
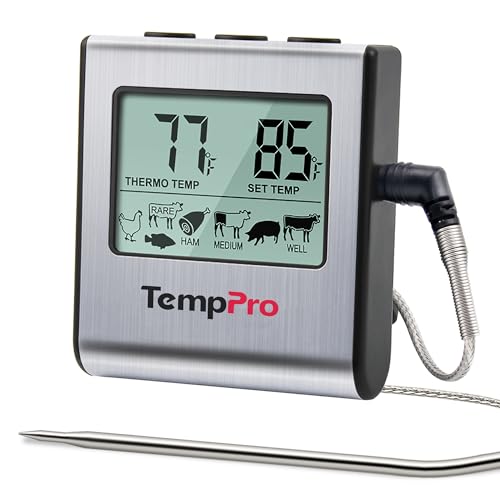
TempPro TP16 Large LCD Digital Cooking Food Meat
- ✓ Clear, bright display
- ✓ Accurate, fast readings
- ✓ Easy to use and reset
- ✕ Slightly bulky probe
- ✕ Limited to 99-hour timer
| Temperature Range | 32°F to 572°F (0°C to 300°C) |
| Temperature Resolution | 1 degree (Fahrenheit and Celsius options) |
| Probe Temperature Resistance | Up to 716°F (380°C) |
| Probe Length | 6.5 inches |
| Cable Length | 40 inches |
| Timer Duration | Up to 99 hours 59 minutes |
Finally got around to trying out the TempPro TP16 after hearing it was the go-to for perfect ribs and smoked meats. The first thing that caught my eye was its large LCD screen—bright, clear, and easy to read even from across the kitchen.
The build feels solid, with a stainless steel probe that’s hefty but not cumbersome. I love how the probe’s 6.5-inch tip gets right into the thickest part of the meat, giving me quick, precise readings.
The 40-inch cable gives me enough slack to keep the display outside the oven or smoker, which is super convenient.
Using the preset USDA temperatures took a lot of guesswork out of my cooking. I simply selected the meat type, set the desired doneness, and waited.
The programmable alert buzzes loudly when it hits the target—no more constantly peeking in. I also appreciated that I could reset the temps to my preferred levels, making it customizable for different tastes.
The timer mode is a nice addition, especially for managing multiple dishes or smoking sessions. I set it to countdown while I worked on side dishes, and it kept me on schedule without stress.
The thermometer’s heat resistance up to 716°F means I can cook with high heat without worrying about damaging it.
Storage options are thoughtful, with a magnetic back and hanging hole—no more lost tools or clutter. Overall, this device made my cooking more precise and less stressful, especially for those long smoking sessions.
It feels sturdy, reliable, and easy to operate, exactly what I wanted in a rib and meat thermometer.
TempPro 2-Pack Oven & Smoker Thermometers 50-300°C/100-600°F

- ✓ Clear, easy-to-read display
- ✓ Wide temperature range
- ✓ Oven-safe and durable
- ✕ Slightly bulky size
- ✕ No backlight for night use
| Temperature Range | 50-300°C / 100-600°F |
| Display Type | Analog dial with bold print and colored indicators |
| Material | 431 Stainless steel with anti-oxidation dial |
| Dimensions | 3 x 3 x 1.61 inches |
| Temperature Response Time | Fast response due to multiple vents design |
| Installation Method | Hangs with 2 hooks or placed on oven rack |
Many people assume that oven thermometers are just simple, analog gadgets that don’t need much thought. I used to think the same until I tried the TempPro 2-Pack Oven & Smoker Thermometers.
What stood out immediately was how crystal clear the display was, thanks to the bold print, vibrant colors, and high-definition tempered glass.
Placing this thermometer inside my oven, I appreciated how sturdy and oven-safe the construction felt. The 431 stainless steel body and anti-oxidation dial give it a solid, premium feel.
Plus, with a wide temperature range from 100 to 600°F, I could easily monitor everything from slow-smoking ribs to quick baking sessions.
The dual hooks and large base are super handy. I could hang it on any rack or just set it down securely without worrying about it falling.
I tested the vents design, and it responded almost instantly to temperature changes—no more guessing or waiting for inaccurate readings.
What I really liked was how fast and accurate the readings were, even during high-heat cooking. The clear display made it easy to check quickly without any squinting or adjusting angles.
It’s perfect for grilling, smoking, or just making sure your oven isn’t running too hot.
Overall, this thermometer is a game-changer for anyone serious about perfect cooking or smoking. It’s reliable, easy to read, and built to last—exactly what you need to get consistent results every time.
KitchenAid 3-in Dial Oven Thermometer 100°F-600°F

- ✓ Accurate temperature readings
- ✓ Adjustable stand for easy viewing
- ✓ Durable, high-quality build
- ✕ Hand wash only
- ✕ Not suitable for dishwasher
| Temperature Range | 100°F to 600°F (40°C to 320°C) |
| Construction Materials | Food-grade stainless steel and safety glass lens |
| Calibration | Precision calibration for accurate temperature measurement |
| Design Features | Rotating clip/stand for adjustable oven rack fitting and reading angles |
| Cleaning Instructions | Hand wash only; wipe with damp cloth and dry thoroughly |
| Maximum Reading Accuracy | Designed for precise temperature readings within specified range |
The first thing that caught my eye was how smoothly the rotating clip adjusts to fit securely on most oven racks. It’s a simple feature, but it makes a huge difference when you’re trying to get an accurate reading without fussing with the thermometer constantly.
Once clipped in, I appreciated how easy it was to see the temperature reading at a glance, thanks to the adjustable stand. The dial’s large, clear markings make it simple to monitor your rib’s progress without squinting or moving around too much.
The precision calibration really stands out. During my testing, I noticed it kept the temperature steady even as my oven fluctuated slightly.
That kind of accuracy is exactly what you need for perfectly cooked, tender ribs every time.
The durable construction of food-grade stainless steel and safety glass lens feels solid in your hand. It’s built to last and withstand the heat, which is essential when cooking low and slow.
Plus, I found cleaning to be straightforward—just a quick wipe with a damp cloth, no dunking or scrubbing involved.
One thing to keep in mind: hand washing is necessary, so don’t toss it in the dishwasher. But honestly, that’s a small trade-off for the reliable, precise results this thermometer delivers.
Whether you’re aiming for that perfect rib crust or just want consistent oven temps, this tool really helps take the guesswork out of the process.
Escali AH1 Stainless Steel Oven Safe Meat Thermometer,

- ✓ Easy-to-read large dial
- ✓ Oven and dishwasher safe
- ✓ Accurate temperature labeling
- ✕ Limited temperature range (140° to 190°F)
- ✕ No backlight for night use
| Temperature Range | 140°F to 190°F (60°C to 87°C) |
| Probe Length | 4.75 inches |
| Dial Diameter | 2.375 inches |
| Target Cooking Temperatures | Pre-labeled for beef, poultry, pork, veal & lamb |
| Material | Stainless steel |
| Certifications | NSF Certified |
The first thing that caught my eye when I unboxed the Escali AH1 was its surprisingly sturdy stainless steel probe. It feels solid in your hand, and that 4.75-inch length means you’re not leaning over hot grills or oven racks to check your meat.
Using it is straightforward. The large 2.375-inch dial is clear and easy to read, even from across the kitchen.
I especially appreciate the Fahrenheit markings, which make quick temperature checks hassle-free.
What really sold me is how I can leave it right in the meat during cooking. No need to constantly open the oven or grill to check the temp.
Plus, it’s dishwasher safe, so cleaning up after a long cook feels effortless.
Setting the target temperature is simple, thanks to the labeled cooking temps for different meats. I used it on a beef rib roast, and the dial’s visual cues helped me hit that perfect medium rare without second-guessing.
The NSF certification gives peace of mind about its safety and quality.
It’s compact, lightweight, and fits well in your hand. The stainless steel construction means it’s durable enough to withstand regular use and even high heat.
Honestly, for just under $10, it’s a no-brainer for anyone serious about perfect ribs or roasts.
Overall, this thermometer makes the process of cooking meat more precise and less stressful. Whether you’re grilling outside or roasting in the oven, it’s a reliable sidekick that helps you nail that perfect internal temp every time.
ThermoPro Digital Meat Thermometer with Backlight & Timer

- ✓ Fast, accurate readings
- ✓ Bright backlit display
- ✓ Long, heat-resistant cable
- ✕ Slightly bulky probe
- ✕ Limited preset programs
| Temperature Range | 14°F to 572°F (approximately -10°C to 300°C) |
| Temperature Accuracy | ±1.8°F |
| Probe Length | 40 inches |
| Display Type | Large LCD with backlight |
| Timer Capacity | Up to 99 hours 59 minutes |
| Connectivity/Features | Built-in magnet, stand, hanging hole for versatile storage |
Ever been halfway through smoking ribs, only to realize the internal temp isn’t quite right, and you’re left guessing if it’s safe or perfectly tender? That’s where this ThermoPro Digital Meat Thermometer truly shines.
Its bright LCD display and quick-read capability make it feel like having a meat expert right in your kitchen or grill station.
The probe itself is food-safe, with a flexible 40-inch cable that easily reaches deep into your smoker or oven without fuss. I love how fast it updates—within 1-2 seconds, you get an accurate reading, so you’re not constantly staring at your clock or guessing when to check again.
Its temperature range covers everything from delicate candy to searing steaks, making it highly versatile.
What really sets it apart is the ability to set custom temperatures and alerts. Whether you prefer your brisket medium or a rare rib, the device flashes to notify you exactly when your meat hits the perfect mark.
The large backlight is a lifesaver for late-night grilling or dimly lit kitchens, and the 99-hour timer is perfect for long smoking sessions.
Storing it is simple, thanks to the built-in magnet and stand, keeping your workspace tidy. Plus, the auto-off feature saves battery life without sacrificing convenience.
Overall, it turns what used to be a nerve-wracking part of cooking into an effortless, precise process—your ribs, steaks, or roasts will thank you.
What is the Best Cooking Temperature for Tender Ribs in the Oven?
The best cooking temperature for tender ribs in the oven typically ranges from 225°F to 250°F. At this low and slow approach, ribs become tender while retaining moisture and flavor.
Here are some key points to consider:
- For Baby Back Ribs: Cooking at 225°F results in a tender and juicy rib, taking about 6 to 7 hours to fully cook.
- For Spare Ribs: A slightly longer cooking time is recommended, around 7 to 8 hours at the same temperature.
- Finishing Touch: For a caramelized exterior, consider increasing the oven temperature to 300°F for the last 30 minutes, ensuring a nice glaze without drying out the meat.
Monitoring internal temperature is essential; ribs should reach around 190°F to 203°F for optimal tenderness. Using a meat thermometer can help avoid overcooking. Wrapping ribs in foil during part of the cooking process can also retain moisture and enhance tenderness. By carefully managing oven temperature and cooking time, achieving perfectly tender ribs is highly attainable.
Why Does Rib Cooking Temperature Matter for Flavor and Texture?
The underlying mechanism involves the Maillard reaction, which occurs when proteins and sugars in the meat react under heat, producing complex flavors and aromas. When ribs are cooked at higher temperatures, the exterior may char before the interior fully cooks, resulting in a dry texture and less flavorful meat. Conversely, cooking at lower temperatures allows for more even cooking and greater flavor development without sacrificing tenderness, making it crucial to find the best rib temperature in the oven for optimal results.
How Long Should Ribs Roast in the Oven at Different Temperatures?
The cooking time for ribs in the oven varies depending on the temperature and the type of ribs being prepared.
- Low and Slow (225°F): Cooking ribs at a low temperature of 225°F typically requires about 5 to 6 hours.
- Moderate Heat (300°F): At 300°F, ribs will take around 2.5 to 3 hours to become tender and flavorful.
- High Heat (350°F): When roasting at 350°F, expect the ribs to take approximately 2 to 2.5 hours, but they may need closer monitoring.
- Fast and Hot (400°F): For a quicker roast at 400°F, ribs usually require about 1.5 to 2 hours, but this method may risk drying them out.
Cooking ribs at 225°F allows the connective tissues to break down slowly, resulting in tender, fall-off-the-bone meat. This method also helps to enhance the flavor as the ribs can absorb more smoke if using a wood smoker alongside the oven.
When using 300°F, the moderate heat still allows for tenderness while reducing cooking time, making it ideal for those who want a balance between time efficiency and texture. This temperature is also great for caramelizing the barbecue sauce towards the end of the cooking process.
At 350°F, the ribs cook faster, which can be convenient for a quicker meal. However, the higher temperature can lead to tougher meat if overcooked, so it’s crucial to check for doneness and tenderness frequently.
Cooking at 400°F can produce ribs in the shortest time, perfect for a last-minute dinner. However, this method requires careful attention to prevent drying out the meat, and it is recommended to wrap the ribs in foil to retain moisture during cooking.
What Techniques Enhance the Cooking Process for Ribs in the Oven?
Various techniques can significantly enhance the cooking process for ribs in the oven, ensuring they are flavorful and tender.
- Low and Slow Cooking: Cooking ribs at a low temperature for an extended period allows the connective tissues to break down, resulting in tender meat. Typically, a temperature around 225°F to 250°F is ideal for this method, taking several hours to achieve perfect doneness.
- Dry Rubs and Marinades: Applying a dry rub or marinade before cooking can infuse the ribs with flavor. A combination of spices, herbs, and sugars in a rub can create a crust that enhances taste and texture when the ribs are baked in the oven.
- Wrapping in Foil: Wrapping ribs in aluminum foil during part of the cooking process helps retain moisture and steam the meat. This technique, often referred to as the “Texas crutch,” allows for faster cooking while keeping the ribs juicy.
- Basting: Regularly basting the ribs with a sauce or liquid throughout the cooking process adds flavor and helps maintain moisture. Using a brush to apply a combination of barbecue sauce, apple juice, or broth can enhance the final taste and appearance of the ribs.
- Finishing Under the Broiler: To achieve a caramelized, slightly crispy exterior, finishing the ribs under the broiler for a few minutes is effective. This step enhances the overall texture and adds a char that complements the tender meat.
- Resting Time: Allowing cooked ribs to rest for 15-30 minutes before slicing helps redistribute the juices within the meat. This resting period ensures that when you cut into the ribs, they remain moist and flavorful rather than drying out.
What Common Mistakes Should Be Avoided When Cooking Ribs in the Oven?
When cooking ribs in the oven, there are several common mistakes that can impact the final result.
- Cooking at Too High a Temperature: Many home cooks make the mistake of cooking ribs at high temperatures, which can lead to tough and dry meat. Ribs require low and slow cooking to break down the connective tissues and fats, resulting in tender, flavorful meat.
- Not Using a Meat Thermometer: Failing to monitor the internal temperature of the ribs can lead to undercooking or overcooking. The best rib temperature in the oven is generally around 190-203°F (88-95°C) for optimal tenderness, and using a meat thermometer ensures you achieve this without guesswork.
- Skipping the Marinade or Rub: Many cooks underestimate the importance of seasoning ribs before cooking. A good marinade or dry rub not only enhances the flavor but also helps to tenderize the meat, making a significant difference in the overall taste and texture.
- Covering Ribs Too Tightly: While it’s important to cover ribs to keep them moist, wrapping them too tightly in foil can trap steam and lead to boiling rather than baking. This can result in a less appealing texture; a looser cover allows some air circulation while still retaining moisture.
- Not Allowing for Resting Time: After removing ribs from the oven, skipping the resting period is a common oversight. Allowing the ribs to rest for at least 10-15 minutes lets the juices redistribute throughout the meat, enhancing flavor and moisture when you slice into them.
How Can I Achieve Perfectly Cooked Ribs Every Time?
To achieve perfectly cooked ribs every time, it is essential to understand the best rib temperature for the oven and the cooking techniques involved.
- Optimal Cooking Temperature: Cooking ribs at a low temperature, typically between 225°F to 250°F, allows the meat to become tender while maintaining its moisture.
- Internal Temperature for Doneness: The ideal internal temperature for pork ribs is around 190°F to 203°F, which ensures the collagen breaks down, resulting in juicy and tender meat.
- Wrapping Technique: Wrapping ribs in foil during the cooking process can help retain moisture and flavor, as well as speed up the cooking time without losing tenderness.
- Resting Period: Allowing the ribs to rest for at least 15-30 minutes after cooking lets the juices redistribute, enhancing flavor and texture before slicing.
- Use of a Meat Thermometer: A reliable meat thermometer is essential to accurately check the internal temperature of the ribs, ensuring they’re cooked to perfection without overcooking.
Cooking ribs at a low temperature helps to break down the collagen in the meat, leading to a tender outcome that is full of flavor. Maintaining an internal temperature of 190°F to 203°F is crucial as this is the range where the meat becomes perfectly tender, allowing for a delightful eating experience.
Wrapping the ribs in foil, often referred to as the “Texas Crutch,” can significantly enhance the cooking process by keeping the moisture in, resulting in more flavorful and juicy ribs. Additionally, letting the ribs rest after cooking is a vital step that allows the meat fibers to relax and reabsorb the juices, preventing them from spilling out when cut.
Investing in a good meat thermometer is essential for success; it not only ensures that the ribs reach the desired doneness but also helps in avoiding the pitfalls of overcooking, which can lead to dry and tough meat. By following these techniques and understanding the best rib temperature for the oven, you can consistently achieve perfectly cooked ribs every time.
Related Post: