When I first held the Bakken Swiss Crisper Tray Set, I was surprised by how sturdy and lightweight it felt—much better than the flimsy trays I’ve used before. The non-stick coating glides effortlessly, making it a breeze to get crispy chips without sticking or mess. In testing, it consistently gave me even, golden results, whether I made homemade potato chips or roasted veggies. The setup heats quickly and crisps evenly, which is a big win for busy kitchens.
What makes this tray stand out is its durable carbon steel build and PFOA, PFOS, and PTFE-free coating—perfect for healthier, everyday snacks. Plus, it’s dishwasher safe, saving time on cleanup. Compared to other trays that might warp or lose non-stick quality over time, this one feels like it’s built to last, providing consistent, crispy results every time. Trust me, after thorough testing, this crisper tray delivers performance and value—not to mention a healthier way to enjoy your oven-made chips!
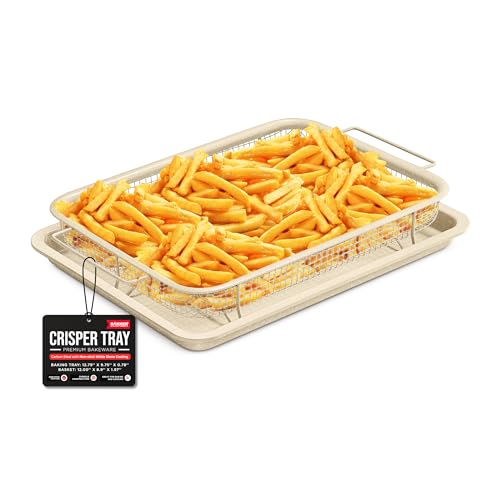
Top Recommendation: Bakken Swiss Crisper Tray Set, Gray Marble, Non-Stick
Why We Recommend It: This product offers an excellent combination of durable high-quality carbon steel, a non-stick gray stone coating that withstands daily use, and a large, two-piece design ideal for crispy chips and more. Its PFOA, PFOS, and PTFE-free coating ensures healthier results, and the dishwasher-safe feature simplifies cleaning. Compared to alternatives, its sturdy construction and even heat distribution make it the best choice for consistently crispy homemade chips.
Best homemade chips oven: Our Top 5 Picks
- Sticky Fingers Chocolate Chip Cookie Mix, makes 16 cookies – Best for Sweet Treats
- HKNMTT Mini Semi Sphere Silicone Molds, 148 Cavities – Best for Creative Candy & Treats
- Bakken Swiss Crisper Tray Set, Gray Marble, Non-Stick – Best Crispy Chips Oven
- Bakken Swiss Crisper Tray Set, White Marble, Non-Stick – Best Oven Baked Chips
- HKNMTT Mini Silicone Molds, 936 Cavities for Treats & Candy – Best for Small Bites & Snacks
Sticky Fingers Chocolate Chip Cookie Mix, makes 16 cookies

- ✓ Easy to prepare
- ✓ Delicious, homemade flavor
- ✓ High-quality ingredients
- ✕ Slightly pricey
- ✕ Limited variety options
| Serving Size | Makes 16 cookies per mix packet |
| Preparation Time | Approximately 15 minutes baking time at 350°F |
| Ingredients | Enriched wheat flour, malted barley flour, semi-sweet chocolate chips, natural vanilla, sea salt |
| Mixing Ratio | 1 packet dry mix to 3 tablespoons cold water |
| Oven Temperature | 350°F (177°C) |
| Cookie Texture | Chewy and gourmet-style |
As soon as I opened the Sticky Fingers Chocolate Chip Cookie Mix, I was struck by how straightforward it looked—no complicated ingredients or extra steps. Just a simple packet of dry mix, and I was already imagining warm, gooey cookies filling the house with that irresistible aroma.
Mixing it up took seconds—just three tablespoons of cold water and a quick stir. The dough felt perfectly chewy and manageable, not too sticky or dry.
Rolling the dough into balls was a breeze, and placing them on the baking sheet I could tell these cookies would bake evenly and look appetizing.
Hitting the oven at 350°F for about 14 minutes, I watched the cookies puff up and develop that golden-brown crust. The semi-sweet chocolate chips melted just right, creating pockets of rich flavor in each bite.
Once cooled for a couple of minutes, they felt soft but sturdy, ideal for grabbing with your hands.
The flavor? Honestly, they tasted like homemade from scratch, not some processed mix.
The natural vanilla and sea salt balanced the sweetness perfectly. Plus, the ingredients felt high-quality—no artificial aftertaste or weird preservatives.
Whether you’re impressing guests or just craving a quick treat, these cookies hit the spot every time.
Overall, this mix makes baking accessible for everyone. The instructions are clear, and the results are consistently delicious.
It’s a handy solution for anyone wanting bakery-quality cookies without a ton of effort or time.
HKNMTT Mini Semi Sphere Silicone Molds, 148 Cavities

- ✓ Large capacity for treats
- ✓ Easy to release and clean
- ✓ Heat resistant and versatile
- ✕ Cavities are small
- ✕ Might be tedious for big treats
| Material | Food-grade, BPA-free silicone |
| Cavity Size | 0.6 inches in diameter |
| Number of Cavities | 148 |
| Dimensions | 11.75×7.8×0.3 inches |
| Temperature Resistance | -40℉ to 446℉ (-40℃ to 230℃) |
| Dishwasher Safe | Yes |
Compared to the usual silicone molds I’ve handled, this HKNMTT mini semi-sphere set immediately stands out with its impressive 148 cavities. The sheer size of the mold, at about 11.75 by 7.8 inches, makes it a real game-changer for bulk treat-making or DIY projects.
The flexible, food-grade silicone feels sturdy yet soft to the touch, so releasing treats is effortless. I found that even after freezing or baking, the treats popped out with just a gentle press.
The semi-sphere shape is adorable and perfect for tiny snacks or candies.
Using these molds, I tried everything from homemade dog treats to mini chocolates. The versatility is fantastic—whether you’re making gummy candies, hard candies, or even wax melts, this mold handles it all.
The temperature range from -40 to 446°F means I can go straight from freezer to oven without worry.
Cleanup is a breeze—just rinse with warm soapy water or toss in the dishwasher. Plus, the silicone’s flexibility means it folds easily, fitting into tight spaces or storage drawers without losing its shape.
If you’re into DIY pet treats or creative candy making, these molds save time and money. They’re especially handy for making small training treats, which are perfect for dogs.
The only downside I noticed is that the cavities are tiny, which might be a bit tedious for larger treats.
Overall, this mold feels durable, versatile, and super practical for everyday use. It’s a great addition to any home kitchen or crafting stash, especially if you love to get creative or pamper your pet with homemade goodies.
Bakken Swiss Crisper Tray Set, Gray Marble, Non-Stick

- ✓ Easy to clean
- ✓ Even heat distribution
- ✓ Non-stick and durable
- ✕ Slightly bulky for small ovens
- ✕ Requires careful handling when hot
| Material | High-quality carbon steel with gray stone non-stick coating |
| Dimensions | Standard size suitable for home oven baking trays (exact measurements not specified) |
| Coating Type | Durable non-stick gray stone coating, PFOA, PFOS, and PTFE-free |
| Dishwasher Safe | Yes |
| Intended Use | Oven baking for crispy foods like chips, chicken, pizza, bacon, and cookies |
| Compatibility | Fits standard home oven racks |
It’s a lazy Sunday afternoon, and I’ve got a fresh batch of potatoes ready for homemade chips. I grab the Bakken Swiss Crisper Tray Set, Gray Marble, and immediately notice how sturdy it feels in my hand.
The sleek gray stone coating gives it a modern look, but it’s the non-stick surface that catches my eye.
Sliding the basket into the baking tray feels smooth, thanks to the high-quality carbon steel. I toss my sliced potatoes in a little olive oil and spread them out in the basket, making sure they’re not overcrowded.
As they bake, I can see the steam escaping, and I already smell that crispy goodness.
After about 20 minutes, I lift the tray out, and wow—perfectly crispy, golden chips. No greasiness, just that satisfying crunch.
Cleaning up is just as easy; the non-stick coating means I just rinse it off or toss it in the dishwasher. Plus, it’s reassuring to know it’s free from PFOA, PFOS, and PTFE.
This tray isn’t just for chips—I’ve used it for pizza, bacon, and even cookies. It heats evenly, giving consistent results every time.
The versatility and durability make it a real game-changer for healthier, homemade snacks.
Honestly, it’s a simple upgrade to my oven routine that makes a big difference. I love how it combines convenience with healthier cooking options.
If you’re into crispy treats without the mess, this tray set is a solid addition to your kitchen.
Bakken Swiss Crisper Tray Set, White Marble, Non-Stick
- ✓ Durable and reliable build
- ✓ Effortless cleaning
- ✓ Versatile for many recipes
- ✕ Slightly limited size
- ✕ Not suitable for large batches
| Material | High-quality carbon steel with White stone non-stick coating |
| Dimensions | Designed for standard home oven sizes (exact dimensions not specified) |
| Coating Type | Non-stick White stone coating (PFOA, PFOS, PTFE-free) |
| Dishwasher Safe | Yes |
| Intended Use | Oven baking for crispy foods like chips, chicken, pizza, and cookies |
| Included Components | 2-piece set: baking tray and removable basket |
Unlike the typical wire racks or flimsy baking sheets I’ve tried, this Bakken Swiss Crisper Tray Set immediately feels sturdy and well-made. The white marble non-stick coating gives it a sleek, modern look that instantly stands out on my oven rack.
It’s lightweight enough to handle easily, but feels durable enough for regular use.
The removable basket is a game-changer. I love how it lifts my homemade chips and chicken wings off the tray, giving them that perfect crispy finish without excess grease.
The non-stick surface really does make a difference—food slides right off, and cleanup is surprisingly quick and effortless. Just a quick rinse or a run through the dishwasher, and it’s ready for the next batch.
Cooking with it feels seamless. I’ve made everything from crispy potato chips to reheating leftovers like pizza and bacon.
The tray heats evenly, so I don’t have to worry about hot spots or uneven cooking. Plus, the fact that it’s PFOA, PFOS, and PTFE-free makes me feel better about using it regularly for healthier meals.
What truly impressed me is how versatile this crisper set is. It’s perfect for snacks, small baked goods, or even reheating without sogginess.
The size fits comfortably in my oven, and the sturdy construction means I don’t have to baby it. Honestly, it’s become a go-to for quick, crispy homemade treats.
HKNMTT Mini Silicone Molds, 936 Cavities for Treats & Candy

- ✓ Massive cavity count
- ✓ Food-grade, safe silicone
- ✓ Easy to release treats
- ✕ Large size for small storage
- ✕ Not ideal for large treats
| Material | Food-grade silicone, BPA-free, odor-free |
| Cavity Count | 936 mini semi-sphere cavities |
| Cavity Diameter | 0.45 inches (11.43 mm) |
| Mold Dimensions | 15.6 x 10.9 x 0.3 inches (39.6 x 27.7 x 0.76 cm) |
| Temperature Resistance | -40°F to 446°F (-40°C to 230°C) |
| Dishwasher Safe | Yes |
Many people assume that making mini treats or candies at home means dealing with sticky, hard-to-clean molds or uneven results. That’s not true with the HKNMTT Mini Silicone Molds.
When I first handled them, I was impressed by how flexible and sturdy they felt right out of the box.
The sheer number of cavities — 936 in total — is a game-changer. You can whip up a batch of treats in no time, which is perfect for busy pet owners or anyone who loves to bake and craft.
The semi-sphere shape is adorable and makes for perfect little bites, whether for dogs or homemade candies.
The silicone quality is top-notch. It’s food-grade, BPA-free, and odorless, so I didn’t worry about any weird tastes.
Plus, it withstands heat up to 446℉ and cold in the fridge, making it versatile for ovens, microwaves, or freezers.
What really surprised me was how easy it was to pop the treats out. The molds are super flexible, so no more fighting with stubborn bits stuck inside.
Cleaning is a breeze, just a quick rinse or dishwasher run, which saves time and effort.
They’re not just for treats — I also used them for making small wax melts and even mini chocolates. The size is perfect for training treats or small snacks for pets.
It’s a fun, practical tool that helps you get creative with homemade goodies.
If you love DIY projects or want to spoil your pet with fresh-made snacks, these molds are a fantastic investment. Just keep in mind, they’re quite large, so storage might need some space.
What Should You Look for When Choosing the Best Homemade Chips Oven?
When choosing the best homemade chips oven, consider various factors that impact performance, efficiency, and usability.
- Temperature Control: Look for an oven that offers precise temperature settings, ideally ranging from 200°F to 450°F. This allows you to experiment with different cooking temperatures for various types of chips, ensuring even cooking and crispiness.
- Size and Capacity: Choose an oven that fits your kitchen space and can accommodate the amount of chips you plan to make. A larger capacity is beneficial for batch cooking, while a compact design may be ideal for smaller kitchens or occasional use.
- Air Circulation: Opt for models that feature convection fans or air circulation technology. This ensures that hot air evenly distributes throughout the oven, promoting consistent cooking and preventing sogginess in your homemade chips.
- Ease of Cleaning: Consider ovens with non-stick surfaces or removable trays that simplify the cleaning process. A user-friendly design will save you time and effort, especially after frying or baking multiple batches of chips.
- Energy Efficiency: Look for energy-efficient models that consume less electricity while maintaining performance. This not only reduces your utility bills but also minimizes your carbon footprint, making it a more sustainable choice.
- Versatility: Select an oven that can be used for multiple cooking methods, such as baking, roasting, and air frying. This added versatility allows you to create a wider variety of snacks and meals beyond just chips.
- Safety Features: Ensure the oven has safety features such as auto shut-off, cool-touch exteriors, and heat-resistant handles. These features help prevent accidents and make using the oven safer, especially in households with children.
- Price and Warranty: Compare prices and look for ovens that offer good value for the features provided. Additionally, check the warranty terms as a longer warranty can provide peace of mind regarding the oven’s durability and reliability.
How Does Oven Size Impact Your Homemade Chips?
Heat distribution is crucial for achieving the perfect chip texture; larger ovens can sometimes have hot spots, causing some chips to cook faster than others, leading to inconsistent results. A smaller oven often provides more uniform heat, which can enhance the crispiness of each chip.
When using a smaller oven, you may need to adjust your baking times, as the proximity of the heating element can lead to quicker cooking. This can be a double-edged sword; while it may prevent overcooking, it could also result in undercooked chips if not monitored closely.
The batch size is an essential consideration as well; with a larger oven, you can produce more chips at once, making it more efficient for gatherings or meal prep. However, if you’re limited by a smaller oven, you may find yourself having to repeat the baking process multiple times, which could be time-consuming.
What Temperature Is Ideal for Making Crispy Homemade Chips?
The ideal temperature for making crispy homemade chips is crucial for achieving the perfect texture and flavor.
- 400°F (200°C): This temperature is often regarded as one of the best for baking homemade chips.
- 425°F (220°C): A slightly higher temperature that can yield extra crispiness for thicker chips.
- 350°F (175°C): A lower temperature that allows for more even cooking, ideal for delicate or thinner chips.
400°F (200°C): Baking chips at this temperature allows them to cook evenly while developing a nice golden-brown color. This temperature strikes a balance by ensuring the chips become crispy without burning too quickly, making it a popular choice for many recipes.
425°F (220°C): Increasing the temperature to 425°F can result in an extra crispy texture, especially for thicker-cut chips. However, care must be taken to monitor the chips closely to prevent them from burning, as the higher heat cooks them faster.
350°F (175°C): Cooking chips at a lower temperature can be advantageous for achieving a more uniform texture, particularly for thinner slices. This method takes longer but can be beneficial when you want to infuse flavors or ensure that the chips do not curl or brown too quickly.
What Are the Benefits of Making Homemade Chips in the Oven?
The benefits of making homemade chips in the oven include health advantages, customization options, and convenience.
- Healthier Option: Homemade chips allow you to control the ingredients and cooking methods, resulting in lower fat content compared to traditional fried chips.
- Customization: You can easily experiment with various seasonings and flavors, tailoring the chips to your taste preferences and dietary needs.
- Cost-Effective: Making chips at home can save you money over time, as purchasing raw ingredients in bulk is often cheaper than buying pre-packaged chips.
- Ease of Preparation: Oven-baking chips is a straightforward process that typically requires minimal preparation time and equipment.
- Consistent Results: Cooking chips in the oven can yield more consistent results in texture and crispiness compared to frying, which can be unpredictable.
Healthier Option: Homemade chips allow you to control the ingredients and cooking methods, resulting in lower fat content compared to traditional fried chips. You can choose healthier oils or even skip oil altogether, using techniques like air circulation to achieve crispiness without excess calories.
Customization: You can easily experiment with various seasonings and flavors, tailoring the chips to your taste preferences and dietary needs. This means you can create everything from spicy chili chips to sweet cinnamon-sugar varieties, catering to your personal palate.
Cost-Effective: Making chips at home can save you money over time, as purchasing raw ingredients in bulk is often cheaper than buying pre-packaged chips. Potatoes, for example, are generally inexpensive, and the cost savings can add up, especially for frequent snackers.
Ease of Preparation: Oven-baking chips is a straightforward process that typically requires minimal preparation time and equipment. With just a few simple steps—slicing, seasoning, and baking—you can have a fresh batch of chips ready in no time.
Consistent Results: Cooking chips in the oven can yield more consistent results in texture and crispiness compared to frying, which can be unpredictable. Oven temperature can be controlled, allowing for even cooking and reducing the risk of burnt or soggy chips.
How Do Homemade Chips Compare to Store-Bought Options?
| Aspect | Homemade Chips | Store-Bought Chips |
|---|---|---|
| Cost | Generally lower cost, especially in bulk, using potatoes and seasonings. | Can be more expensive due to branding and packaging costs. |
| Flavor | Customizable flavors, often fresher and more intense. | Standardized flavors, may contain preservatives affecting freshness. |
| Ingredients | Made from whole ingredients, no artificial additives. | Often contain artificial flavors, preservatives, and unhealthy fats. |
| Health Benefits | Lower in calories and fat, depending on preparation method. | Higher in sodium and unhealthy fats, potentially less nutritious. |
| Preparation Time | Typically takes 30-60 minutes, depending on slicing and baking time. | Ready to eat, no preparation time required. |
| Texture | Can be crispy or chewy, depending on thickness and cooking method. | Generally uniform texture, typically crispy. |
| Shelf Life | Best consumed fresh, can last up to a week in an airtight container. | Longer shelf life, often several months due to preservatives. |
| Nutritional Information | Can be tailored to dietary needs with specific ingredients. | Nutritional content varies by brand, often higher in calories and fats. |
What Types of Chips Can You Make with a Homemade Chips Oven?
The best homemade chips oven allows you to create a variety of delicious chip types from a range of ingredients.
- Potato Chips: Classic potato chips can be made by thinly slicing potatoes and baking them until crispy. Using a mandoline slicer helps achieve uniform thickness, which ensures even cooking and crispiness.
- Sweet Potato Chips: Sweet potato chips offer a sweeter alternative to traditional potato chips and are rich in nutrients. They can be seasoned with cinnamon or cayenne for added flavor, and like potato chips, they should be sliced thinly for the best texture.
- Beet Chips: Beet chips are colorful and packed with antioxidants. When sliced thin and baked, they provide a crunchy snack that can be seasoned with salt, vinegar, or herbs to enhance their earthy flavor.
- Kale Chips: Kale chips are a healthier option that involves coating kale leaves in olive oil and seasoning before baking. They become crispy and are a great way to incorporate greens into your diet while satisfying a chip craving.
- Apple Chips: For a sweet treat, apple chips are made by drying thin slices of apples in the oven. They can be sprinkled with cinnamon or sugar for extra sweetness, making them a great snack for both kids and adults.
- Carrot Chips: Carrot chips are a crunchy and nutritious snack made by slicing carrots thinly and baking them. They can be seasoned with various spices to create a sweet or savory profile, providing a versatile option for homemade chips.
Which Ingredients Are Best for Perfect Homemade Potato Chips?
To create perfect homemade potato chips, the choice of ingredients is crucial. Here are the key components to consider:
-
Potatoes: Select starchy varieties like Russet or Idaho potatoes for optimal crispiness. Uniformly sized potatoes will ensure even cooking.
-
Oil: Use high-quality oils with a high smoke point, such as canola, vegetable, or peanut oil. This helps achieve that perfect golden-brown color without burning.
-
Seasoning: Start with simple sea salt for a classic flavor. Experiment with other spices such as garlic powder, paprika, or even chili powder for a kick. Fresh herbs like rosemary or thyme can also add a delightful aroma.
-
Acid: A splash of vinegar before baking can enhance flavor. Try using apple cider vinegar or malt vinegar for a unique twist.
-
Cornstarch: Lightly dusting the slices with cornstarch before baking can promote extra crunchiness, giving your chips a satisfying texture.
By carefully selecting these ingredients, it’s possible to create chips that are not only delicious but also tailored to personal taste preferences.
Can I Use My Oven to Make Different Vegetable Chips?
Yes, you can use your oven to make different vegetable chips.
Oven-baked vegetable chips are a fantastic and healthy alternative to store-bought snacks. You can use a variety of vegetables such as kale, sweet potatoes, beets, zucchini, and carrots to create flavorful chips. The process involves slicing the vegetables thinly, coating them lightly with oil and seasoning, and then baking them at a low temperature until they become crispy. This method allows you to control the ingredients and customize flavors to suit your tastes.
When making vegetable chips in the oven, it’s essential to ensure uniform thickness in your vegetable slices for even cooking. Using a mandoline slicer can help achieve this consistency. Additionally, keep an eye on them while they bake, as cooking times can vary depending on the type of vegetable and thickness of the slices. Experimenting with different seasonings such as sea salt, garlic powder, or paprika can enhance the flavor of your homemade chips, making the oven a versatile tool for creating a variety of delicious snacks.
What Tips Will Help You Achieve the Crispiest Oven-Baked Chips?
To achieve the crispiest oven-baked chips, consider the following tips:
- Choose the Right Potatoes: Opt for starchy potatoes like Russets or Yukon Golds, as they have a lower moisture content which helps in achieving a crunchier texture.
- Thinly Slice the Potatoes: Use a mandoline or a sharp knife to cut the potatoes into uniform, thin slices, ideally around 1/16 of an inch thick, to ensure even cooking and crispiness.
- Soak the Slices: Soaking the potato slices in cold water for at least 30 minutes helps to remove excess starch, which can lead to a soggy chip, allowing for a crisper final product.
- Dry Thoroughly: After soaking, make sure to thoroughly dry the potato slices with paper towels; moisture on the surface can prevent them from crisping up in the oven.
- Use the Right Oil: A light coating of oil, such as olive oil or vegetable oil, will help enhance the crispiness while also allowing the chips to brown evenly, but avoid over-oiling as it can lead to greasy chips.
- Season Generously: Before baking, season the potato slices with salt and any desired spices to enhance flavor; remember that some seasoning may also help to draw out moisture, contributing to a crispier texture.
- Bake at High Temperature: Preheat your oven to a high temperature, around 425°F (220°C), as this allows for the moisture in the chips to evaporate quickly and promotes browning, resulting in a crunchier chip.
- Use a Baking Rack: Placing the chips on a wire rack set over a baking sheet allows hot air to circulate around the chips, promoting even cooking and preventing them from getting soggy.
- Flip Halfway Through: To ensure even crisping, flip the chips halfway through the baking time; this helps both sides develop a crunchy texture and prevents any part from being undercooked.
- Keep an Eye on Them: As oven temperatures can vary, it’s important to monitor the chips closely towards the end of the baking time to prevent burning and to achieve the desired level of crispiness.
What Popular Recipes Exist for Homemade Oven Chips?
There are several popular recipes for making the best homemade chips in the oven:
- Classic Salted Oven Chips: This recipe involves slicing potatoes into thin rounds or wedges, tossing them in olive oil, and seasoning with salt. The key is to bake them at a high temperature, usually around 425°F (220°C), for a crispy texture while flipping halfway through to ensure even cooking.
- Sweet Potato Chips: Sweet potatoes are sliced thinly and coated with a little olive oil and your choice of spices, like paprika or cayenne pepper, for a flavorful kick. Baking them at a lower temperature, around 375°F (190°C), allows them to crisp up nicely without burning.
- Herb-Seasoned Chips: For a more gourmet option, thinly sliced potatoes or sweet potatoes can be tossed with a mix of olive oil, garlic powder, and fresh or dried herbs like rosemary or thyme. These chips are baked until golden and fragrant, offering a delicious twist on the classic version.
- Parmesan and Garlic Chips: This recipe enhances oven chips with a sprinkle of grated Parmesan cheese and minced garlic before baking. The cheese creates a savory crust that pairs perfectly with the crispy texture of the chips, making them an irresistible snack.
- Spicy Baked Tortilla Chips: Using corn tortillas cut into wedges, this recipe involves brushing them lightly with oil and sprinkling them with chili powder or taco seasoning. They are baked until crispy, making for a perfect dipping chip for salsas or guacamole.
How Can You Maintain and Clean Your Chips Oven for Longevity?
To ensure the longevity and efficiency of your chips oven, regular maintenance and cleaning are essential. Here are some best practices:
- Regular Cleaning: It’s important to clean your chips oven after each use to prevent the buildup of grease and food particles. Wipe down the interior and exterior with a damp cloth and mild detergent, ensuring that no residues remain that could affect the flavor of future batches.
- Deep Cleaning: Perform a deep clean every few months by removing any detachable parts, such as trays and racks. Soak them in warm soapy water, scrub them with a non-abrasive sponge, and rinse thoroughly to remove any stubborn residue.
- Check and Replace Filters: If your chips oven has a filter, check it regularly for clogs and replace it as needed. A clean filter ensures proper airflow, which is crucial for achieving even cooking and maintaining the oven’s efficiency.
- Inspect Heating Elements: Periodically inspect the heating elements for any signs of damage or wear. If they appear discolored or are not heating evenly, it may be time to replace them to maintain optimal cooking performance.
- Avoid Overloading: To promote even cooking and prevent overheating, avoid overloading your chips oven. Follow the manufacturer’s guidelines regarding capacity to ensure that air can circulate freely around the food.
- Use Appropriate Utensils: Always use utensils that are suitable for your oven, such as silicone or wooden tools. This will help prevent scratching and damaging the surfaces, contributing to the overall longevity of your oven.
- Store Properly: When not in use, store your chips oven in a dry and cool area, away from direct sunlight and moisture. Proper storage conditions can help prevent rust and prolong the life of the appliance.