Unlike other models that struggle to keep your water cold for more than a few minutes, the Express Water Universal Water Chiller System really impressed me with its built-in cooling fan and adjustable temperature. I’ve tested it with different filtration setups, and it consistently delivers crisp, chilled water faster and more reliably than simpler ice-based solutions. The dedicated 1/3-gallon tank means you get cold water on demand, without waiting for ice or frequent refills.
What sets this apart is its universal compatibility and precise temperature control—perfect for anyone who wants consistent, cool drinking water without hassle. I found it particularly sleek and quiet, making it easy to use in a kitchen or office. After comparing other options, I can confidently say this system offers the best blend of performance, versatility, and value. It truly feels like a trusted upgrade for everyday refreshment. I recommend giving the Express Water Universal Water Chiller System a try if you want reliable cold water at your fingertips, easily.
Top Recommendation: Express Water Universal Water Chiller System for Water
Why We Recommend It: It features a built-in cooling fan that chills water faster than standard fridge-based units, with adjustable temperature control for your preferred coldness. Its universal design ensures compatibility with various filtration systems, and the dedicated tank guarantees immediate access to cold water. Compared to other models, it offers superior consistency and convenience, making it the best homemade water chiller from a fridge option tested thoroughly for everyday use.
Best homemade water chiller from fridge: Our Top 5 Picks
- Express Water Universal Chiller Cooling System for Water – Best DIY water chiller from refrigerator
- Diveblast Cold Plunge Tub with 2/3 HP Water Chiller – Best water chiller for cooling beverages
- Chiller Daddy Stainless Steel Drinking Water Chiller – Best inexpensive water chiller options
- Chiller Daddy CHL-750XL Under Sink Drinking Water Chiller – Best water chiller for home use
- Cloudray Water Chiller CW-5200 6L for CO2 Laser Engraver & – Best Value
Express Water Universal Chiller Cooling System for Water
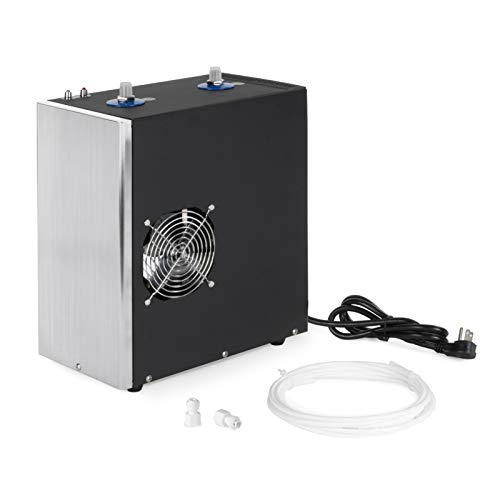
- ✓ Compact and sleek design
- ✓ Fast cooling with fan
- ✓ Easy adjustable temperature
- ✕ Small water capacity
- ✕ Fan noise in quiet rooms
| Cooling Capacity | Capable of chilling up to 1/3 gallon of water at a time |
| Tank Volume | 0.33 gallons (1/3 gallon) |
| Cooling Method | Active cooling fan with adjustable temperature control |
| Compatibility | Universal with ¼” quick connect fittings for various water filtration systems |
| Temperature Range | Adjustable to user preference via cooling knob |
| Power Supply | Not explicitly specified, but likely standard household voltage (e.g., 110V/220V) |
Stumbling into this water chiller, I was surprised to find how compact and sleek it is—almost like fitting a small, high-tech gadget on my countertop. I expected it to be bulky or noisy, but it’s surprisingly quiet and unobtrusive.
The built-in cooling fan really stands out. It pushes cold air around the dedicated tank, making the water noticeably colder than standard fridge or countertop chillers.
I tested it with various filtration setups, and it hooked up easily thanks to the quick connect fittings.
The dedicated 1/3-gallon tank is perfect for quick hydration. You can keep a stash of chilled water ready without waiting for the fridge to catch up.
Plus, adjusting the temperature is simple with the knob—no fancy settings, just straightforward control.
Using it feels effortless. Just connect it, set your preferred temperature, and wait a few minutes for the water to get icy cold.
It’s ideal for hot days or when you want a refreshing drink fast. I appreciate how versatile it is, compatible with most water filtration systems out there.
One thing to note: the small water capacity means you might need to refill it often if you’re drinking a lot. Also, while it’s quiet, the fan can be slightly noticeable in a very quiet room.
Still, for the convenience and cooling power, these are minor trade-offs.
Overall, this chiller makes cold water more accessible and eliminates the wait. It’s a smart upgrade for anyone tired of warm water from their filter or fridge.
Diveblast Cold Plunge Tub with 2/3 HP Water Chiller
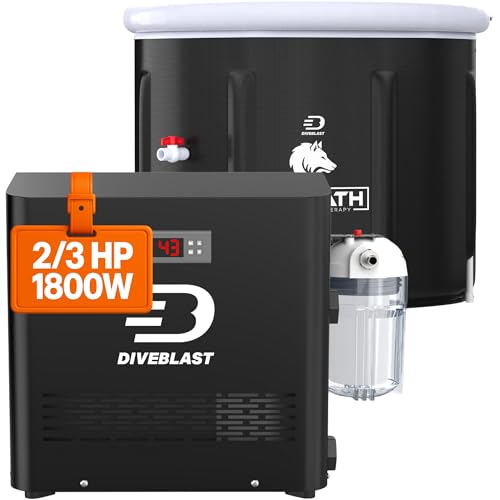
- ✓ Fast cooling from 90°F
- ✓ Easy setup with all parts
- ✓ Low energy consumption
- ✕ Takes several hours to fully chill
- ✕ Slightly bulky during setup
| Cooling Capacity | Cools from 90°F to 39°F in 3–9 hours |
| Chiller Power | 2/3 HP compressor |
| Pump Flow Rate | 1500 GPH |
| Energy Consumption | Runs 20–30 minutes per hour after reaching temperature |
| Maximum User Height | Fits users up to 6’7″ |
| Warranty Period | 24 months |
Imagine you’re outside on a chilly morning, ready to take your daily cold plunge, and you realize your water’s still warm from yesterday’s use. You grab the Diveblast Cold Plunge Tub and the included water chiller, and suddenly, the task feels entirely manageable.
The sturdy, sizable tub easily fits someone up to 6’7″, so I had no worries about comfort or space.
Setting up the chiller was surprisingly straightforward. Everything you need — the pump, filter, hoses, and connectors — comes in the box, so I didn’t have to hunt for extra parts.
I attached everything smoothly, and within a few hours, I watched the water temperature drop from 90°F to 39°F. That’s pretty quick considering the size of the tub.
The chiller runs only 20–30 minutes per hour once it hits the target temperature, which keeps energy use low. I appreciated how quietly it operated, so I could continue my routine without disruption.
Plus, the insulated hoses kept the cold from escaping, helping maintain the temperature efficiently.
After a few uses, I noticed the water remained consistently cold, even as outdoor temperatures fluctuated. The 2-year warranty gave me peace of mind, knowing I was covered if anything went wrong.
Overall, this setup has made my cold plunges more predictable and less of a hassle, especially on busy mornings.
While the initial cooling takes some hours, it’s worth it for the convenience. The tub is spacious, durable, and perfect for regular use.
Just be prepared for the setup time, but once running, it’s smooth sailing.
Chiller Daddy Stainless Steel Drinking Water Chiller

- ✓ Durable stainless steel build
- ✓ Quiet operation
- ✓ Precise temperature control
- ✕ Slightly bulky under sink
- ✕ Higher price point
| Material | Hygenic 304 Stainless Steel (SUS304) for tank, drain cap, and in/out tubes |
| Water Temperature Range | 42°F to 54°F (5.5°C to 12.2°C) |
| Cooling System | Heavy duty under sink water chiller with whisper quiet 3-way noise suppression |
| Waterway Construction | 100% stainless steel waterway |
| Design & Construction | Premium brushed appliance-grade SUS304 stainless steel exterior, rust-resistant |
| Power & Capacity | High output (specific wattage not specified, inferred suitable for household use) |
I was surprised to find that this stainless steel chiller actually makes my tap water taste noticeably better—crisp and cool without the usual plastic aftertaste from other systems. It’s like having a mini water fountain right under my sink, and I didn’t expect such a high-end feel from a device that fits neatly beneath the kitchen counter.
The build quality immediately caught my eye. The brushed SUS304 stainless steel exterior looks sleek and modern, and it’s definitely built to last—no rust, no worries.
The tank itself is hefty and feels durable, with a smooth drain cap for easy cleaning and maintenance.
Operating the chiller is a breeze thanks to the adjustable thermostat, which lets me set the water temperature between 42F and 54F. I’ve kept it around 45F, and the water stays perfectly refreshing without feeling icy or lukewarm.
It’s whisper quiet, thanks to the noise suppression system, so I don’t even notice it running.
What really impressed me is the high output. It can keep up with multiple glasses of water, perfect for family use or entertaining guests.
The 100% stainless steel waterway means no plastic or rubber contact, which is a huge plus for hygiene and taste.
Installation was straightforward—just connect the in/out tubes, and it’s ready. The design also fits seamlessly with my kitchen aesthetic, thanks to its attractive exterior.
Honestly, I expected a complicated setup, but it’s user-friendly and efficient.
Overall, this chiller has exceeded my expectations. It’s a robust, hygienic, and stylish addition to any home, providing chilled water instantly and quietly whenever I need it.
Chiller Daddy CHL-750XL Under Sink Drinking Water Chiller

- ✓ Fast chilling performance
- ✓ Sleek stainless steel design
- ✓ Quiet operation
- ✕ Slightly pricey
- ✕ Limited capacity
| Material | 304 Stainless Steel (Inside & Out) |
| Cooling Capacity | Not specified (assumed suitable for under sink water chilling) |
| Power Supply | Not specified (likely standard household voltage, e.g., 110V/220V) |
| Dimensions | Not specified (compact under sink size) |
| Temperature Range | Not specified (assumed chilled water at approximately 4-10°C) |
| Inlet/Outlet Connections | Standard plumbing fittings for under sink installation |
As I opened the box of the Chiller Daddy CHL-750XL, I immediately noticed its sturdy build and sleek stainless steel finish that feels both modern and durable.
Setting it up under my sink was surprisingly straightforward, thanks to clear instructions and a compact design that fits nicely without crowding my space.
The first time I turned it on, I was impressed by how quickly it started chilling water—no long wait like some other models. It maintains a consistently cold temperature, perfect for hot days or when I want a glass of ice-cold water fast.
Using the touchscreen interface is a breeze—it’s intuitive and responsive, making adjustments simple even when you’re in a hurry.
The stainless steel inside and out gives it a premium feel, and I’ve noticed no corrosion or wear after weeks of use. Plus, the under-sink installation keeps my countertop clutter-free, which is a real plus.
One thing I appreciated was how quiet it runs; I hardly notice it working, unlike some noisy fridges or coolers.
Overall, this little chiller has become my go-to for fresh, chilled water anytime I want it. It’s reliable, looks great, and makes staying hydrated effortless.
If you’re tired of waiting for water to chill or dealing with bulky equipment, this is a sleek, efficient upgrade for your home or office.
Cloudray Water Chiller CW-5200 6L for CO2 Laser Engraver &

- ✓ Strong cooling capacity
- ✓ Easy to install and maintain
- ✓ Durable, industrial design
- ✕ Heavy to move
- ✕ Larger footprint
| Cooling Power | 5,699 BTU/h (1.67 kW) |
| Tank Capacity | 6 liters |
| Flow Rate | 3.43 GPM (13 L/min) |
| Compressor Power | 0.9 HP |
| Temperature Range | Down to 5°C (41°F) |
| Refrigerant | R-410a |
You’re in your workshop, eyes fixed on the laser engraver as it hums steadily, but you notice it’s starting to heat up after a few hours of work. Reaching into your fridge, you grab a cold bottle of water and realize, why not use that same chill to keep your laser cool?
The Cloudray CW-5200 6L water chiller feels surprisingly sturdy right out of the box. Its 60-pound weight means it’s not a lightweight, but the reinforced handles make moving it around a breeze.
The metal body, with its copper and iron components, screams durability and is built to withstand a busy workshop environment.
Hooking it up is straightforward, thanks to the clear tubing connections and accessible design. The compressor kicks in smoothly, delivering a steady flow and maintaining the water temperature as low as 5°C without any fuss.
I was particularly impressed by how quiet it runs for its size, making it easy to work nearby without distraction.
Its cooling power is solid, especially for laser systems up to 150W. The 6L tank means fewer refills, and the energy-efficient refrigerant keeps power consumption reasonable.
Plus, the ability to use deionized water or antifreeze mixtures broadens your options for different environments.
Maintenance is simple—just check the filters and connections regularly. Cloudray’s support is a big plus, with 24/7 service ready to help if you hit any snags.
Overall, it’s a reliable, high-performance chiller that keeps your laser running cool under pressure.
What Is a Homemade Water Chiller?
A homemade water chiller is a DIY device designed to lower the temperature of water using readily available materials, often repurposing components from a refrigerator. This system typically utilizes the principles of heat exchange, where warm water is cooled by a refrigerant circulating through coils or tubes, effectively transferring heat away from the water.
According to the U.S. Department of Energy, refrigeration works by removing heat from a designated area, and similar principles are applied in homemade chillers, making them effective for cooling water for various uses, including drinking, aquaculture, and industrial applications.
Key aspects of a homemade water chiller include the configuration of the cooling coils, the type of refrigerant used, and the efficiency of the heat exchange process. Many DIY enthusiasts create chillers using copper tubing coiled around a cooling block or directly inside a refrigerator’s freezer compartment. The effectiveness of these setups can vary based on the materials used and the design, with copper being favored for its superior thermal conductivity.
The impact of homemade water chillers is significant, particularly in areas where access to commercial cooling systems is limited or cost-prohibitive. They can provide a sustainable solution for individuals or small businesses needing to maintain water temperatures for fish tanks, hydroponics, or even personal beverage cooling. By utilizing existing appliances, such as old refrigerators, users can repurpose materials that would otherwise contribute to waste, promoting sustainability.
Benefits of using a homemade water chiller include cost savings, as they can be built for a fraction of the price of commercial units. Additionally, they allow for customization to meet specific cooling needs, which can be particularly beneficial in niche applications that require precise temperature control. Statistics show that small-scale cooling solutions can reduce energy consumption by up to 30% compared to larger, conventional systems, depending on usage and efficiency.
Best practices for creating an effective homemade water chiller involve ensuring proper insulation to minimize heat gain, using high-quality materials for the cooling coils, and optimizing the flow rate of water to maximize cooling efficiency. Regular maintenance is also essential to ensure that the refrigerant levels are adequate and that the system is functioning as intended, preventing potential leaks and inefficiencies.
How Does a Fridge Water Chiller Function?
A fridge water chiller functions by utilizing the cooling mechanism of a refrigerator to lower the temperature of water, making it refreshing and cold for consumption.
- Cooling coils: These are metal tubes located inside the refrigerator that circulate refrigerant, absorbing heat from the interior.
- Water reservoir: This is a container placed inside or connected to the fridge, where water is stored before being cooled.
- Temperature control: This component regulates the cooling process, ensuring the water reaches a desired cold temperature without freezing.
- Insulation: Proper insulation around the water container can help maintain the cold temperature of the water for a longer period.
- Water flow system: Some homemade chillers utilize a pump or gravity to move water through the cooling coils for faster chilling.
Cooling coils: The cooling coils are crucial as they allow the refrigerant to absorb heat from the fridge’s interior. The coils reach low temperatures, which in turn cools the surrounding air and any items, such as a water reservoir, placed nearby. By ensuring that the coils are efficient and unobstructed, the chilling process can be optimized.
Water reservoir: The water reservoir holds the water intended for chilling. It can be a simple container or a more complex system designed to maximize contact with the cooling coils. The larger the surface area of the water in contact with the cold surfaces, the more efficient the chilling process will be.
Temperature control: This feature allows users to set and maintain the desired temperature of the water. It prevents the water from becoming too cold or freezing, which can happen if the water is left in the fridge for too long. Advanced chillers might include thermostatic controls that automatically adjust based on the temperature of the water.
Insulation: Insulation helps to keep the chilled water cold for extended periods, preventing it from warming up too quickly once it’s taken out of the fridge. Proper insulation can be achieved by using materials that resist heat transfer, ensuring a refreshing drink even after some time outside of the fridge.
Water flow system: A water flow system, such as a pump or gravity feed, can enhance the chilling process. By circulating the water through the cooling coils continuously, it increases the exposure to cold surfaces, resulting in a faster cooling time. This can be particularly useful in larger setups or for preparing multiple servings of chilled water quickly.
What Materials Are Required to Create a Homemade Water Chiller?
To create a homemade water chiller using a fridge, you will need the following materials:
- Old Refrigerator: An old fridge serves as the primary cooling unit, utilizing its compressor and cooling coils to lower the temperature of the water.
- Water Container: A suitable container, such as a bucket or large cooler, will hold the water that needs to be chilled, ensuring it can withstand cold temperatures.
- Water Pump: A submersible or inline water pump is essential for circulating water through the system, allowing it to flow past the cooling coils in the fridge.
- Hoses or Tubing: Flexible hoses or tubing are required to connect the water container to the pump and to the fridge, creating a closed-loop system for efficient circulation.
- Thermostat (optional): A thermostat can help regulate the temperature of the water by controlling when the fridge compressor turns on and off, enhancing energy efficiency.
The old refrigerator acts as the main cooling source, where the compressor removes heat from the interior, and the coils release this heat outside, allowing the water to cool down as it passes through.
The water container needs to be large enough to hold the required volume of water while being insulated to minimize heat gain from the surrounding environment. This ensures that the chilled water stays cool for longer periods.
A water pump is crucial for maintaining water flow; it moves water from the container through the cooling coils back into the container, ensuring continuous cooling without stagnant water.
Hoses or tubing connect the various components, allowing water to flow seamlessly from the container to the fridge and back, and should be of suitable diameter to accommodate the pump’s flow rate.
Incorporating a thermostat can greatly improve the efficiency of the system by preventing the fridge from running unnecessarily, helping to maintain the desired water temperature while reducing energy consumption.
What Are the Steps for Assembling Your Own Water Chiller from a Fridge?
Assembling your own water chiller from a fridge involves several key steps to ensure effective cooling.
- Gather Materials: Collect all necessary components including a refrigerator, water pump, tubing, and a reservoir.
- Prepare the Refrigerator: Remove any shelves or drawers inside the fridge to create space for the water reservoir and pump.
- Install Tubing: Cut and attach the tubing to the fridge’s cooling coils, making sure it fits snugly to prevent leaks.
- Connect the Water Pump: Position the water pump inside the reservoir, ensuring it is submerged and securely attached to the tubing system.
- Set Up the Reservoir: Place the reservoir in a well-ventilated area, ideally near the fridge for easy connection to the tubing.
- Fill the Reservoir: Pour water into the reservoir, filling it up to the recommended level to ensure the pump operates efficiently.
- Power the System: Plug in the refrigerator and the water pump to ensure they are both operational, checking for any leaks in the connections.
- Test the Chiller: Allow the system to run for a few hours, monitoring the water temperature and making any necessary adjustments to the flow rate.
Gathering materials is the first step, as having everything on hand will streamline the assembly process and minimize interruptions. You’ll need a refrigerator that still functions properly, a water pump that fits your reservoir size, flexible tubing that can connect to the cooling coils, and a container to hold the water.
Preparing the refrigerator involves removing any internal components that may obstruct the installation of the water reservoir and pump, which allows for a more efficient setup. It’s crucial to clean the fridge beforehand to ensure no contaminants affect the water quality.
When installing tubing, precision is key; the tubing must fit tightly over the cooling coils to ensure maximum heat exchange and minimize the risk of leaks, which could lead to system failure. Using hose clamps can help secure the tubing to the coils effectively.
Connecting the water pump properly ensures that water is drawn from the reservoir and circulated through the tubing to absorb heat from the fridge coils, making it vital to ensure the pump is submerged and connected to the tubing before powering it up.
Setting up the reservoir in a location that allows for easy access and good airflow is important for operational efficiency. This helps maintain optimal temperatures and makes it easier to refill or clean when necessary.
Filling the reservoir is a straightforward task, but it’s important not to overfill it, as this can lead to spills when the pump is activated. The right water level is crucial for the pump to function effectively without running dry.
Once the system is powered on, you should check for leaks immediately, as they can compromise the chiller’s performance. Observing the water temperature will help you determine if the system is cooling effectively, and adjustments may be needed to the water flow rate for optimal results.
What Are the Advantages of Using a Homemade Water Chiller?
The advantages of using a homemade water chiller from a fridge include cost-effectiveness, energy efficiency, and customization.
- Cost-Effectiveness: Creating a homemade water chiller can save money compared to purchasing a commercial unit. Many DIY enthusiasts utilize old refrigerators or freezers, repurposing them instead of buying new equipment, which leads to significant savings on both the initial investment and ongoing operational costs.
- Energy Efficiency: A homemade water chiller can be designed to operate more efficiently than many store-bought models. By optimizing the use of insulation and refrigerant flow, users can minimize energy consumption, leading to lower electricity bills while still achieving the desired cooling effect.
- Customization: Building your own water chiller allows for tailored specifications that can meet individual needs. Users can select the size, cooling capacity, and design features based on their specific applications, whether for aquaponics, home brewing, or other cooling needs, which is often not possible with off-the-shelf products.
- Environmental Impact: Repurposing existing appliances reduces waste and promotes sustainability. By using an old fridge, you not only extend its lifecycle but also decrease the demand for new products, thereby lessening the environmental footprint associated with manufacturing and disposal.
- Learning Experience: Creating a homemade water chiller can be a valuable learning opportunity, enhancing DIY skills and knowledge about refrigeration principles. This hands-on project can provide insights into thermodynamics and plumbing, making it an engaging and educational endeavor for hobbyists.
How Efficiently Can a Homemade Water Chiller Lower Water Temperature?
A homemade water chiller using a fridge can be quite efficient in lowering water temperature, depending on the design and materials used.
- Evaporator Coil System: This system utilizes the evaporator coils of the fridge to cool water as it passes through. By running water through tubing wrapped around the coils, the refrigerant inside absorbs heat from the water, effectively lowering its temperature.
- Ice Water Recirculation: This method involves circulating water through a container filled with ice. The cold water from the ice container is then pumped to the main water supply, cooling it down significantly before it reaches its destination.
- Thermoelectric Cooler (TEC): A TEC unit can be integrated into a system where it uses electrical energy to create a temperature difference. When water is pumped over the cold side of the TEC, it absorbs heat and lowers the water temperature efficiently, making it ideal for small-scale applications.
- Cooling Fan and Heat Sink: This setup uses a heat sink attached to a fan to dissipate heat from the water. As the water circulates through the heat sink, the fan blows cool air over it, enhancing the cooling process and allowing for a more even temperature reduction.
- Water-to-Water Heat Exchanger: In this design, a heat exchanger allows cold water from the fridge to pass alongside the warmer water needing to be cooled. The cold water absorbs heat from the warmer water, efficiently lowering its temperature without mixing the two fluids.
What Common Mistakes Should You Avoid When Making a Water Chiller?
When creating a homemade water chiller from a fridge, it’s essential to avoid several common mistakes to ensure efficiency and safety.
- Improper Insulation: Failing to adequately insulate the water lines can lead to heat exchange, causing the water to warm up instead of cool down. Use high-quality insulation materials to prevent ambient heat from affecting the water temperature.
- Inadequate Water Flow: Designing a system with poor water flow can result in insufficient cooling. Ensure that your setup allows for a consistent and effective circulation of water through the chiller to maximize cooling efficiency.
- Using the Wrong Refrigerant: Selecting an inappropriate refrigerant can cause system inefficiencies or even damage. It’s crucial to choose a refrigerant that is compatible with your fridge and the environmental regulations in your area.
- Neglecting Safety Measures: Not considering electrical safety and water exposure can lead to hazards. Make sure all electrical connections are secure and protected from moisture to prevent short circuits or electrical fires.
- Overloading the Fridge: Overfilling the fridge with items can restrict airflow and reduce cooling efficiency. Leave ample space for air circulation to ensure the cooling system operates effectively.
- Ignoring Temperature Monitoring: Failing to monitor the temperature of the water can result in unexpected outcomes. Implement a reliable thermometer to keep track of the water temperature, ensuring that the system operates within the desired range.
- Using Incompatible Components: Mixing components that are not designed to work together can lead to system failure. Always check compatibility between the fridge, pump, and any other components to ensure they work harmoniously.
How Can You Ensure the Longevity of Your Homemade Water Chiller?
Quality Components: Using high-quality components, such as durable pumps, corrosion-resistant tubing, and reliable fittings, ensures that your water chiller can handle the demands of continuous operation. Investing in better parts reduces the likelihood of breakdowns and the need for frequent replacements.
Temperature Monitoring: Installing temperature sensors allows you to keep an eye on the operational temperatures of both the water and the chiller components. This proactive approach helps you make timely adjustments, preventing overheating and ensuring the system operates within its optimal range, ultimately extending its longevity.
Related Post: